Pigsty is a portable, extensible open-source PostgreSQL distribution for building production-grade database services in local environments with declarative configuration and automation. It has a vast ecosystem providing a complete set of tools, scripts, and best practices to bring PostgreSQL to enterprise-grade RDS service levels.
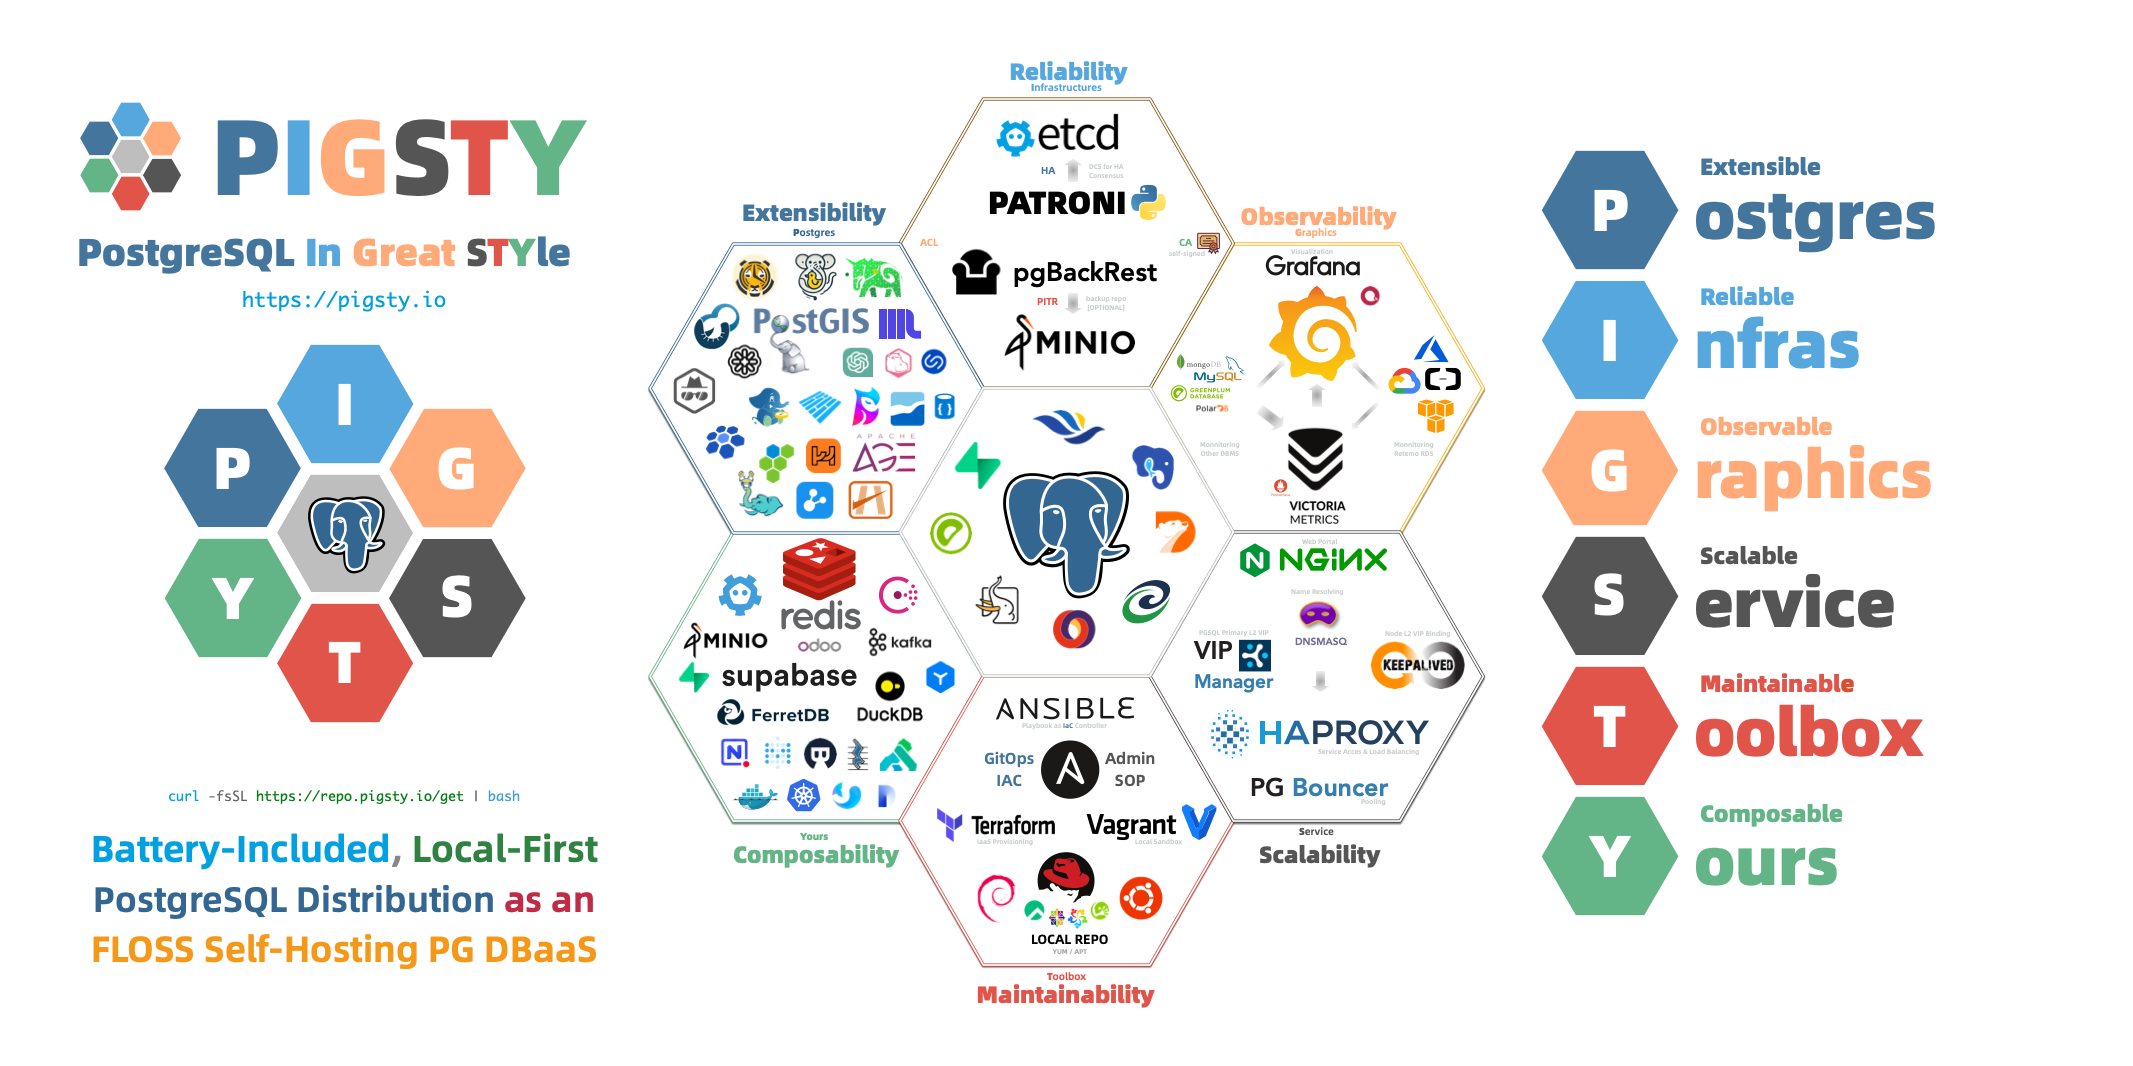
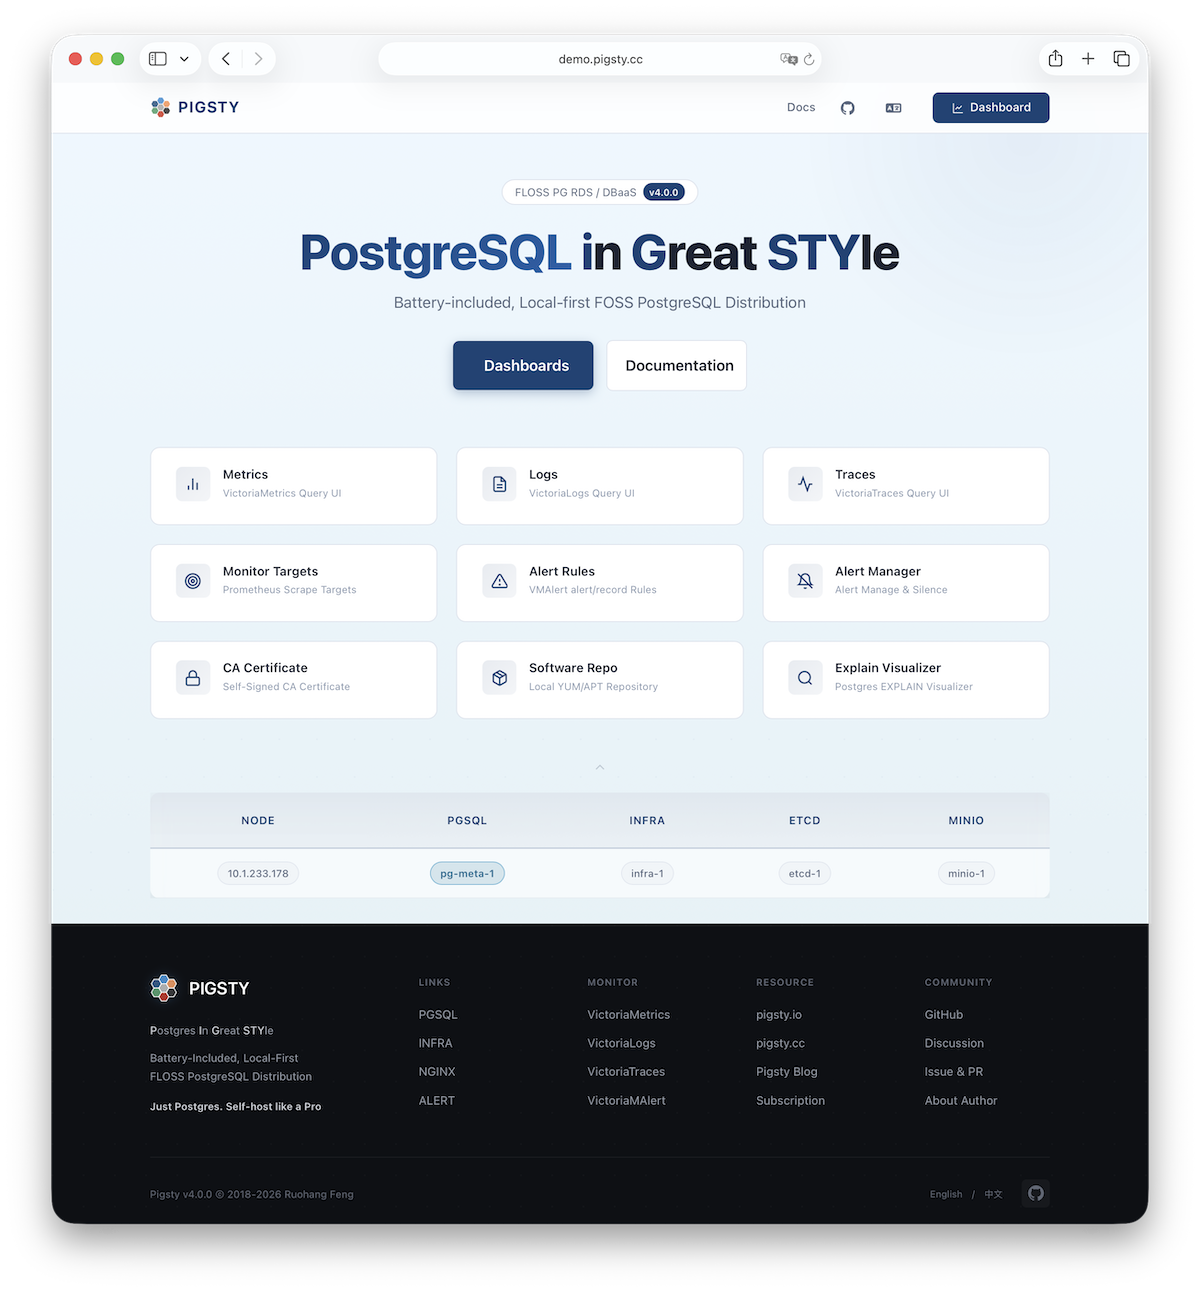
Pigsty’s name comes from PostgreSQL In Great STYle, also understood as Postgres, Infras, Graphics, Service, Toolbox, it’s all Yours—a self-hosted PostgreSQL solution with graphical monitoring that’s all yours. You can find the source code on GitHub, visit the official documentation for more information, or experience the Web UI in the online demo.
Why Pigsty? What Can It Do?
PostgreSQL is a sufficiently perfect database kernel, but it needs more tools and systems to become a truly excellent database service. In production environments, you need to manage every aspect of your database: high availability, backup recovery, monitoring alerts, access control, parameter tuning, extension installation, connection pooling, load balancing…
Wouldn’t it be easier if all this complex operational work could be automated? This is precisely why Pigsty was created.
Pigsty provides:
Out-of-the-Box PostgreSQL Distribution
Pigsty deeply integrates 451 extensions from the PostgreSQL ecosystem, providing out-of-the-box distributed, time-series, geographic, spatial, graph, vector, search, and other multi-modal database capabilities. From kernel to RDS distribution, providing production-grade database services for versions 13-18 on EL/Debian/Ubuntu.
Self-Healing High Availability Architecture
A high availability architecture built on Patroni, Etcd, and HAProxy enables automatic failover for hardware failures with seamless traffic handoff. Primary failure recovery time RTO < 45s, data recovery point RPO ≈ 0. You can perform rolling maintenance and upgrades on the entire cluster without application coordination.
Complete Point-in-Time Recovery Capability
Based on pgBackRest and optional MinIO cluster, providing out-of-the-box PITR point-in-time recovery capability. Giving you the ability to quickly return to any point in time, protecting against software defects and accidental data deletion.
Flexible Service Access and Traffic Management
Through HAProxy, Pgbouncer, and VIP, providing flexible service access patterns for read-write separation, connection pooling, and automatic routing. Delivering stable, reliable, auto-routing, transaction-pooled high-performance database services.
Stunning Observability
A modern observability stack based on Prometheus and Grafana provides unparalleled monitoring best practices. Over three thousand types of monitoring metrics describe every aspect of the system, from global dashboards to CRUD operations on individual objects.
Declarative Configuration Management
Following the Infrastructure as Code philosophy, using declarative configuration to describe the entire environment. You just tell Pigsty “what kind of database cluster you want” without worrying about how to implement it—the system automatically adjusts to the desired state.
Modular Architecture Design
A modular architecture design that can be freely combined to suit different scenarios. Beyond the core PostgreSQL module, it also provides optional modules for Redis, MinIO, Etcd, FerretDB, and support for various PG-compatible kernels.
Solid Security Best Practices
Industry-leading security best practices: self-signed CA certificate encryption, AES encrypted backups, scram-sha-256 encrypted passwords, out-of-the-box ACL model, HBA rule sets following the principle of least privilege, ensuring data security.
Simple and Easy Deployment
All dependencies are pre-packaged for one-click installation in environments without internet access. Local sandbox environments can run on micro VMs with 1 core and 2GB RAM, providing functionality identical to production environments. Provides Vagrant-based local sandboxes and Terraform-based cloud deployments.
What Pigsty Is Not
Pigsty is not a traditional, all-encompassing PaaS (Platform as a Service) system.
Pigsty doesn’t provide basic hardware resources. It runs on nodes you provide, whether bare metal, VMs, or cloud instances, but it doesn’t create or manage these resources itself (though it provides Terraform templates to simplify cloud resource preparation).
Pigsty is not a container orchestration system. It runs directly on the operating system, not requiring Kubernetes or Docker as infrastructure. Of course, it can coexist with these systems and provides a Docker module for running stateless applications.
Pigsty is not a general database management tool. It focuses on PostgreSQL and its ecosystem. While it also supports peripheral components like Redis, Etcd, and MinIO, the core is always built around PostgreSQL.
Pigsty won’t lock you in. It’s built on open-source components, doesn’t modify the PostgreSQL kernel, and introduces no proprietary protocols. You can continue using your well-managed PostgreSQL clusters anytime without Pigsty.
Pigsty doesn’t restrict how you should or shouldn’t build your database services. For example:
Pigsty provides good parameter defaults and configuration templates, but you can override any parameter.
Pigsty provides a declarative API, but you can still use underlying tools (Ansible, Patroni, pgBackRest, etc.) for manual management.
Pigsty can manage the complete lifecycle, or you can use only its monitoring system to observe existing database instances or RDS.
Pigsty provides a different level of abstraction than the hardware layer—it works at the database service layer, focusing on how to deliver PostgreSQL at its best, rather than reinventing the wheel.
Evolution of PostgreSQL Deployment
To understand Pigsty’s value, let’s review the evolution of PostgreSQL deployment approaches.
Manual Deployment Era
In traditional deployment, DBAs needed to manually install and configure PostgreSQL, manually set up replication, manually configure monitoring, and manually handle failures. The problems with this approach are obvious:
Low efficiency: Each instance requires repeating many manual operations, prone to errors.
Lack of standardization: Databases configured by different DBAs can vary greatly, making maintenance difficult.
Poor reliability: Failure handling depends on manual intervention, with long recovery times and susceptibility to human error.
Weak observability: Lack of unified monitoring, making problem discovery and diagnosis difficult.
Managed Database Era
To solve these problems, cloud providers offer managed database services (RDS). Cloud RDS does solve some operational issues, but also brings new challenges:
High cost: Managed services typically charge multiples to dozens of times hardware cost as “service fees.”
Vendor lock-in: Migration is difficult, tied to specific cloud platforms.
Limited functionality: Cannot use certain advanced features, extensions are restricted, parameter tuning is limited.
Data sovereignty: Data stored in the cloud, reducing autonomy and control.
Local RDS Era
Pigsty represents a third approach: building database services in local environments that match or exceed cloud RDS.
Pigsty combines the advantages of both approaches:
High automation: One-click deployment, automatic configuration, self-healing failures—as convenient as cloud RDS.
Complete autonomy: Runs on your own infrastructure, data completely in your own hands.
Extremely low cost: Run enterprise-grade database services at near-pure-hardware costs.
Complete functionality: Unlimited use of PostgreSQL’s full capabilities and ecosystem extensions.
Open architecture: Based on open-source components, no vendor lock-in, free to migrate anytime.
This approach is particularly suitable for:
Private and hybrid clouds: Enterprises needing to run databases in local environments.
Cost-sensitive users: Organizations looking to reduce database TCO.
High-security scenarios: Critical data requiring complete autonomy and control.
PostgreSQL power users: Scenarios requiring advanced features and rich extensions.
Development and testing: Quickly setting up databases locally that match production environments.
What’s Next
Now that you understand Pigsty’s basic concepts, you can:
ETCD: Distributed key-value store as DCS for HA Postgres clusters: consensus leader election/config management/service discovery.
REDIS: Redis servers supporting standalone primary-replica, sentinel, and cluster modes with full monitoring.
MINIO: S3-compatible simple object storage that can serve as an optional backup destination for PG databases.
You can declaratively compose them freely. If you only want host monitoring, installing the INFRA module on infrastructure nodes and the NODE module on managed nodes is sufficient.
The ETCD and PGSQL modules are used to build HA PG clusters—installing these modules on multiple nodes automatically forms a high-availability database cluster.
You can reuse Pigsty infrastructure and develop your own modules; REDIS and MINIO can serve as examples. More modules will be added—preliminary support for Mongo and MySQL is already on the roadmap.
Note that all modules depend strongly on the NODE module: in Pigsty, nodes must first have the NODE module installed to be managed before deploying other modules.
When nodes (by default) use the local software repo for installation, the NODE module has a weak dependency on the INFRA module. Therefore, the admin/infrastructure nodes with the INFRA module complete the bootstrap process in the deploy.yml playbook, resolving the circular dependency.
Standalone Installation
By default, Pigsty installs on a single node (physical/virtual machine). The deploy.yml playbook installs INFRA, ETCD, PGSQL, and optionally MINIO modules on the current node,
giving you a fully-featured observability stack (Prometheus, Grafana, Loki, AlertManager, PushGateway, BlackboxExporter, etc.), plus a built-in PostgreSQL standalone instance as a CMDB, ready to use out of the box (cluster name pg-meta, database name meta).
This node now has a complete self-monitoring system, visualization tools, and a Postgres database with PITR auto-configured (HA unavailable since you only have one node). You can use this node as a devbox, for testing, running demos, and data visualization/analysis. Or, use this node as an admin node to deploy and manage more nodes!
Monitoring
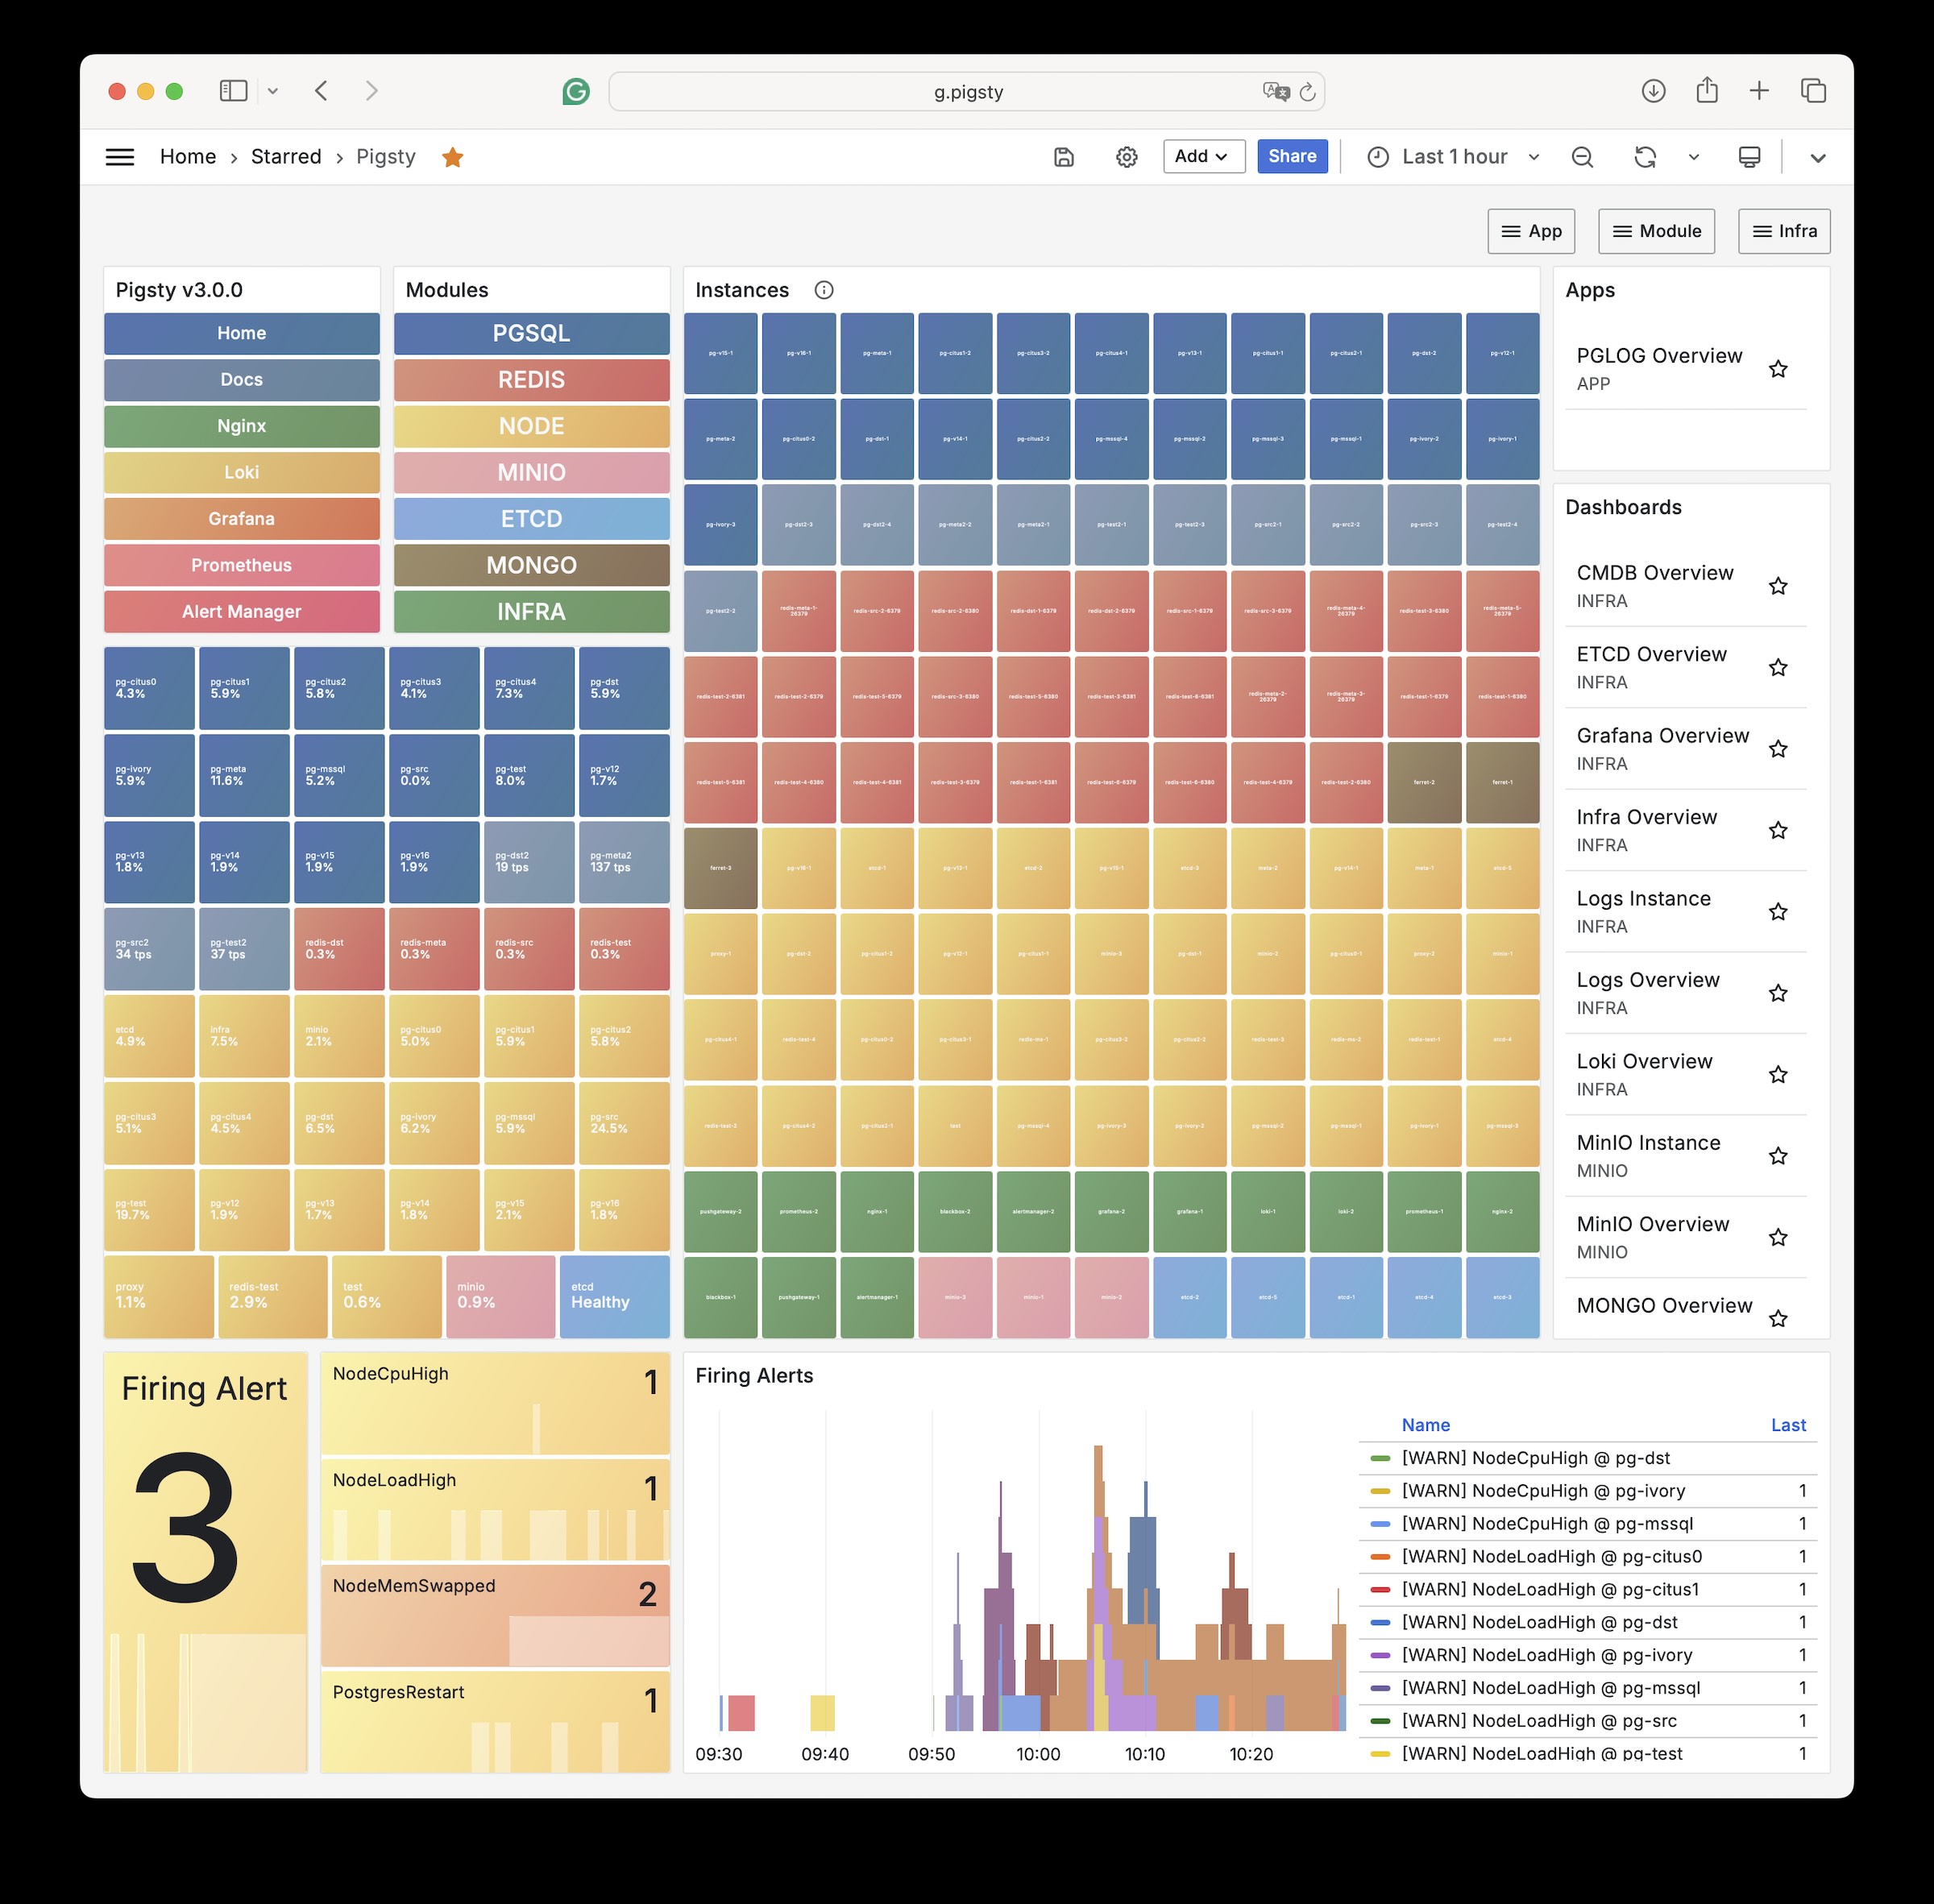
The installed standalone meta node can serve as an admin node and monitoring center to bring more nodes and database servers under its supervision and control.
Pigsty’s monitoring system can be used independently. If you want to install the Prometheus/Grafana observability stack, Pigsty provides best practices!
It offers rich dashboards for host nodes and PostgreSQL databases.
Whether or not these nodes or PostgreSQL servers are managed by Pigsty, with simple configuration, you immediately have a production-grade monitoring and alerting system, bringing existing hosts and PostgreSQL under management.
HA PostgreSQL Clusters
Pigsty helps you own your own production-grade HA PostgreSQL RDS service anywhere.
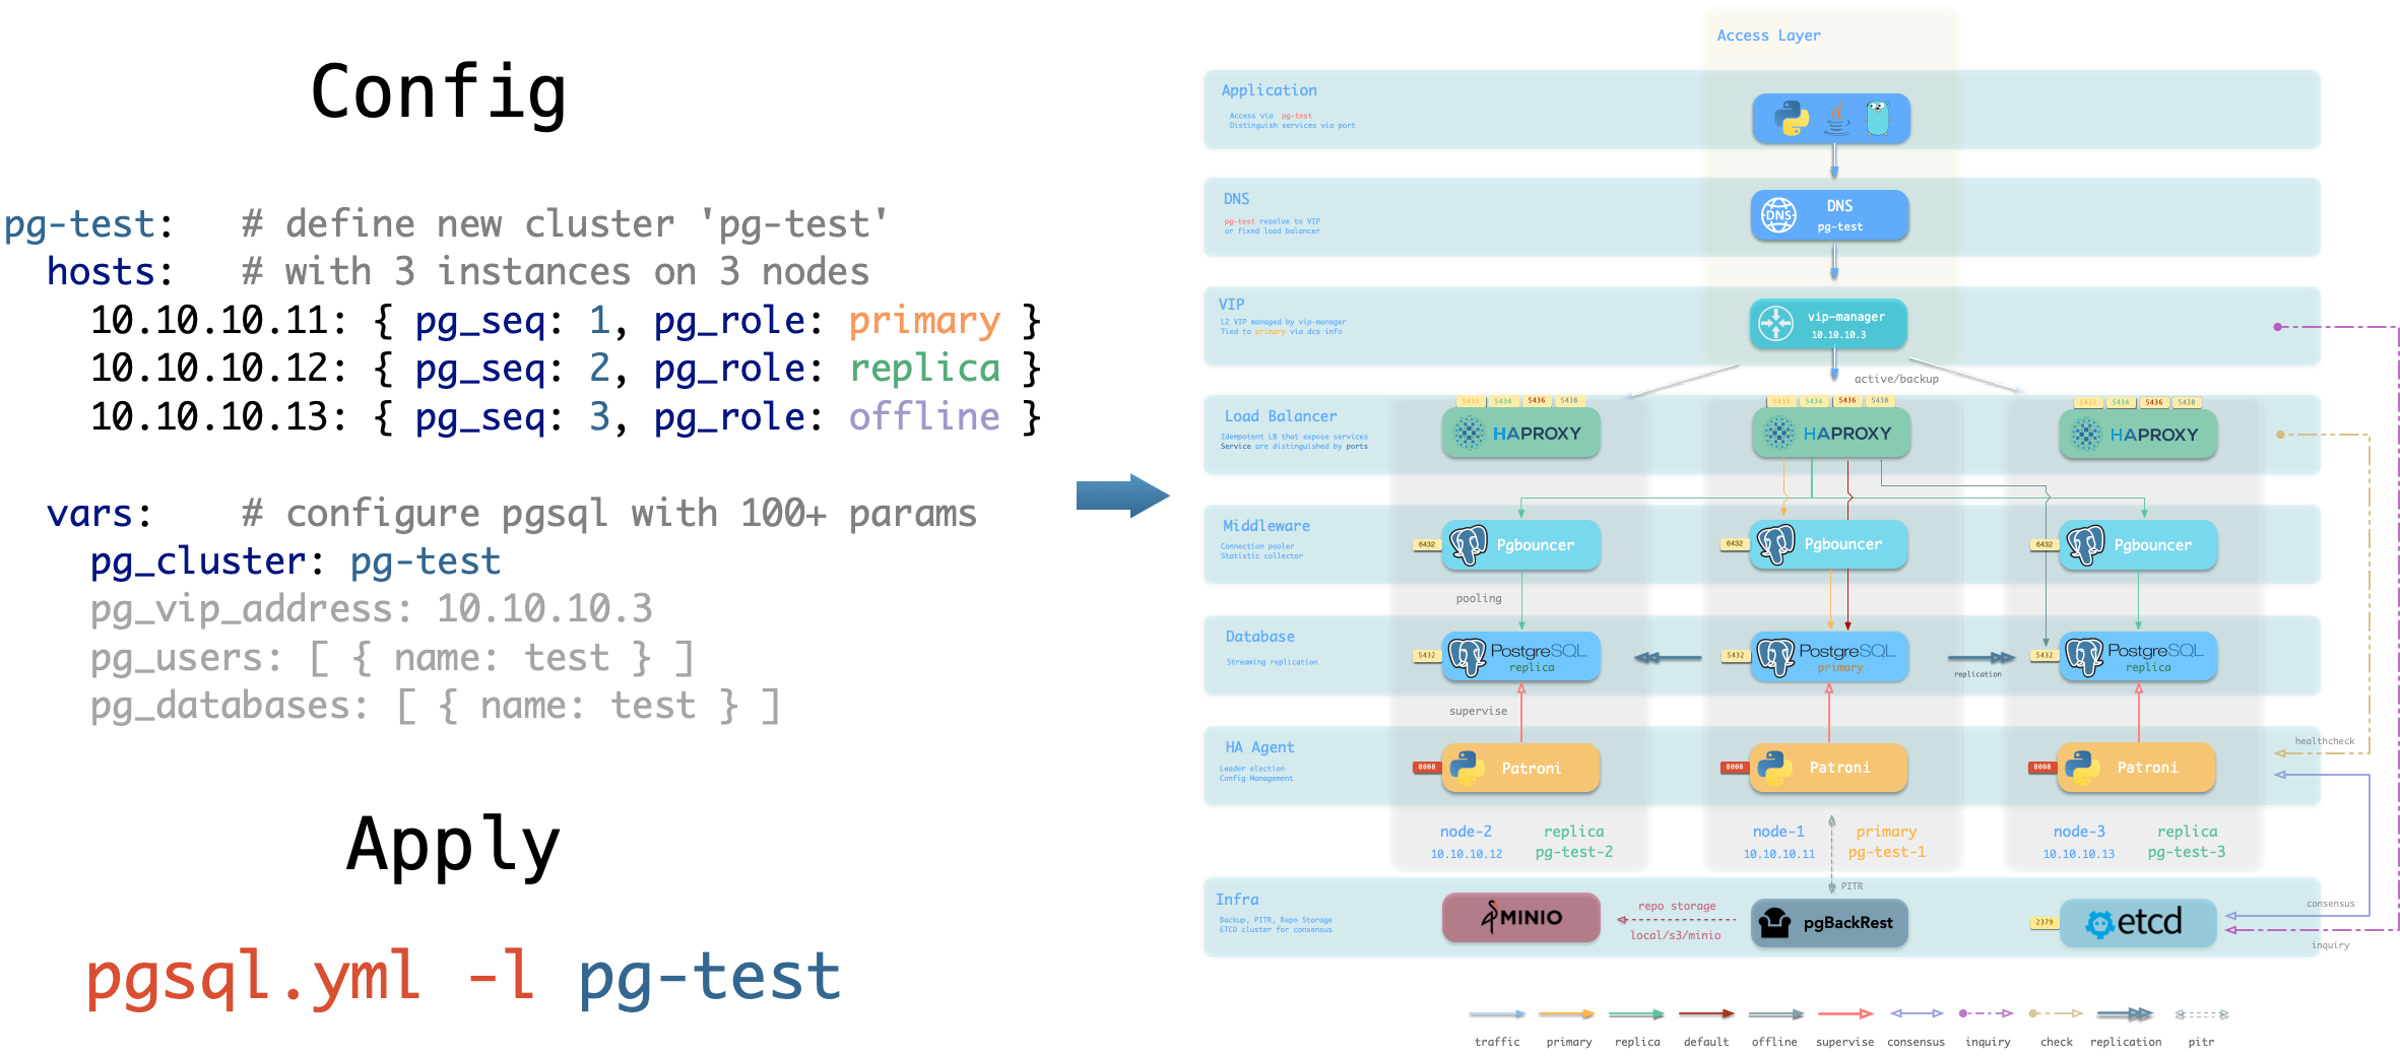
To create such an HA PostgreSQL cluster/RDS service, you simply describe it with a short config and run the playbook to create it:
In less than 10 minutes, you’ll have a PostgreSQL database cluster with service access, monitoring, backup PITR, and HA fully configured.
Hardware failures are covered by the self-healing HA architecture provided by patroni, etcd, and haproxy—in case of primary failure, automatic failover executes within 45 seconds by default.
Clients don’t need to modify config or restart applications: Haproxy uses patroni health checks for traffic distribution, and read-write requests are automatically routed to the new cluster primary, avoiding split-brain issues.
This process is seamless—for example, in case of replica failure or planned switchover, clients experience only a momentary flash of the current query.
Software failures, human errors, and datacenter-level disasters are covered by pgbackrest and the optional MinIO cluster. This provides local/cloud PITR capabilities and, in case of datacenter failure, offers cross-region replication and disaster recovery.
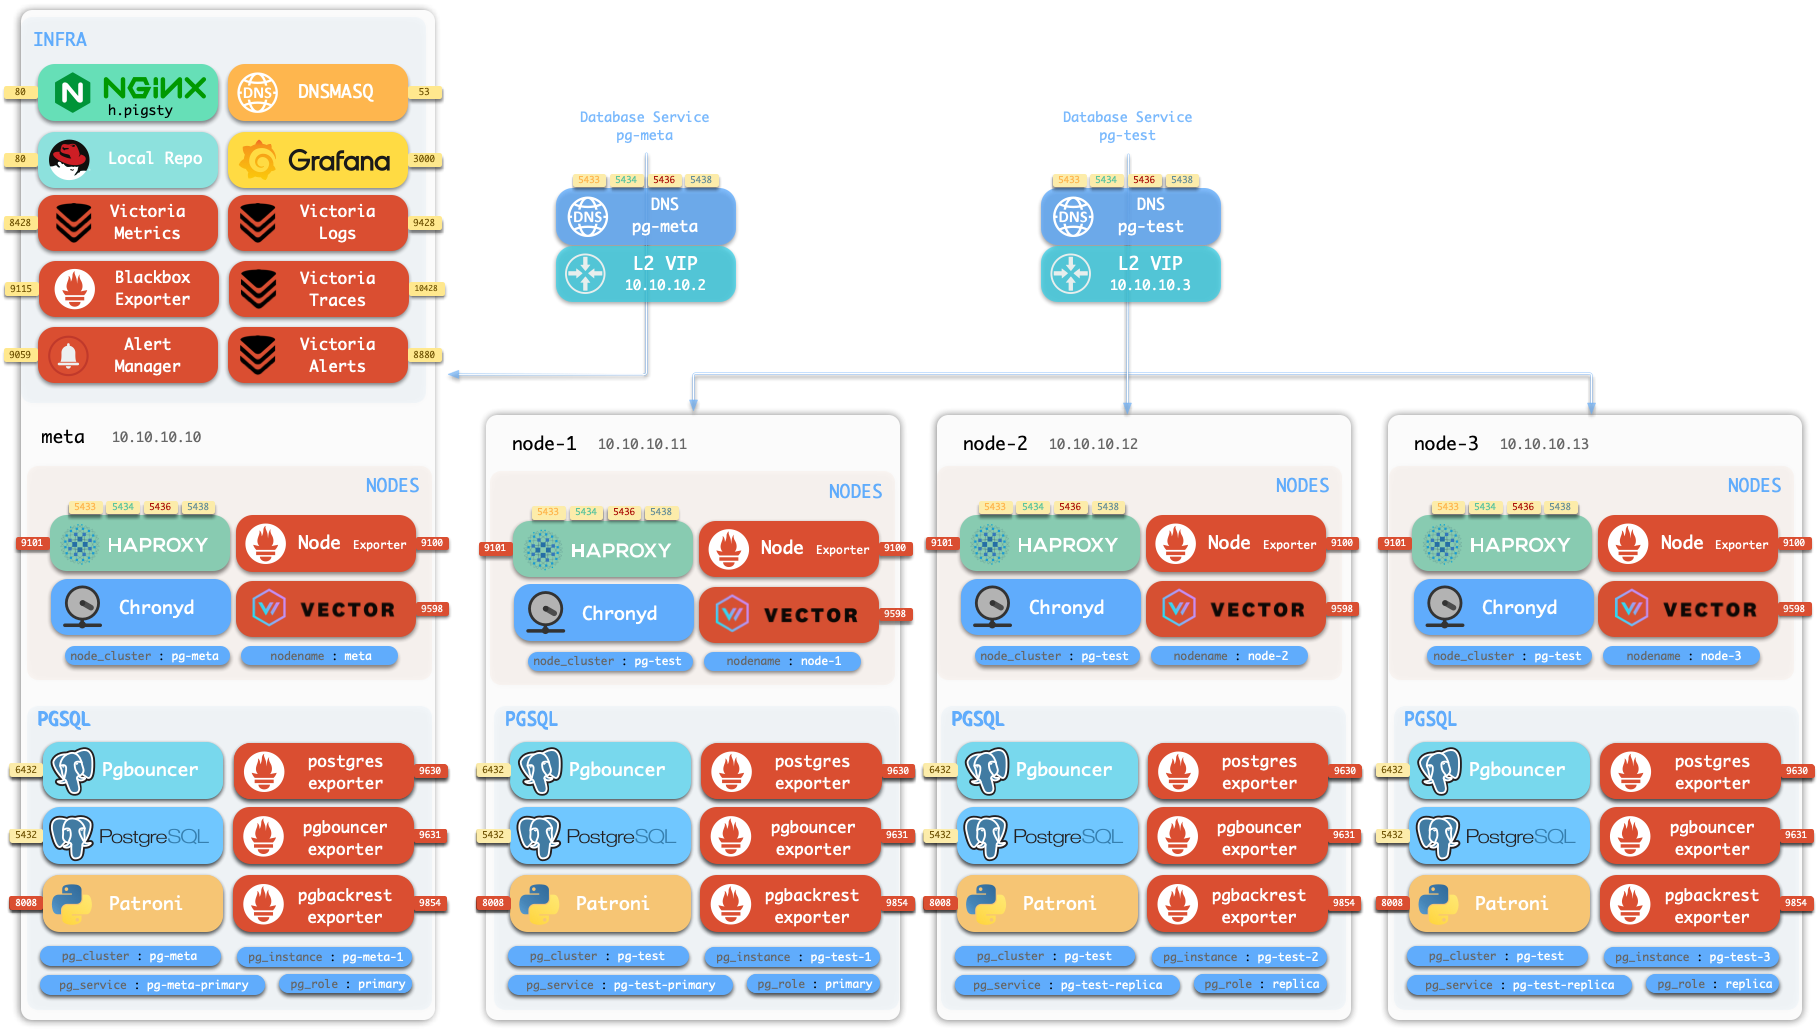
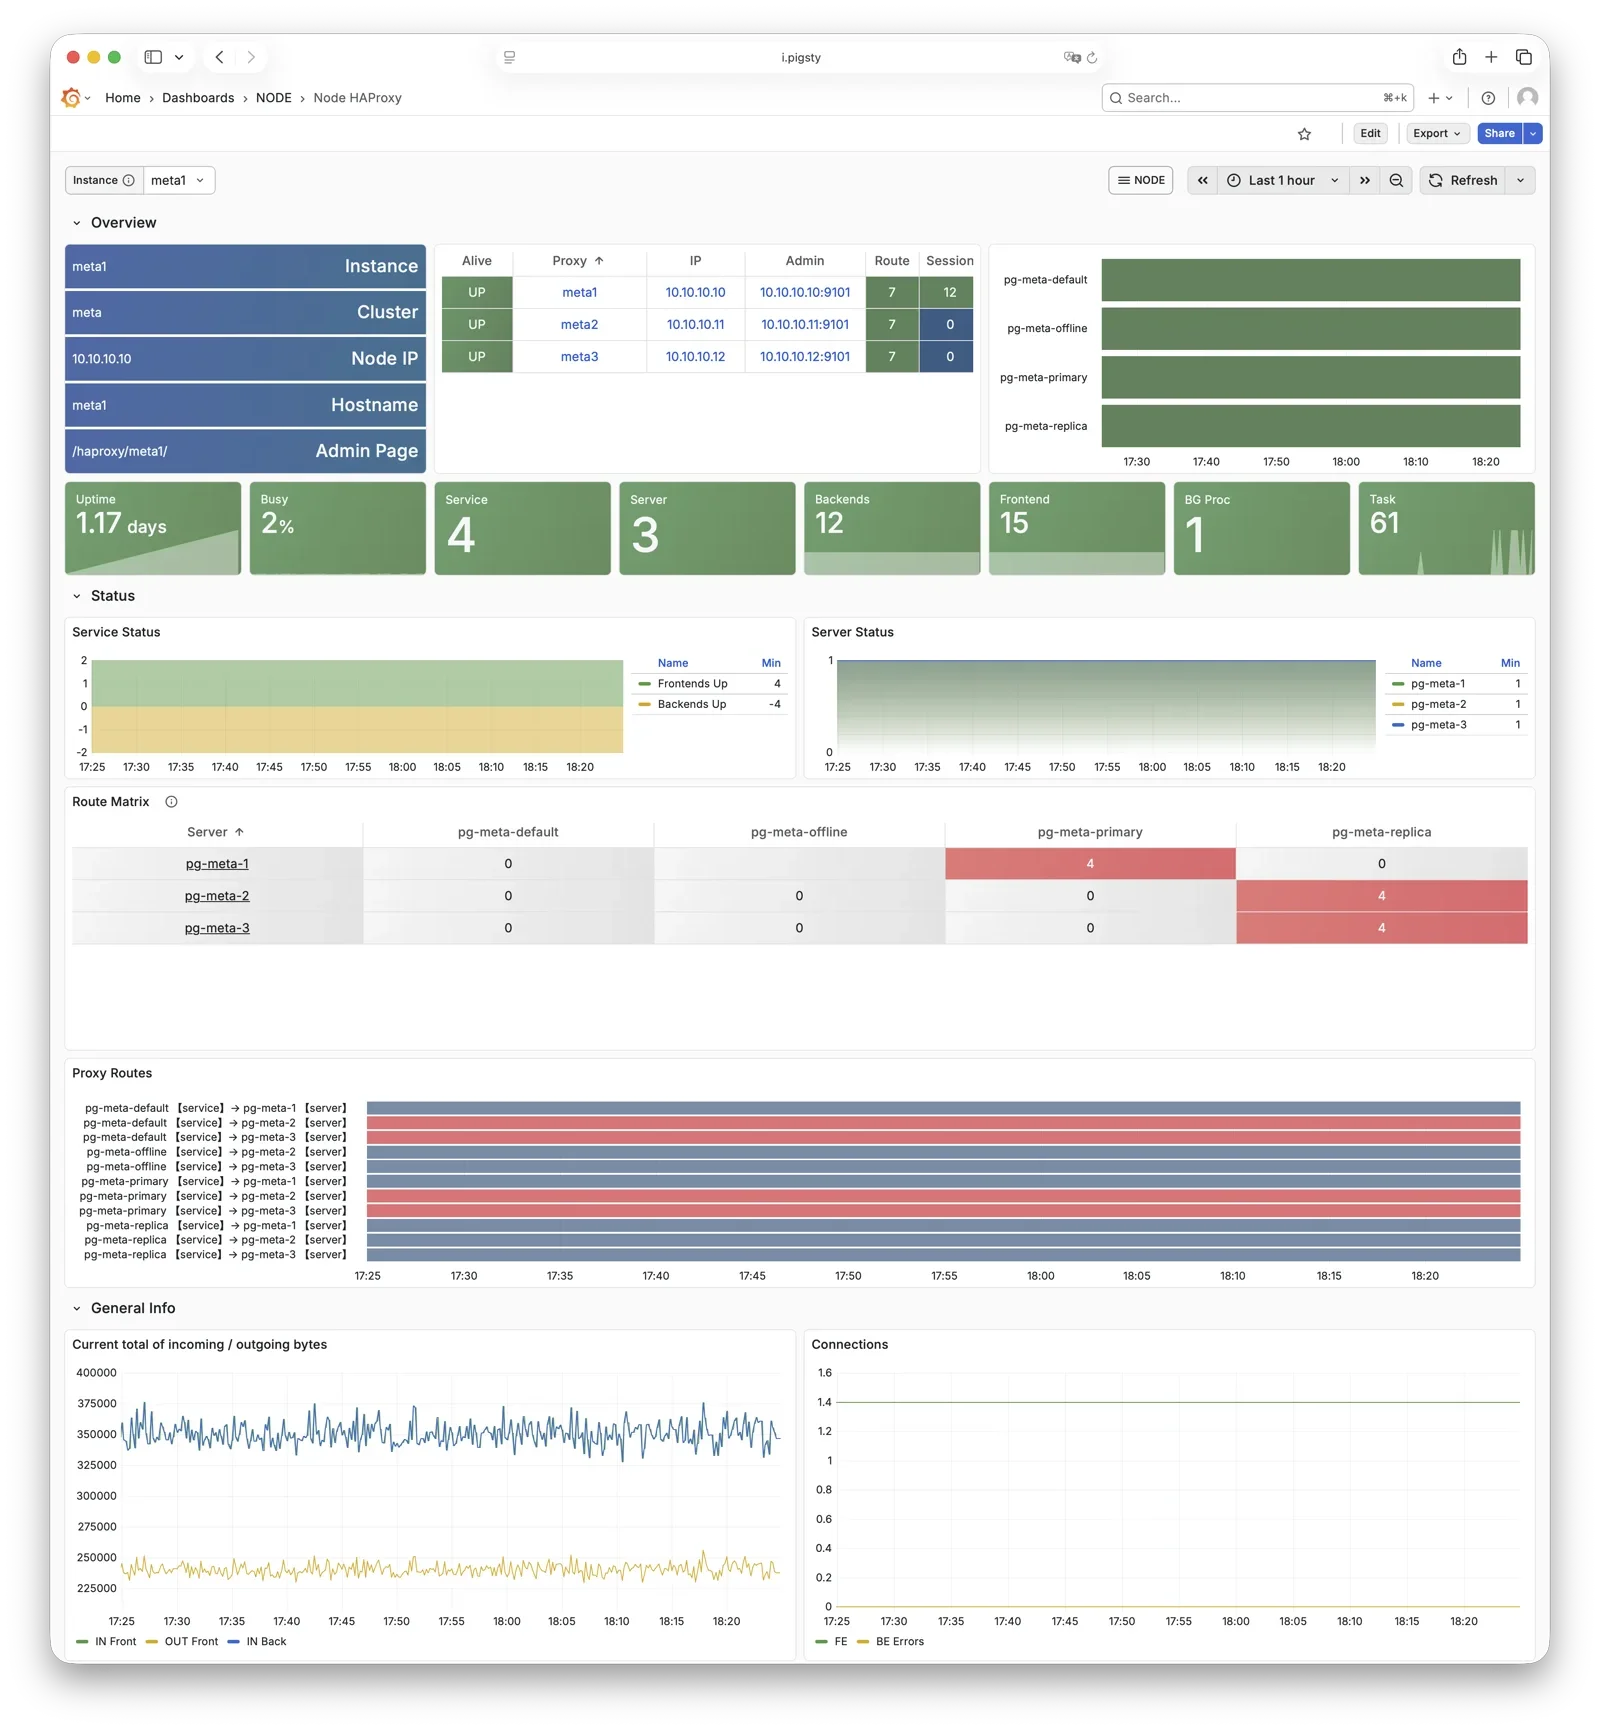
1.1 - Nodes
A node is an abstraction of hardware/OS resources—physical machines, bare metal, VMs, or containers/pods.
A node is an abstraction of hardware resources and operating systems. It can be a physical machine, bare metal, virtual machine, or container/pod.
Any machine running a Linux OS (with systemd daemon) and standard CPU/memory/disk/network resources can be treated as a node.
Nodes can have modules installed. Pigsty has several node types, distinguished by which modules are deployed:
In a singleton Pigsty deployment, multiple roles converge on one node: it serves as the regular node, admin node, infra node, ETCD node, and database node simultaneously.
Regular Node
Nodes managed by Pigsty can have modules installed. The node.yml playbook configures nodes to the desired state.
A regular node may run the following services:
Component
Port
Description
Status
node_exporter
9100
Host metrics exporter
Enabled
haproxy
9101
HAProxy load balancer (admin port)
Enabled
vector
9598
Log collection agent
Enabled
docker
9323
Container runtime support
Optional
keepalived
n/a
L2 VIP for node cluster
Optional
keepalived_exporter
9650
Keepalived status monitor
Optional
Here, node_exporter exposes host metrics, vector sends logs to the collection system, and haproxy provides load balancing. These three are enabled by default.
Docker, keepalived, and keepalived_exporter are optional and can be enabled as needed.
ADMIN Node
A Pigsty deployment has exactly one admin node—the node that runs Ansible playbooks and issues control/deployment commands.
This node has ssh/sudo access to all other nodes. Admin node security is critical; ensure access is strictly controlled.
During single-node installation and configuration, the current node becomes the admin node.
However, alternatives exist. For example, if your laptop can SSH to all managed nodes and has Ansible installed, it can serve as the admin node—though this isn’t recommended for production.
For instance, you might use your laptop to manage a Pigsty VM in the cloud. In this case, your laptop is the admin node.
In serious production environments, the admin node is typically 1-2 dedicated DBA machines. In resource-constrained setups, INFRA nodes often double as admin nodes since all INFRA nodes have Ansible installed by default.
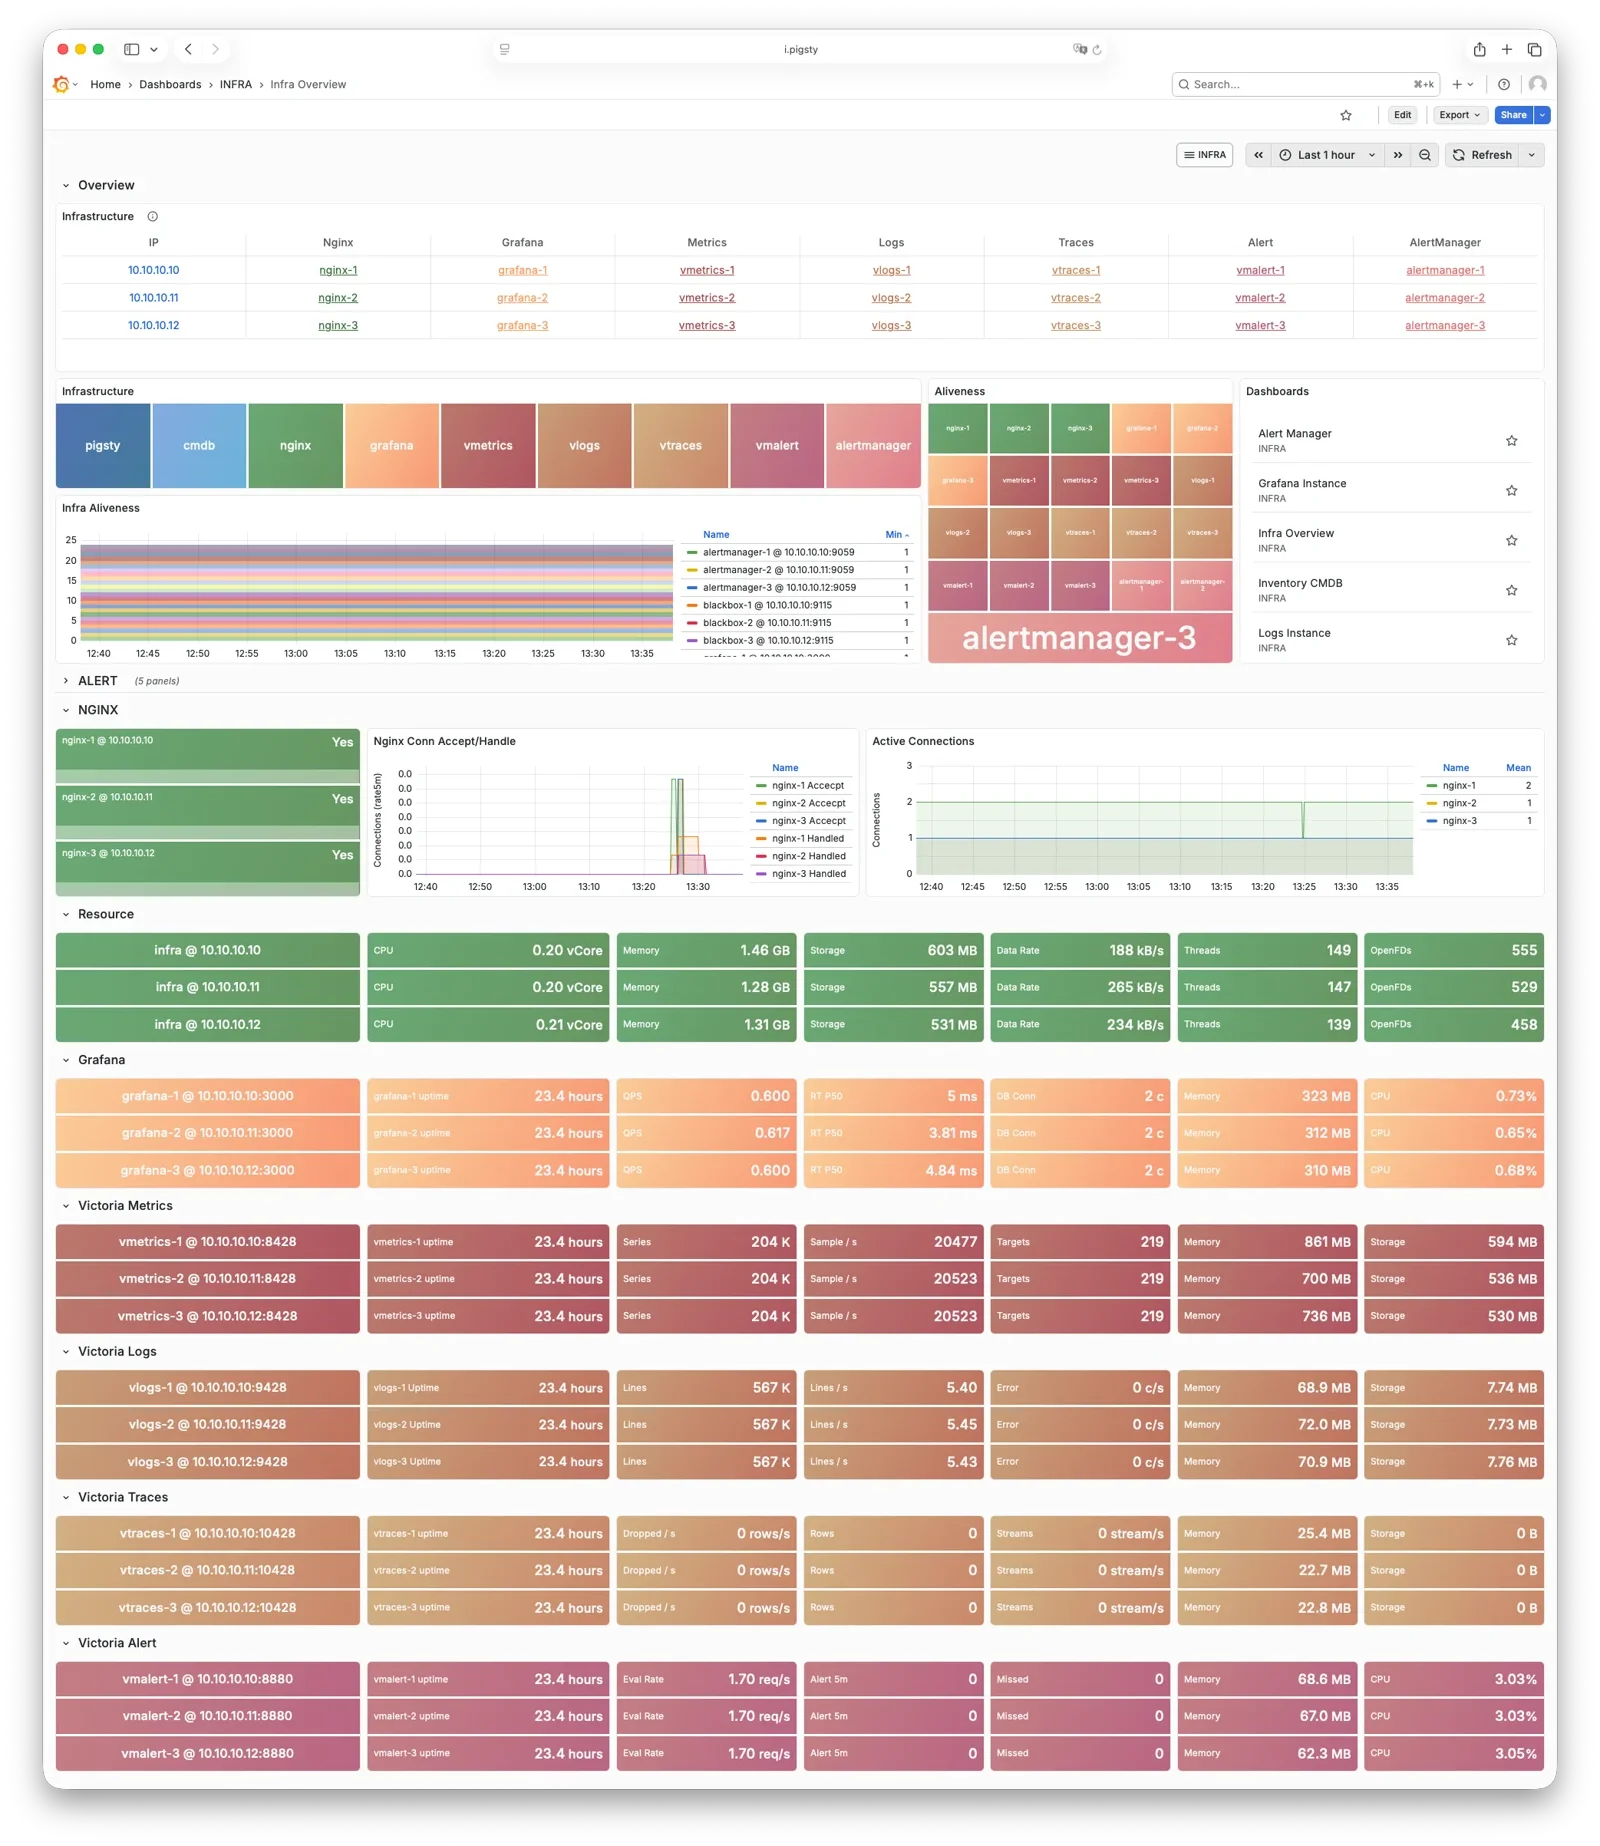
INFRA Node
A Pigsty deployment may have 1 or more INFRA nodes; large production environments typically have 2-3.
The infra group in the inventory defines which nodes are INFRA nodes. These nodes run the INFRA module with these components:
Component
Port
Description
nginx
80/443
Web UI, local software repository
grafana
3000
Visualization platform
victoriaMetrics
8428
Time-series database (metrics)
victoriaLogs
9428
Log collection server
victoriaTraces
10428
Trace collection server
vmalert
8880
Alerting and derived metrics
alertmanager
9059
Alert aggregation and routing
blackbox_exporter
9115
Blackbox probing (ping nodes/VIPs)
dnsmasq
53
Internal DNS resolution
chronyd
123
NTP time server
ansible
-
Playbook execution
Nginx serves as the module’s entry point, providing the web UI and local software repository.
With multiple INFRA nodes, services on each are independent, but you can access all monitoring data sources from any INFRA node’s Grafana.
Pigsty is licensed under Apache-2.0, though embedded Grafana component uses AGPLv3.
ETCD Node
The ETCD module provides Distributed Consensus Service (DCS) for PostgreSQL high availability.
The etcd group in the inventory defines ETCD nodes. These nodes run etcd servers on two ports:
The minio group in the inventory defines MinIO nodes. These nodes run MinIO servers on:
Component
Port
Description
minio
9000
MinIO S3 API endpoint
minio
9001
MinIO admin console
PGSQL Node
Nodes with the PGSQL module are called PGSQL nodes. Node and PostgreSQL instance have a 1:1 deployment—one PG instance per node.
PGSQL nodes can borrow identity from their PostgreSQL instance—controlled by node_id_from_pg, defaulting to true, meaning the node name is set to the PG instance name.
PGSQL nodes run these additional components beyond regular node services:
Component
Port
Description
Status
postgres
5432
PostgreSQL database server
Enabled
pgbouncer
6432
PgBouncer connection pool
Enabled
patroni
8008
Patroni HA management
Enabled
pg_exporter
9630
PostgreSQL metrics exporter
Enabled
pgbouncer_exporter
9631
PgBouncer metrics exporter
Enabled
pgbackrest_exporter
9854
pgBackRest metrics exporter
Enabled
vip-manager
n/a
Binds L2 VIP to cluster primary
Optional
{{ pg_cluster }}-primary
5433
HAProxy service: pooled read/write
Enabled
{{ pg_cluster }}-replica
5434
HAProxy service: pooled read-only
Enabled
{{ pg_cluster }}-default
5436
HAProxy service: primary direct connection
Enabled
{{ pg_cluster }}-offline
5438
HAProxy service: offline read
Enabled
{{ pg_cluster }}-<service>
543x
HAProxy service: custom PostgreSQL services
Custom
The vip-manager is only enabled when users configure a PG VIP.
Additional custom services can be defined in pg_services, exposed via haproxy using additional service ports.
Node Relationships
Regular nodes typically reference an INFRA node via the admin_ip parameter as their infrastructure provider.
For example, with global admin_ip = 10.10.10.10, all nodes use infrastructure services at this IP.
Typically the admin node and INFRA node coincide. With multiple INFRA nodes, the admin node is usually the first one; others serve as backups.
In large-scale production deployments, you might separate the Ansible admin node from INFRA module nodes.
For example, use 1-2 small dedicated hosts under the DBA team as the control hub (ADMIN nodes), and 2-3 high-spec physical machines as monitoring infrastructure (INFRA nodes).
Typical node counts by deployment scale:
Scale
ADMIN
INFRA
ETCD
MINIO
PGSQL
Single-node
1
1
1
0
1
3-node
1
3
3
0
3
Small prod
1
2
3
0
N
Large prod
2
3
5
4+
N
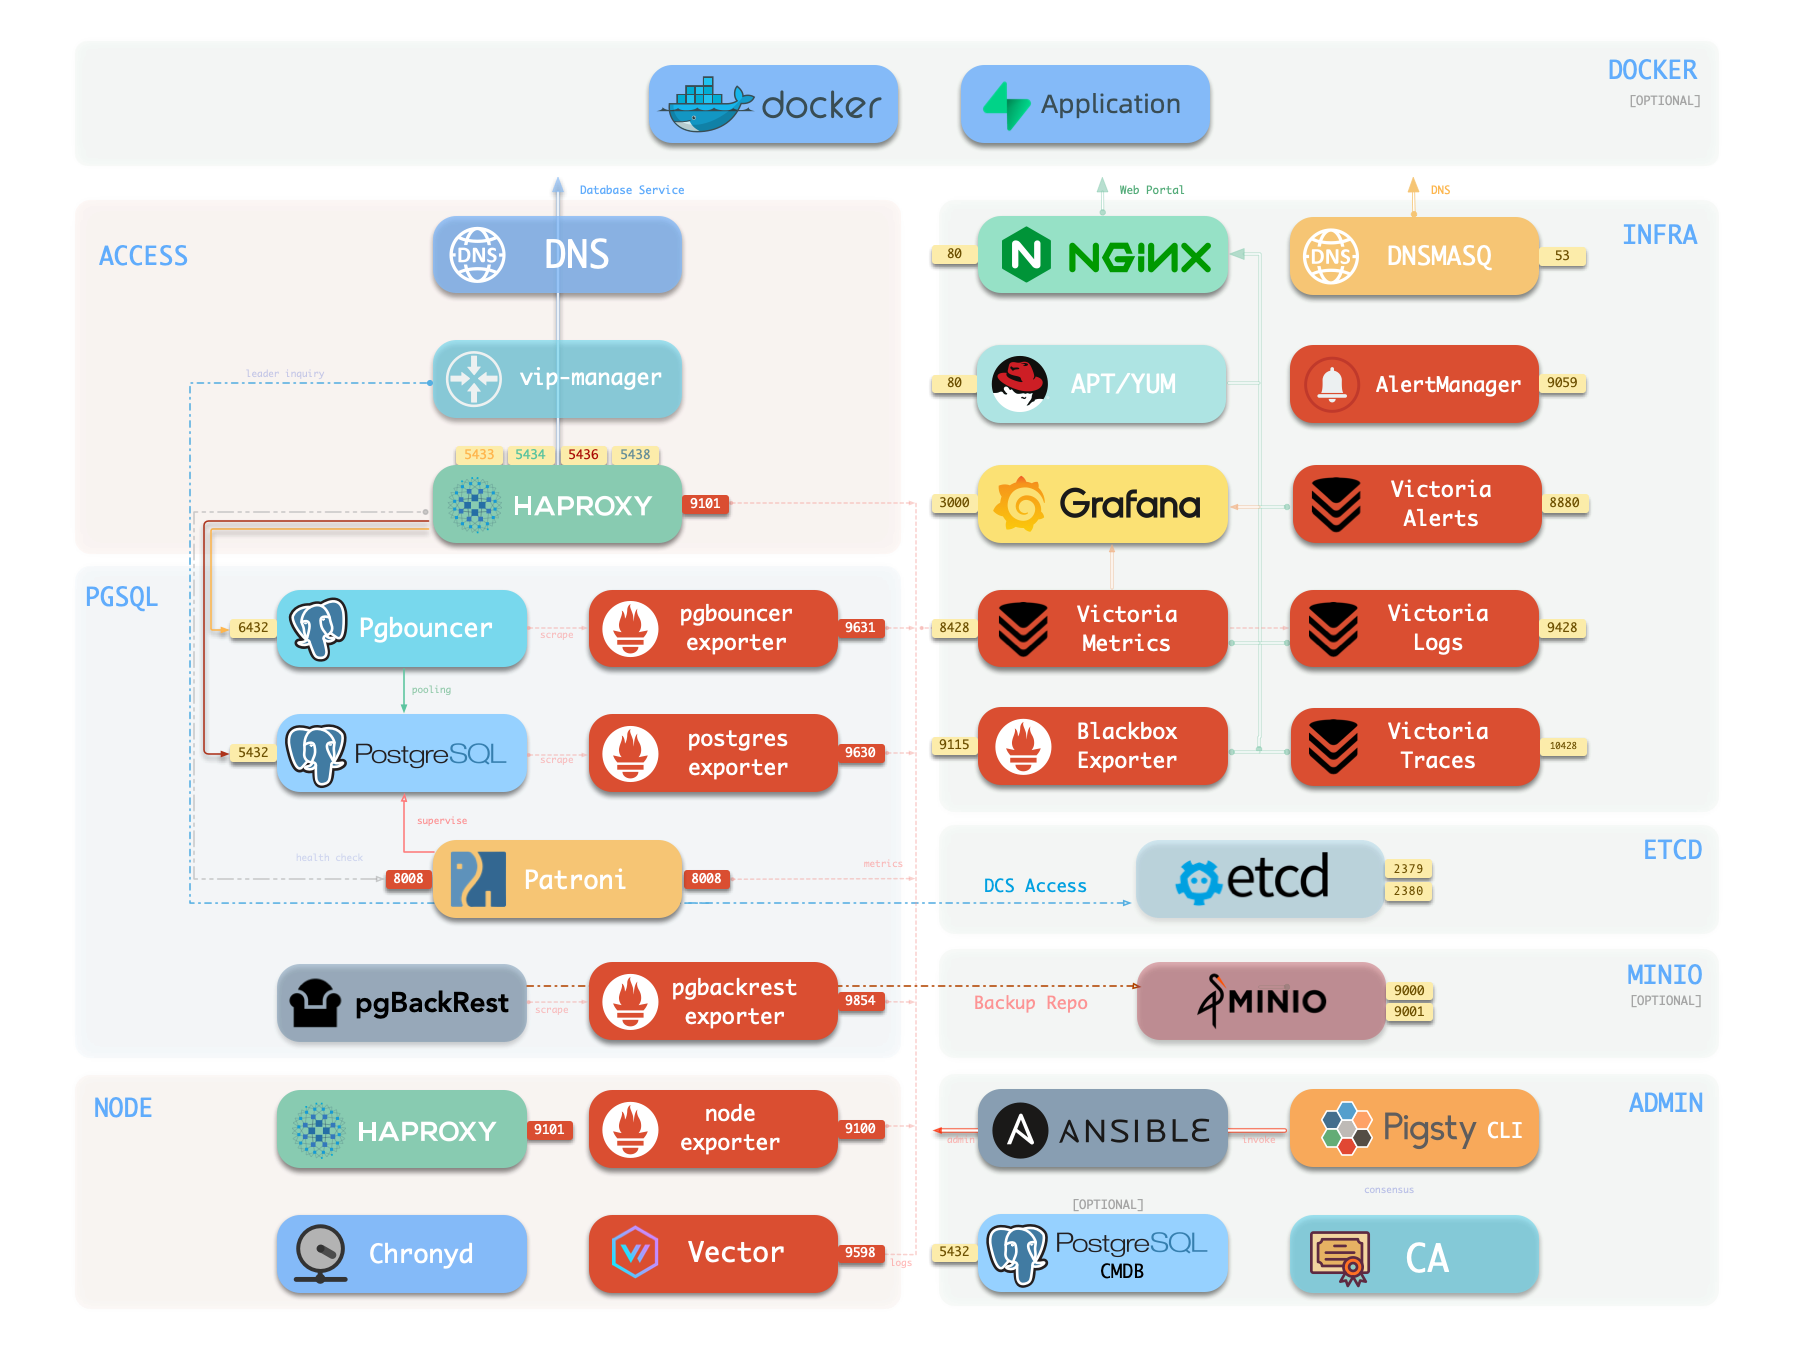
1.2 - Infrastructure
Infrastructure module architecture, components, and functionality in Pigsty.
Running production-grade, highly available PostgreSQL clusters typically requires a comprehensive set of infrastructure services (foundation) for support, such as monitoring and alerting, log collection, time synchronization, DNS resolution, and local software repositories.
Pigsty provides the INFRA module to address this—it’s an optional module, but we strongly recommend enabling it.
Overview
The diagram below shows the architecture of a single-node deployment. The right half represents the components included in the INFRA module:
Infrastructure components with WebUIs can be exposed uniformly through Nginx, such as Grafana, VictoriaMetrics (VMUI), AlertManager,
and HAProxy console. Additionally, the local software repository and other static resources are served via Nginx.
Nginx configures local web servers or reverse proxy servers based on definitions in infra_portal.
infra_portal:home :{domain:i.pigsty }
By default, it exposes Pigsty’s admin homepage: i.pigsty. Different endpoints on this page proxy different components:
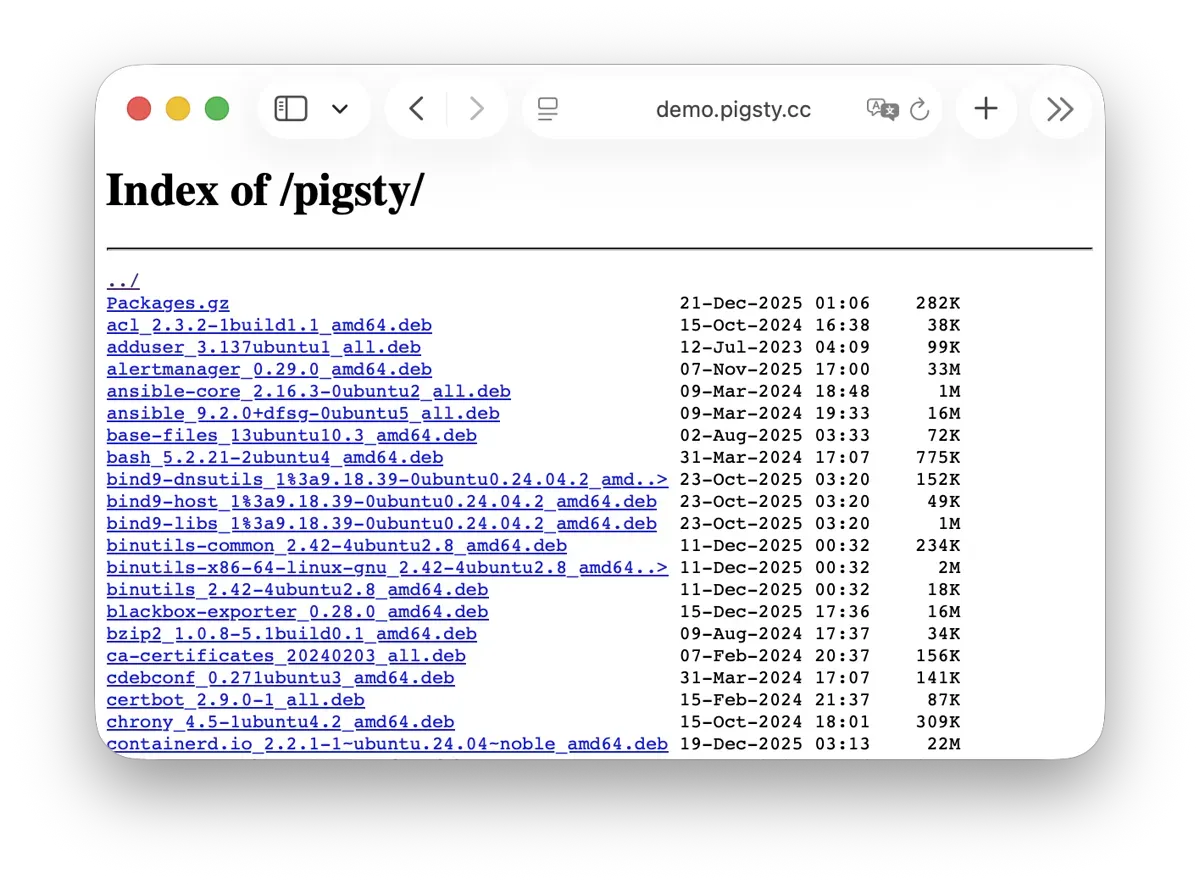
Pigsty supports offline installation, which essentially pre-copies a prepared local software repository to the target environment.
When Pigsty performs production deployment and needs to create a local software repository, if it finds the /www/pigsty/repo_complete marker file already exists locally, it skips downloading packages from upstream and uses existing packages directly, avoiding internet downloads.
Pigsty provides pre-built dashboards based on VictoriaMetrics / Logs / Traces, with one-click drill-down and roll-up via URL jumps for rapid troubleshooting.
Grafana can also serve as a low-code visualization platform, so ECharts, victoriametrics-datasource, victorialogs-datasource plugins are installed by default,
with Vector / Victoria datasources registered uniformly as vmetrics-*, vlogs-*, vtraces-* for easy custom dashboard extension.
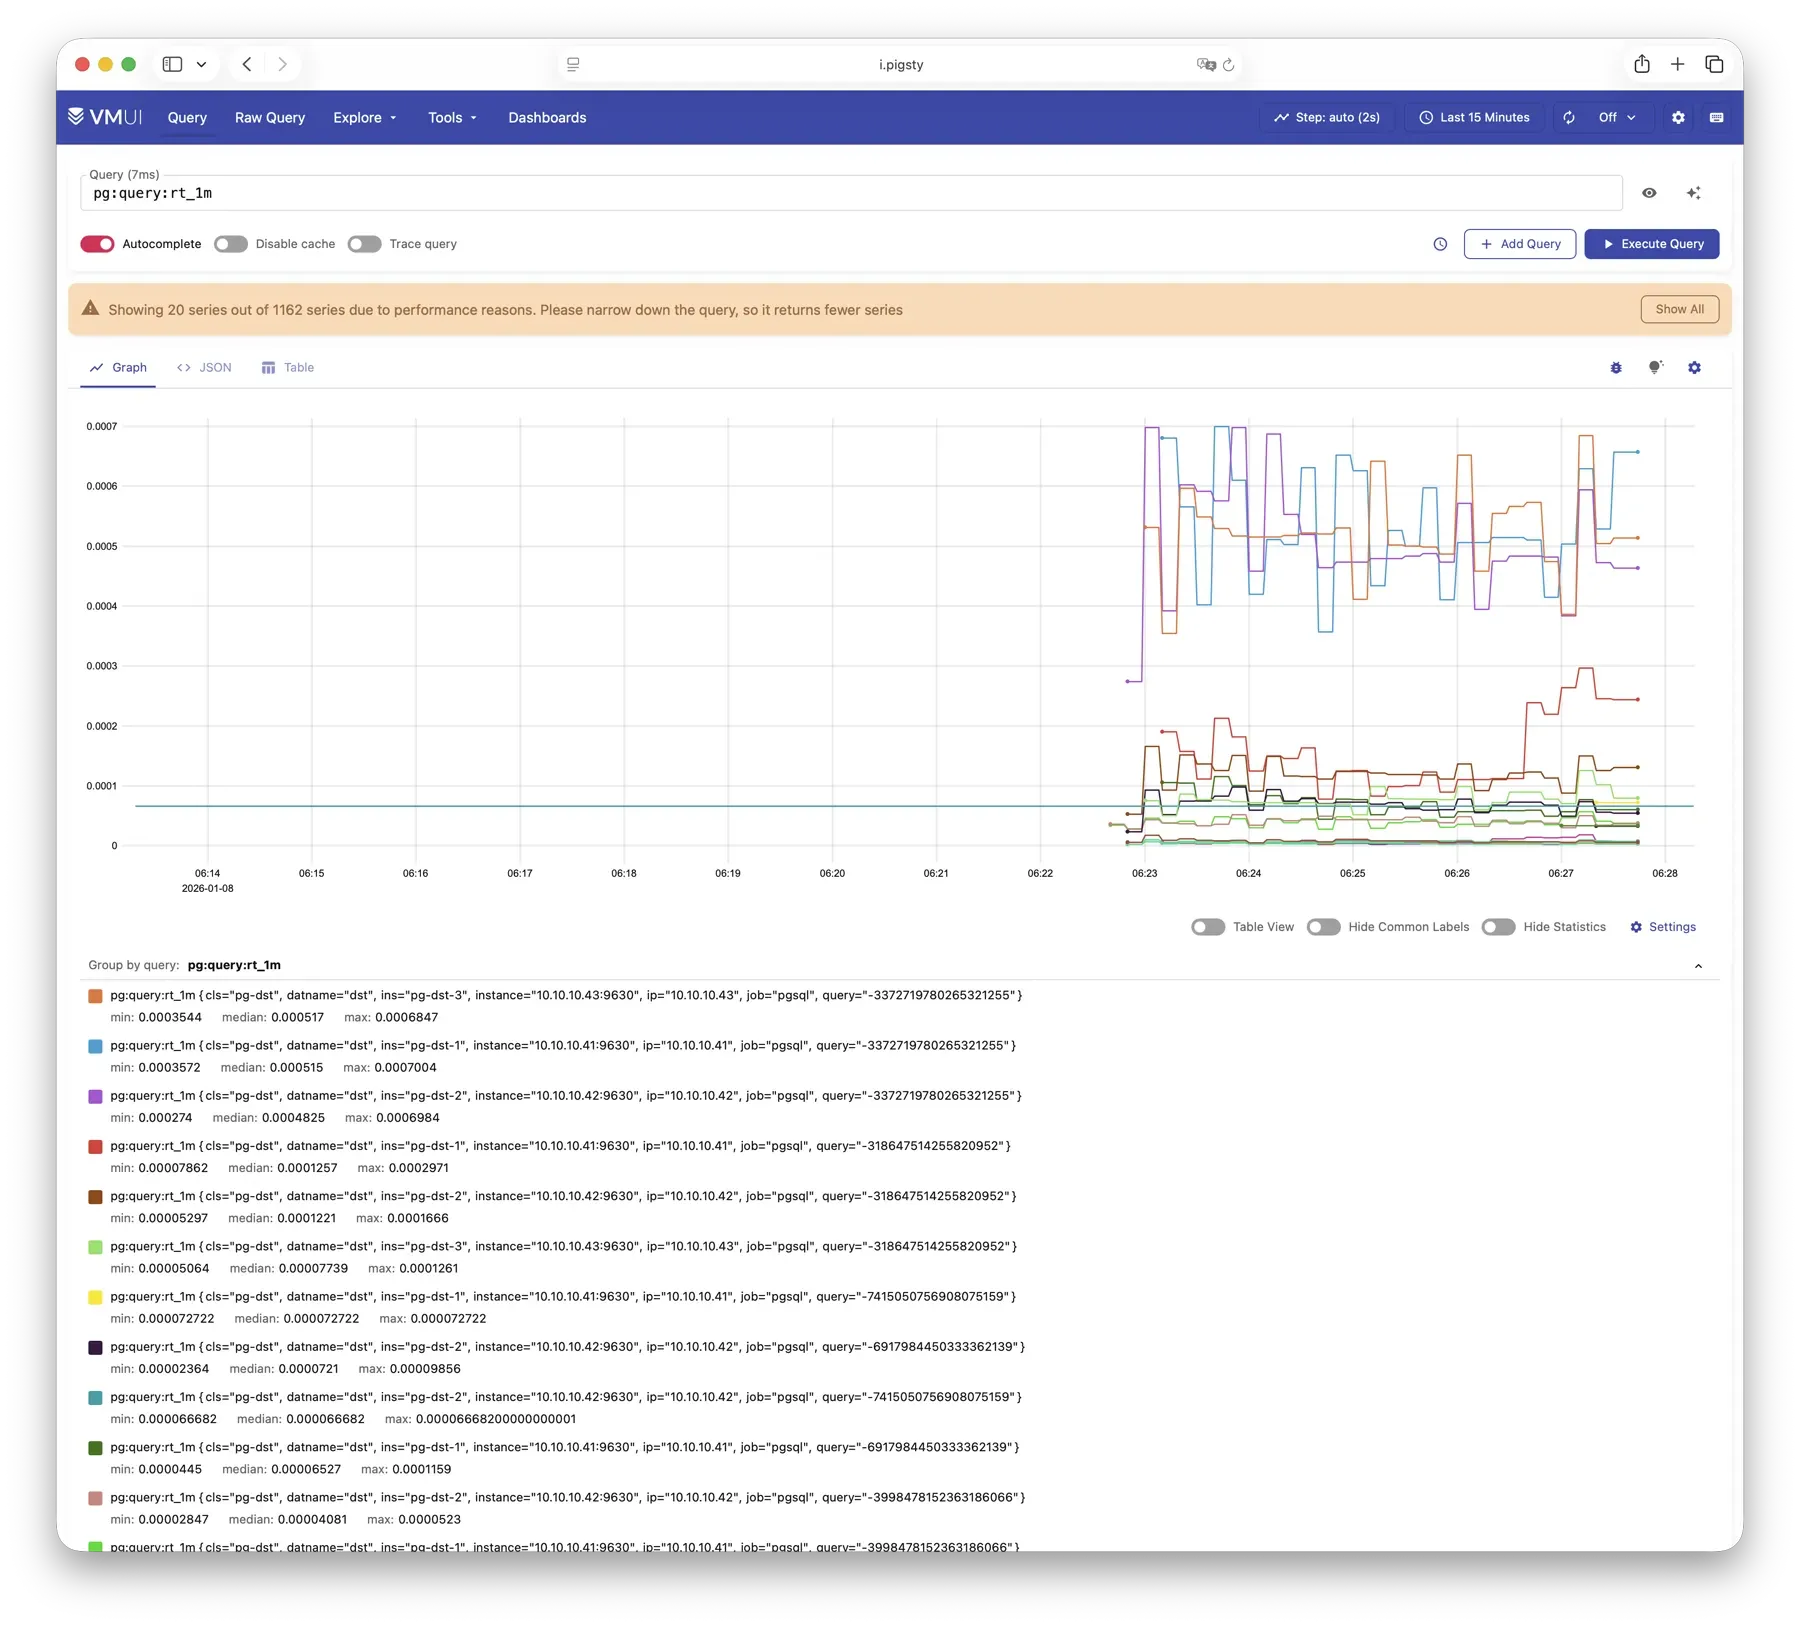
VictoriaMetrics is fully compatible with the Prometheus API, supporting PromQL queries, remote read/write protocols, and the Alertmanager API.
The built-in VMUI provides an ad-hoc query interface for exploring metrics data directly, and also serves as a Grafana datasource.
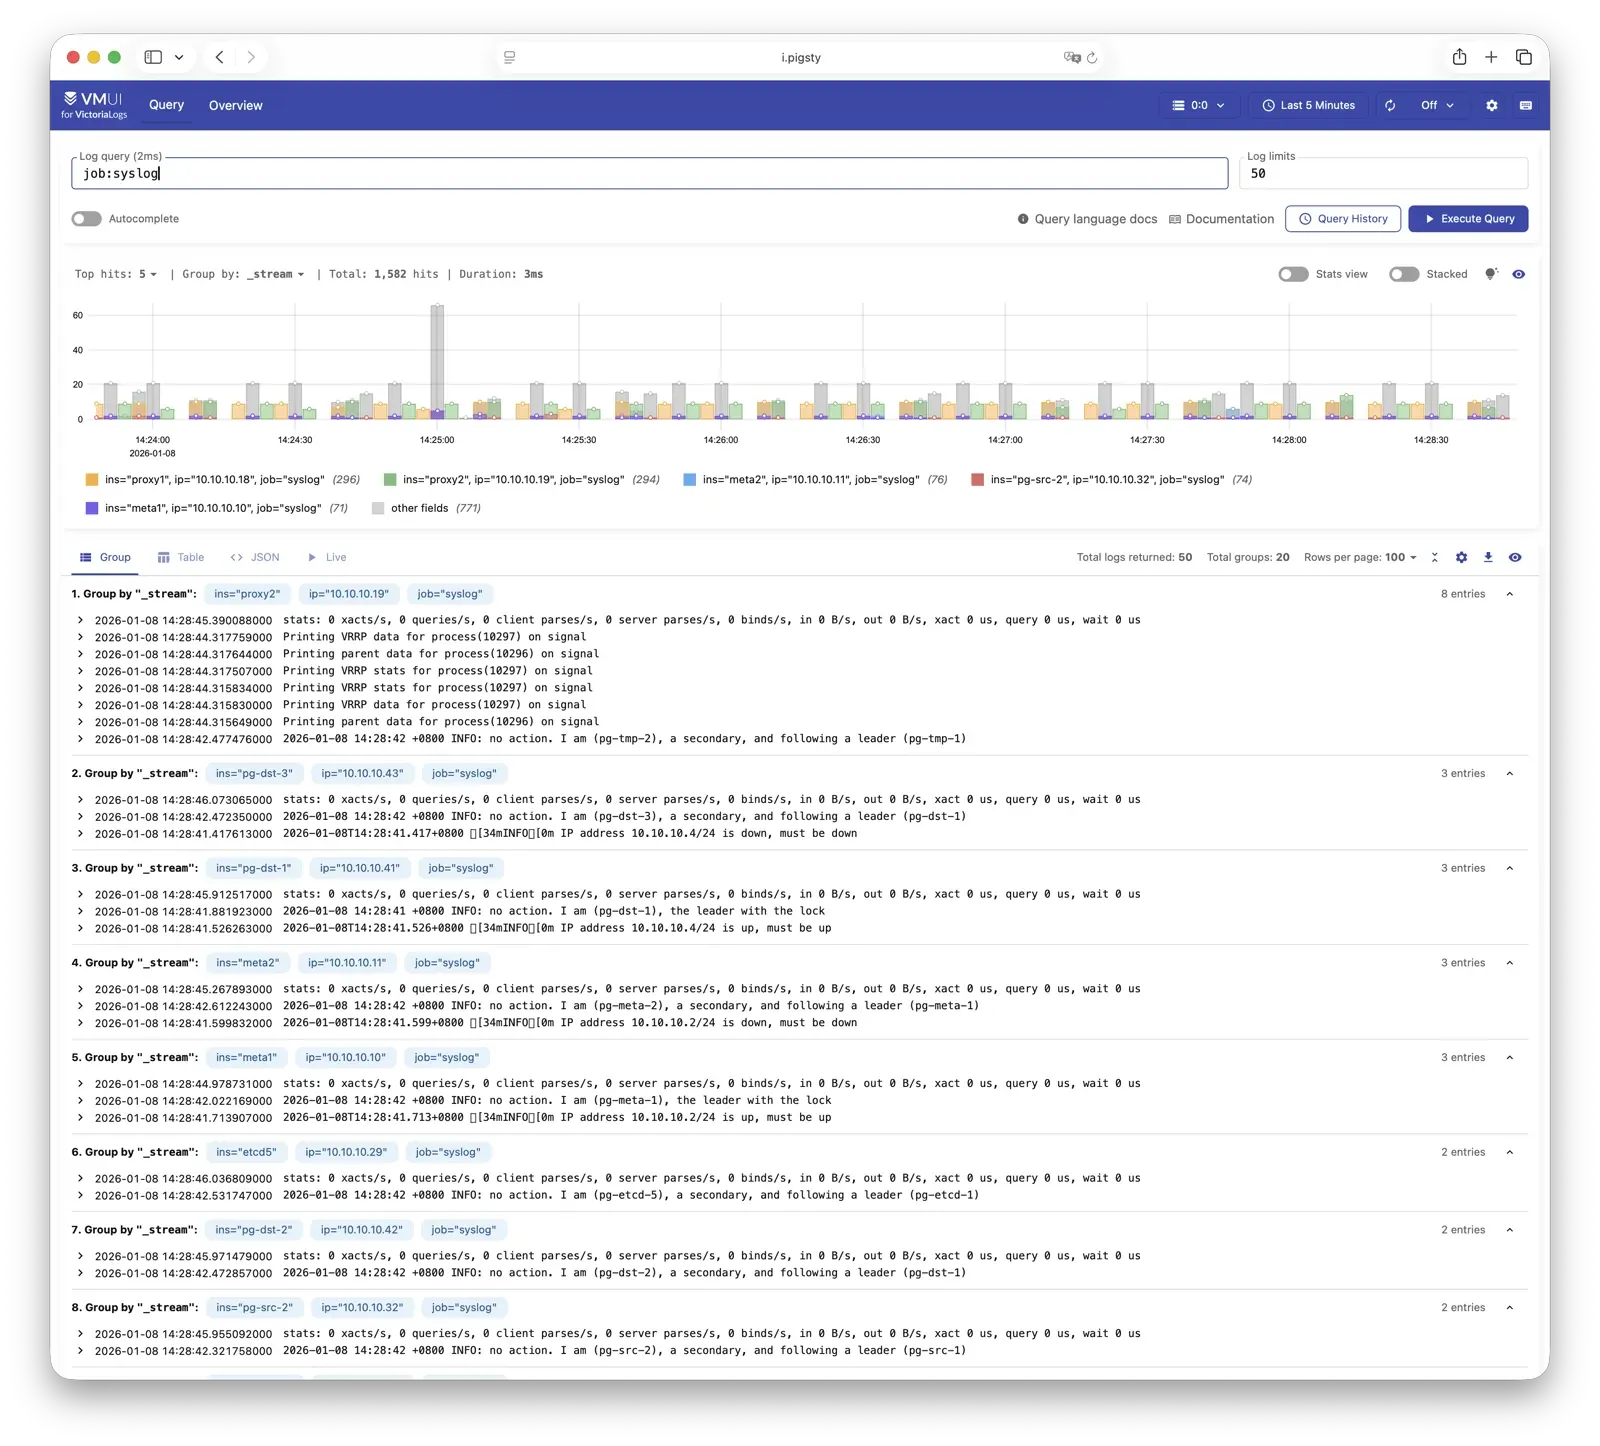
All managed nodes run Vector Agent by default, collecting system logs, PostgreSQL logs, Patroni logs, Pgbouncer logs, etc., processing them into structured format and pushing to VictoriaLogs.
The built-in Web UI supports log search and filtering, and can be integrated with Grafana’s victorialogs-datasource plugin for visual analysis.
VictoriaTraces provides a Jaeger-compatible interface for analyzing service call chains and database slow queries.
Combined with Grafana dashboards, it enables rapid identification of performance bottlenecks and root cause tracing.
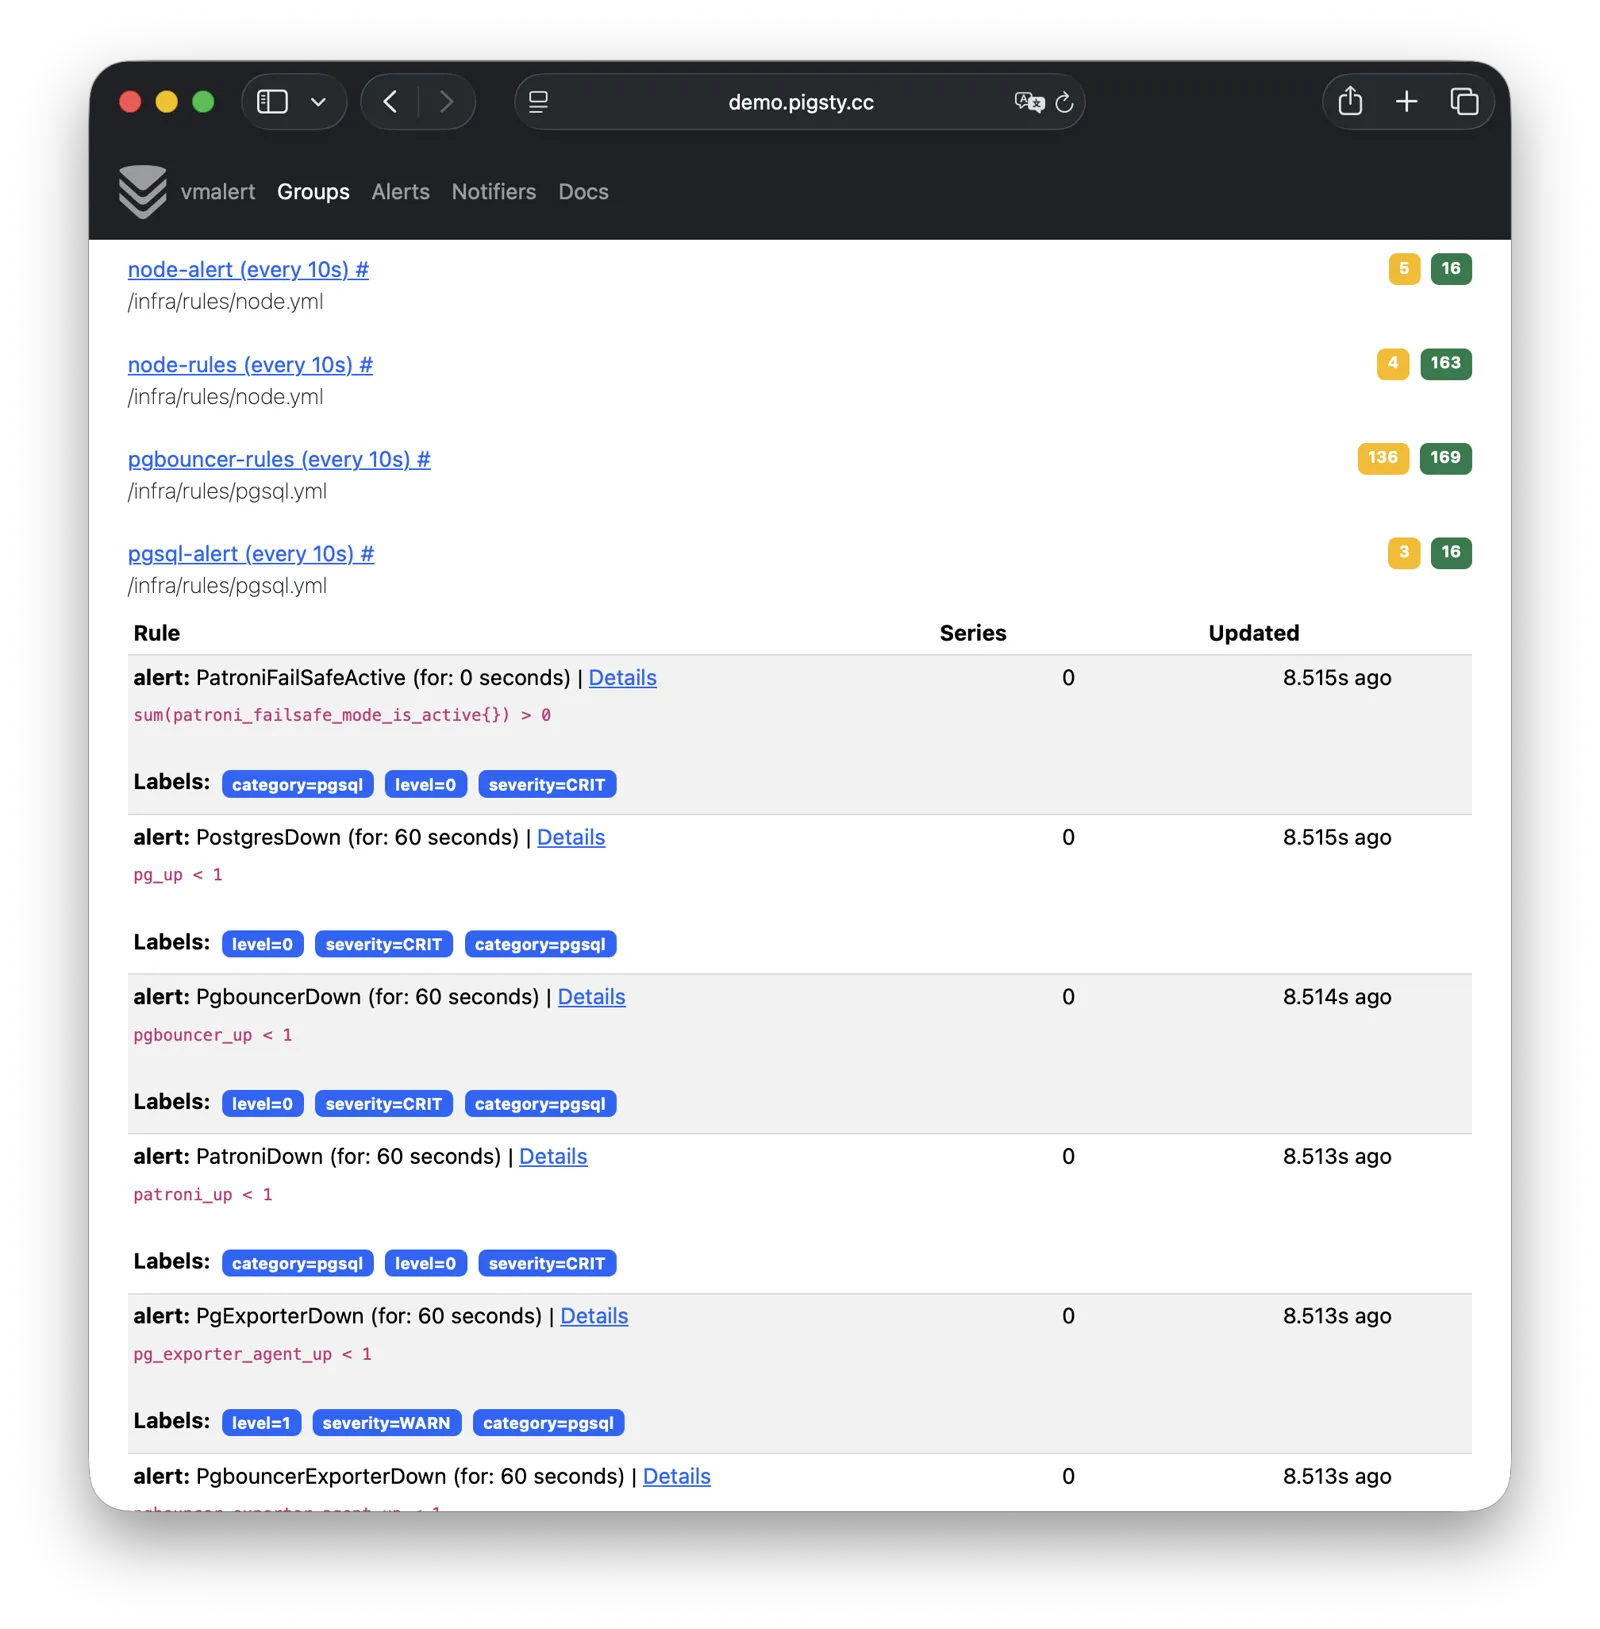
VMAlert reads metrics data from VictoriaMetrics and periodically evaluates alerting rules.
Pigsty provides pre-built alerting rules for PGSQL, NODE, REDIS, and other modules, covering common failure scenarios out of the box.
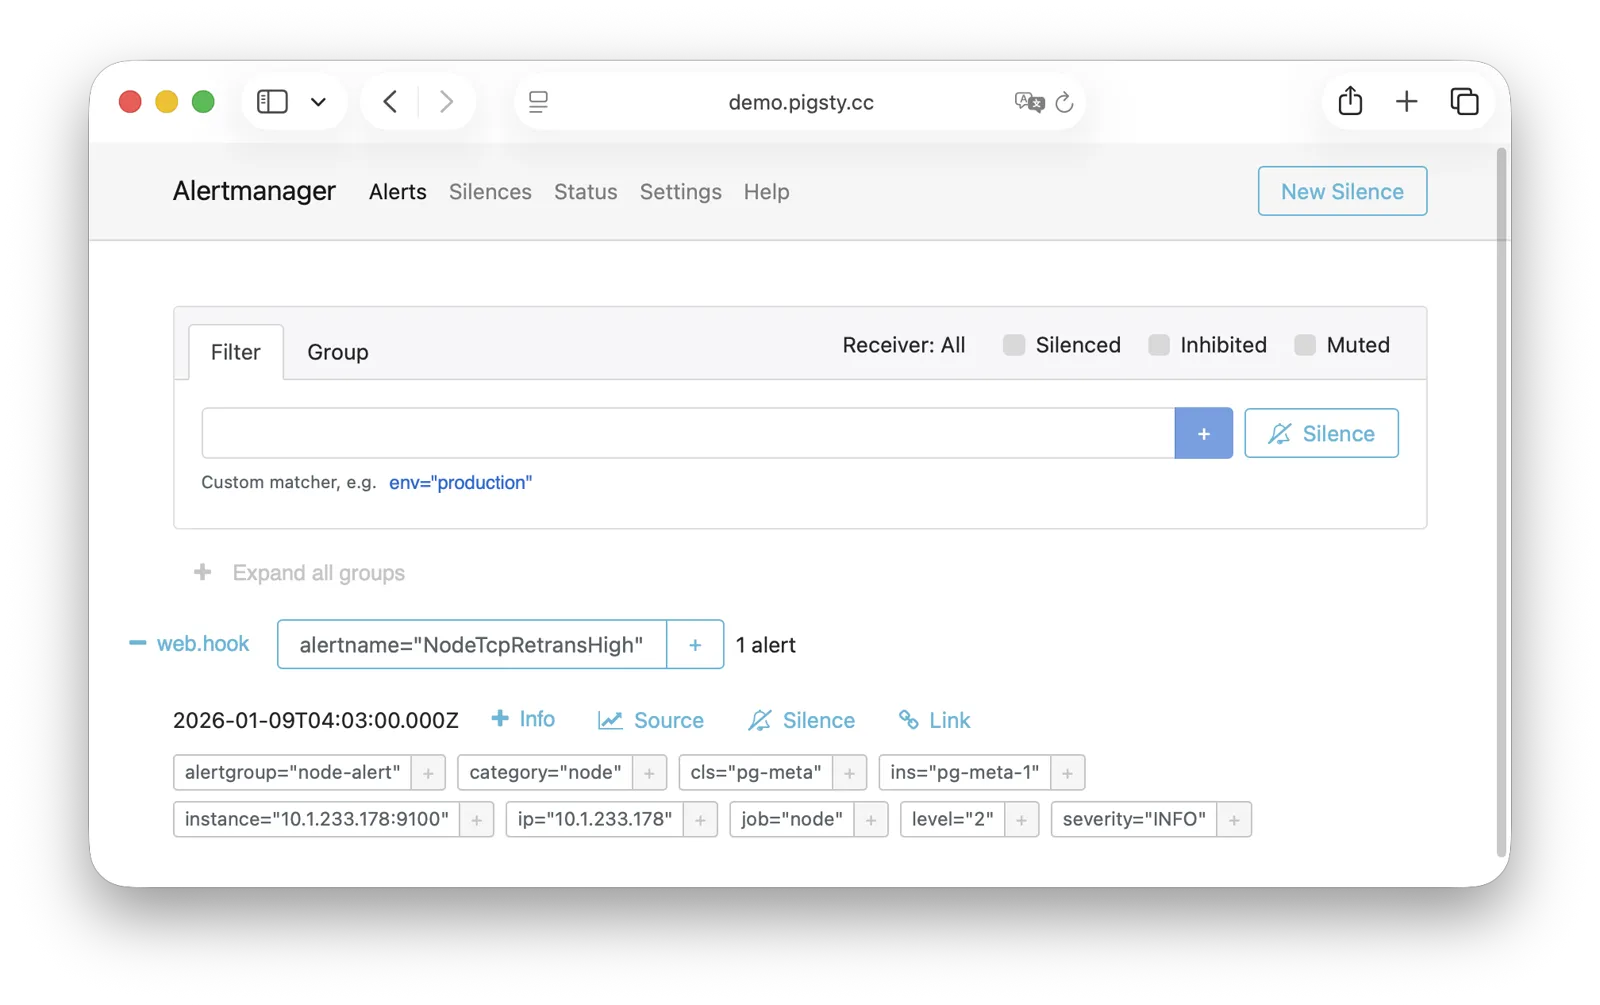
AlertManager supports multiple notification channels: email, Webhook, Slack, PagerDuty, WeChat Work, etc.
Through alert routing rules, differentiated dispatch based on severity level and module type is possible, with support for silencing, inhibition, and other advanced features.
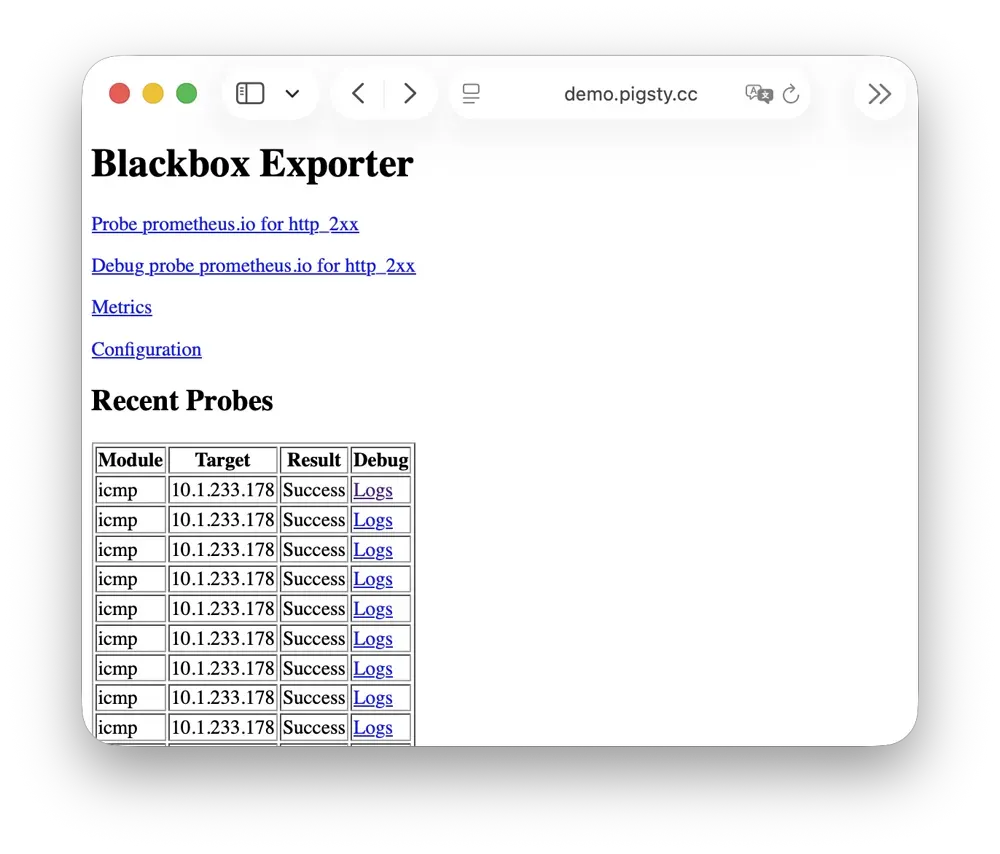
It supports multiple probe methods including ICMP Ping, TCP ports, and HTTP/HTTPS endpoints.
Useful for monitoring VIP reachability, service port availability, external dependency health, etc.—an important tool for assessing failure impact scope.
Ansible is Pigsty’s core orchestration tool; all deployment, configuration, and management operations are performed through Ansible Playbooks.
Pigsty automatically installs Ansible on the admin node (Infra node) during installation.
It adopts a declarative configuration style and idempotent playbook design: the same playbook can be run repeatedly, and the system automatically converges to the desired state without side effects.
Ansible’s core advantages:
Agentless: Executes remotely via SSH, no additional software needed on target nodes.
Declarative: Describes the desired state rather than execution steps; configuration is documentation.
Idempotent: Multiple executions produce consistent results; supports retry after partial failures.
DNSMASQ provides DNS resolution on INFRA nodes, resolving domain names to their corresponding IP addresses.
DNSMASQ listens on port 53 (UDP/TCP) by default, providing DNS resolution for all nodes. Records are stored in the /infra/hosts directory.
Other modules automatically register their domain names with DNSMASQ during deployment, which you can use as needed.
DNS is completely optional—Pigsty works normally without it.
Client nodes can configure INFRA nodes as their DNS servers, allowing access to services via domain names without remembering IP addresses.
dns_records: Default DNS records written to INFRA nodes
Chronyd provides NTP time synchronization, ensuring consistent clocks across all nodes. It listens on port 123 (UDP) by default as the time source.
Time synchronization is critical for distributed systems: log analysis requires aligned timestamps, certificate validation depends on accurate clocks, and PostgreSQL streaming replication is sensitive to clock drift.
In isolated network environments, the INFRA node can serve as an internal NTP server with other nodes synchronizing to it.
In Pigsty, all nodes run chronyd by default for time sync. The default upstream is pool.ntp.org public NTP servers.
Chronyd is essentially managed by the Node module, but in isolated networks, you can use admin_ip to point to the INFRA node’s Chronyd service as the internal time source.
In this case, the Chronyd service on the INFRA node serves as the internal time synchronization infrastructure.
In Pigsty, the relationship between nodes and infrastructure is a weak circular dependency: node_monitor → infra → node
The NODE module itself doesn’t depend on the INFRA module, but the monitoring functionality (node_monitor) requires the monitoring platform and services provided by the infrastructure module.
Therefore, in the infra.yml and deploy playbooks, an “interleaved deployment” technique is used:
First, initialize the NODE module on all regular nodes, but skip monitoring config since infrastructure isn’t deployed yet.
For example, when a node installs software, the local repo points to the Nginx local software repository at admin_ip:80/pigsty. The DNS server also points to DNSMASQ at admin_ip:53.
However, this isn’t mandatory—nodes can ignore the local repo and install directly from upstream internet sources (most single-node config templates); DNS servers can also remain unconfigured, as Pigsty has no DNS dependency.
INFRA Node vs ADMIN Node
The management-initiating ADMIN node typically coincides with the INFRA node.
In single-node deployment, this is exactly the case. In multi-node deployment with multiple INFRA nodes, the admin node is usually the first in the infra group; others serve as backups.
However, exceptions exist. You might separate them for various reasons:
For example, in large-scale production deployments, a classic pattern uses 1-2 dedicated management hosts (tiny VMs suffice) belonging to the DBA team
as the control hub, with 2-3 high-spec physical machines (or more!) as monitoring infrastructure. Here, admin nodes are separate from infrastructure nodes.
In this case, the admin_ip in your config should point to an INFRA node’s IP, not the current ADMIN node’s IP.
This is for historical reasons: initially ADMIN and INFRA nodes were tightly coupled concepts, with separation capabilities evolving later, so the parameter name wasn’t changed.
Another common scenario is managing cloud nodes locally. For example, you can install Ansible on your laptop and specify cloud nodes as “managed targets.”
In this case, your laptop acts as the ADMIN node, while cloud servers act as INFRA nodes.
all:children:infra:{hosts:{10.10.10.10:{infra_seq: 1 , ansible_host:your_ssh_alias } } } # <--- Use ansible_host to point to cloud node (fill in ssh alias)etcd:{hosts:{10.10.10.10:{etcd_seq: 1 } }, vars:{etcd_cluster: etcd } } # SSH connection will use:ssh your_ssh_aliaspg-meta:{hosts:{10.10.10.10:{pg_seq: 1, pg_role: primary } }, vars:{pg_cluster:pg-meta } }vars:version:v4.2.1admin_ip:10.10.10.10region:default
Multiple INFRA Nodes
By default, Pigsty only needs one INFRA node for most requirements. Even if the INFRA module goes down, it won’t affect database services on other nodes.
However, in production environments with high monitoring and alerting requirements, you may want multiple INFRA nodes to improve infrastructure availability.
A common deployment uses two Infra nodes for redundancy, monitoring each other…
or more nodes to deploy a distributed Victoria cluster for unlimited horizontal scaling.
Each Infra node is independent—Nginx points to services on the local machine.
VictoriaMetrics independently scrapes metrics from all services in the environment,
and logs are pushed to all VictoriaLogs collection endpoints by default.
The only exception is Grafana: every Grafana instance registers all VictoriaMetrics / Logs / Traces / PostgreSQL instances as datasources.
Therefore, each Grafana instance can see complete monitoring data.
If you modify Grafana—such as adding new dashboards or changing datasource configs—these changes only affect the Grafana instance on that node.
To keep Grafana consistent across all nodes, use a PostgreSQL database as shared storage. See Tutorial: Configure Grafana High Availability for details.
1.3 - PGSQL Arch
PostgreSQL module component interactions and data flow.
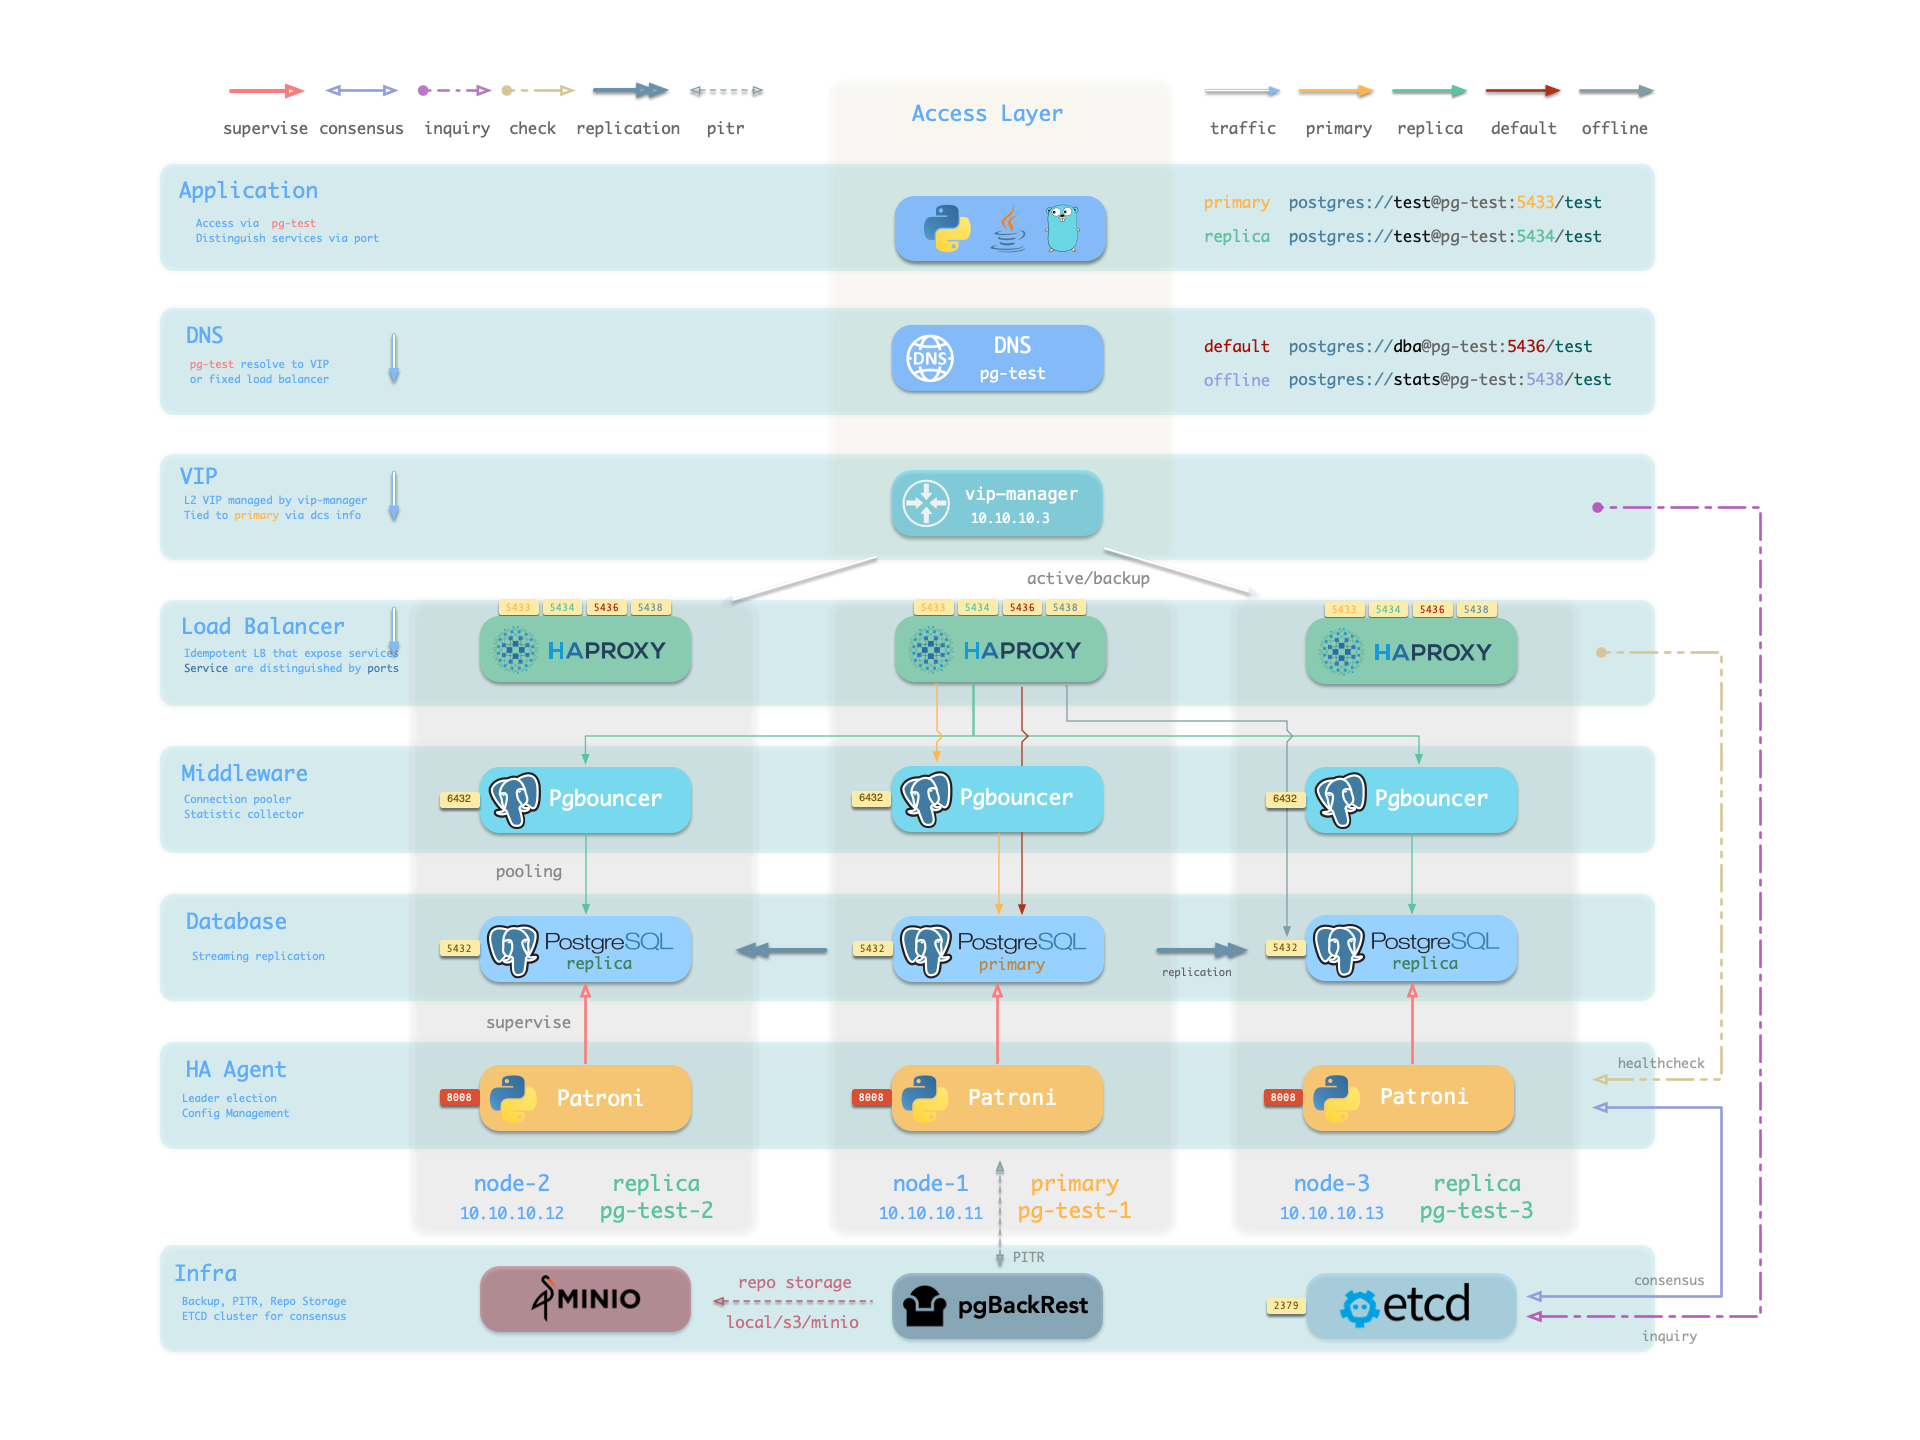
The PGSQL module organizes PostgreSQL in production as clusters—logical entities composed of a group of database instances associated by primary-replica relationships.
Overview
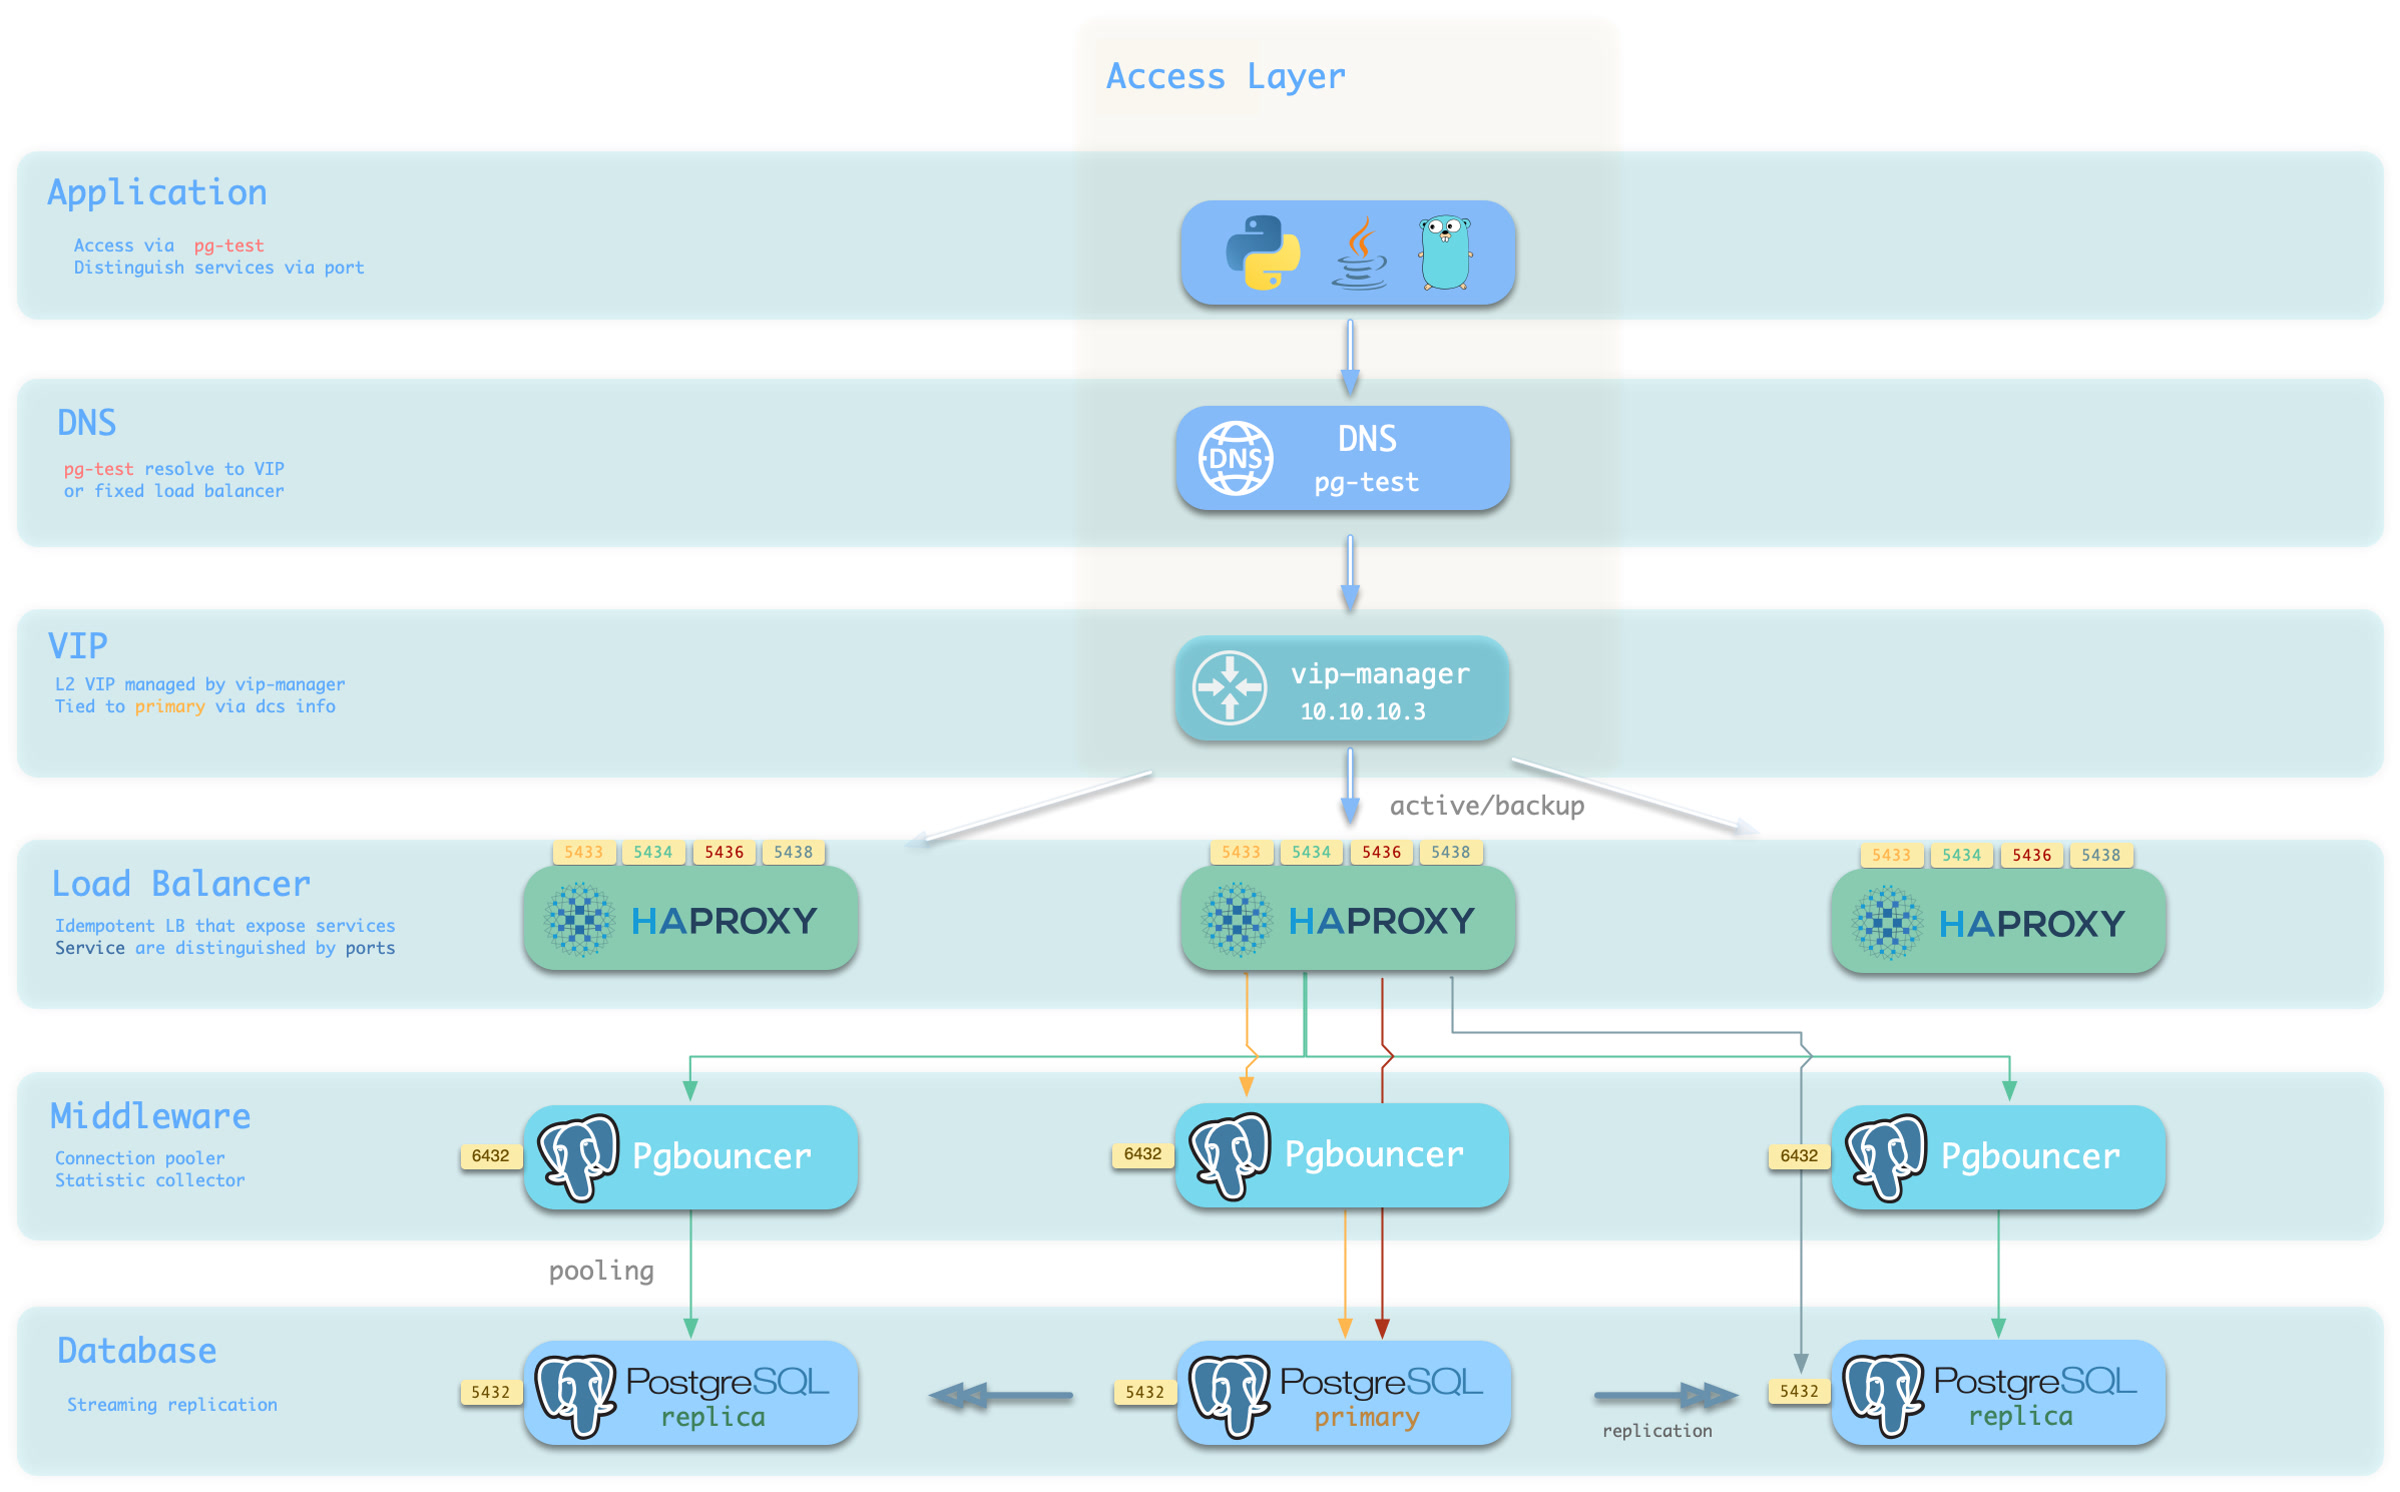
The PGSQL module includes the following components, working together to provide production-grade PostgreSQL HA cluster services:
HAProxy routes traffic based on health check info from patroni.
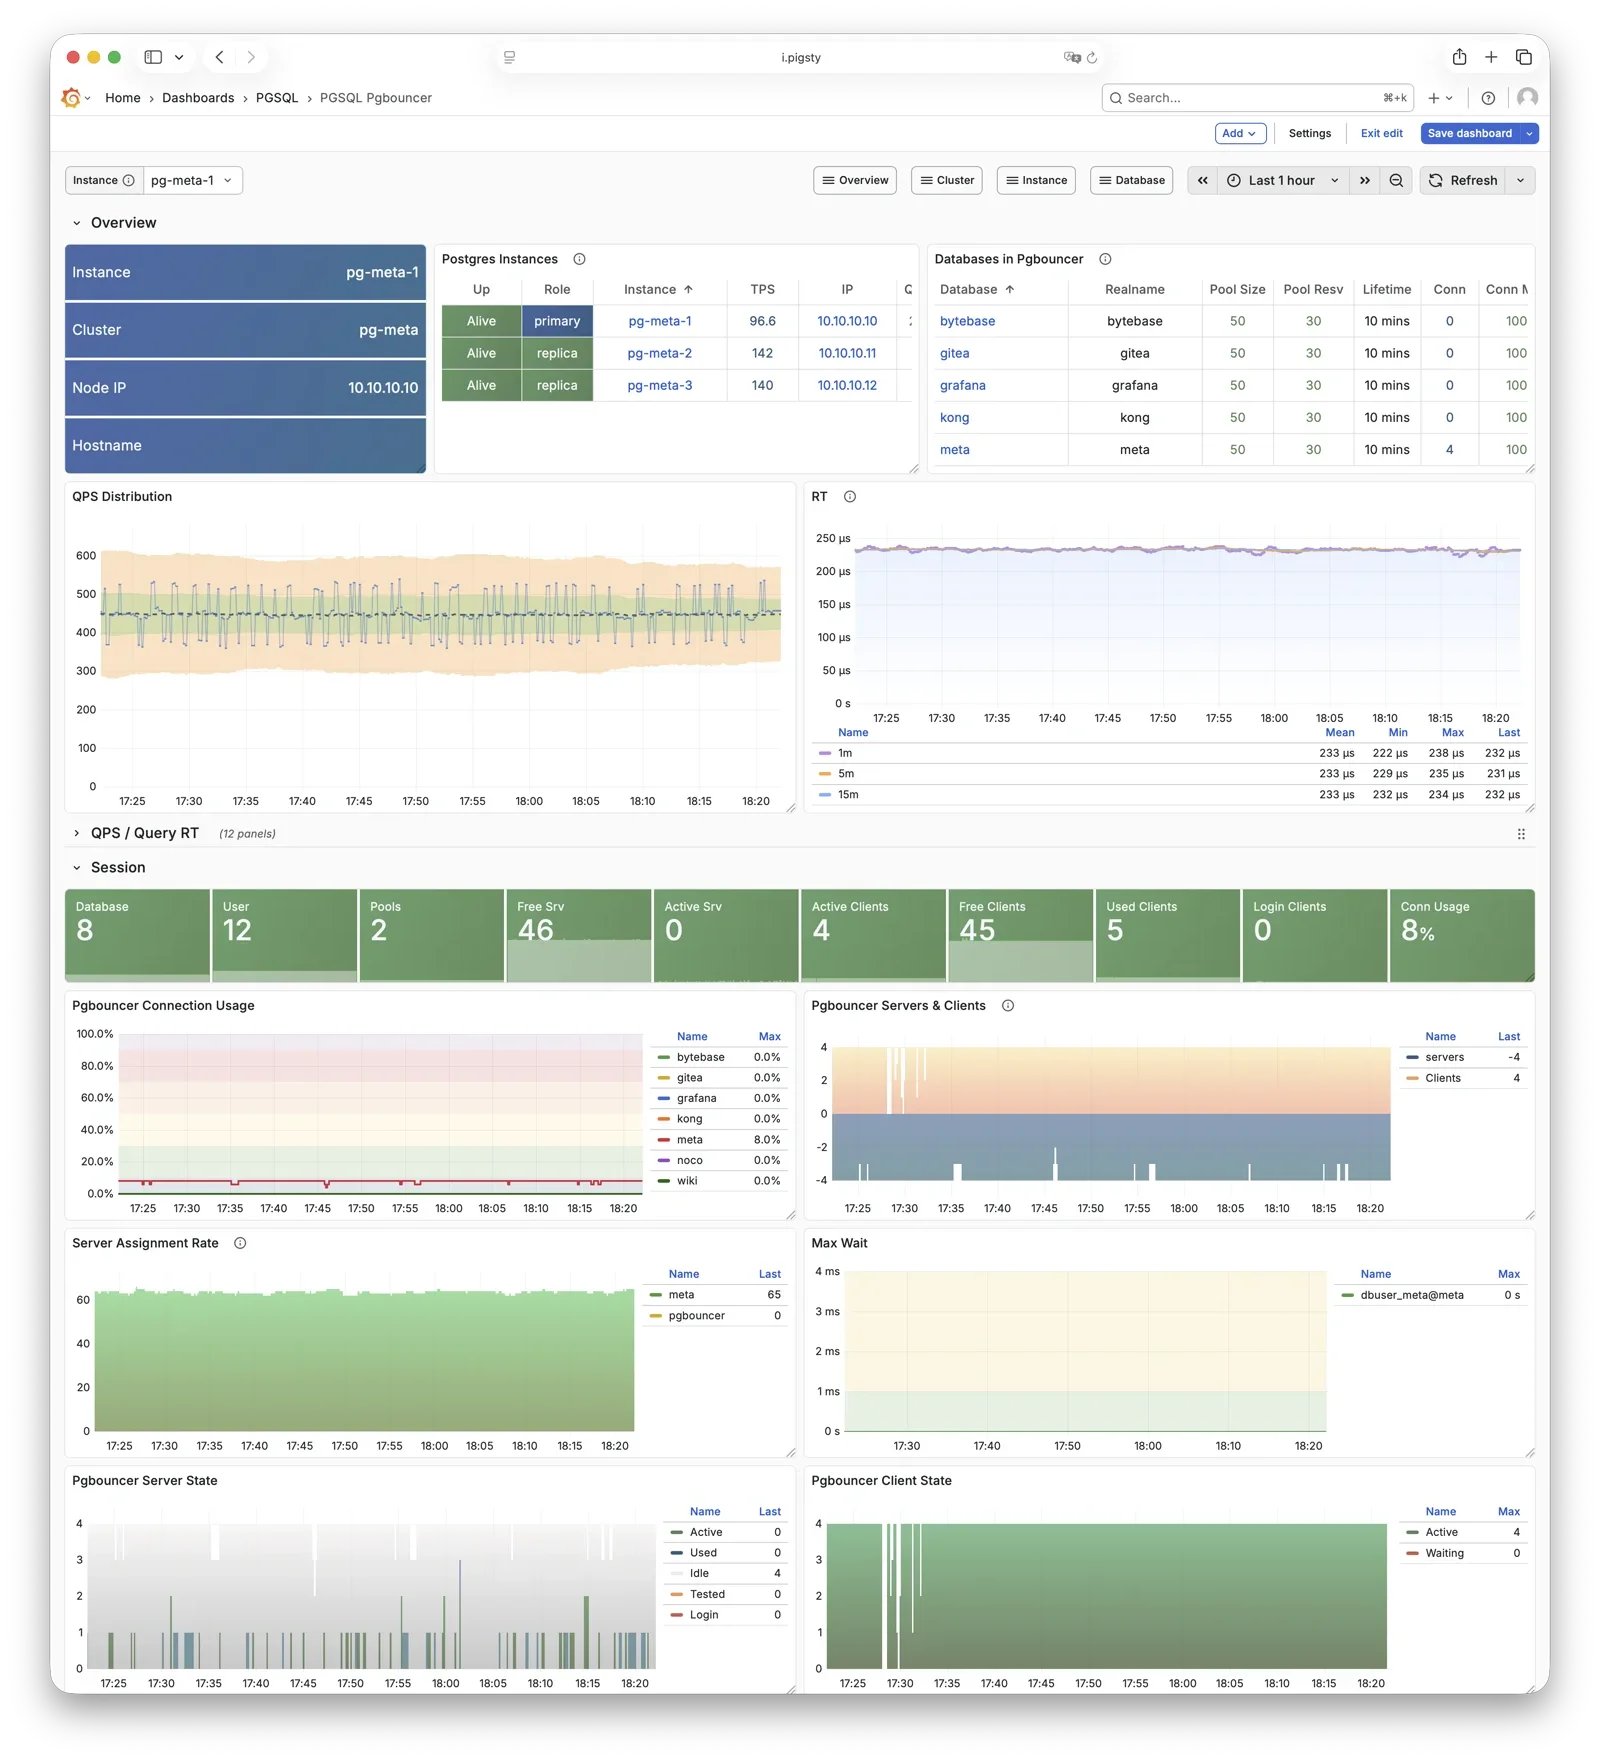
Pgbouncer is connection pooling middleware, listening on port 6432 by default, buffering connections, exposing additional metrics, and providing extra flexibility.
Pgbouncer is stateless and deployed 1:1 with Postgres via local Unix socket.
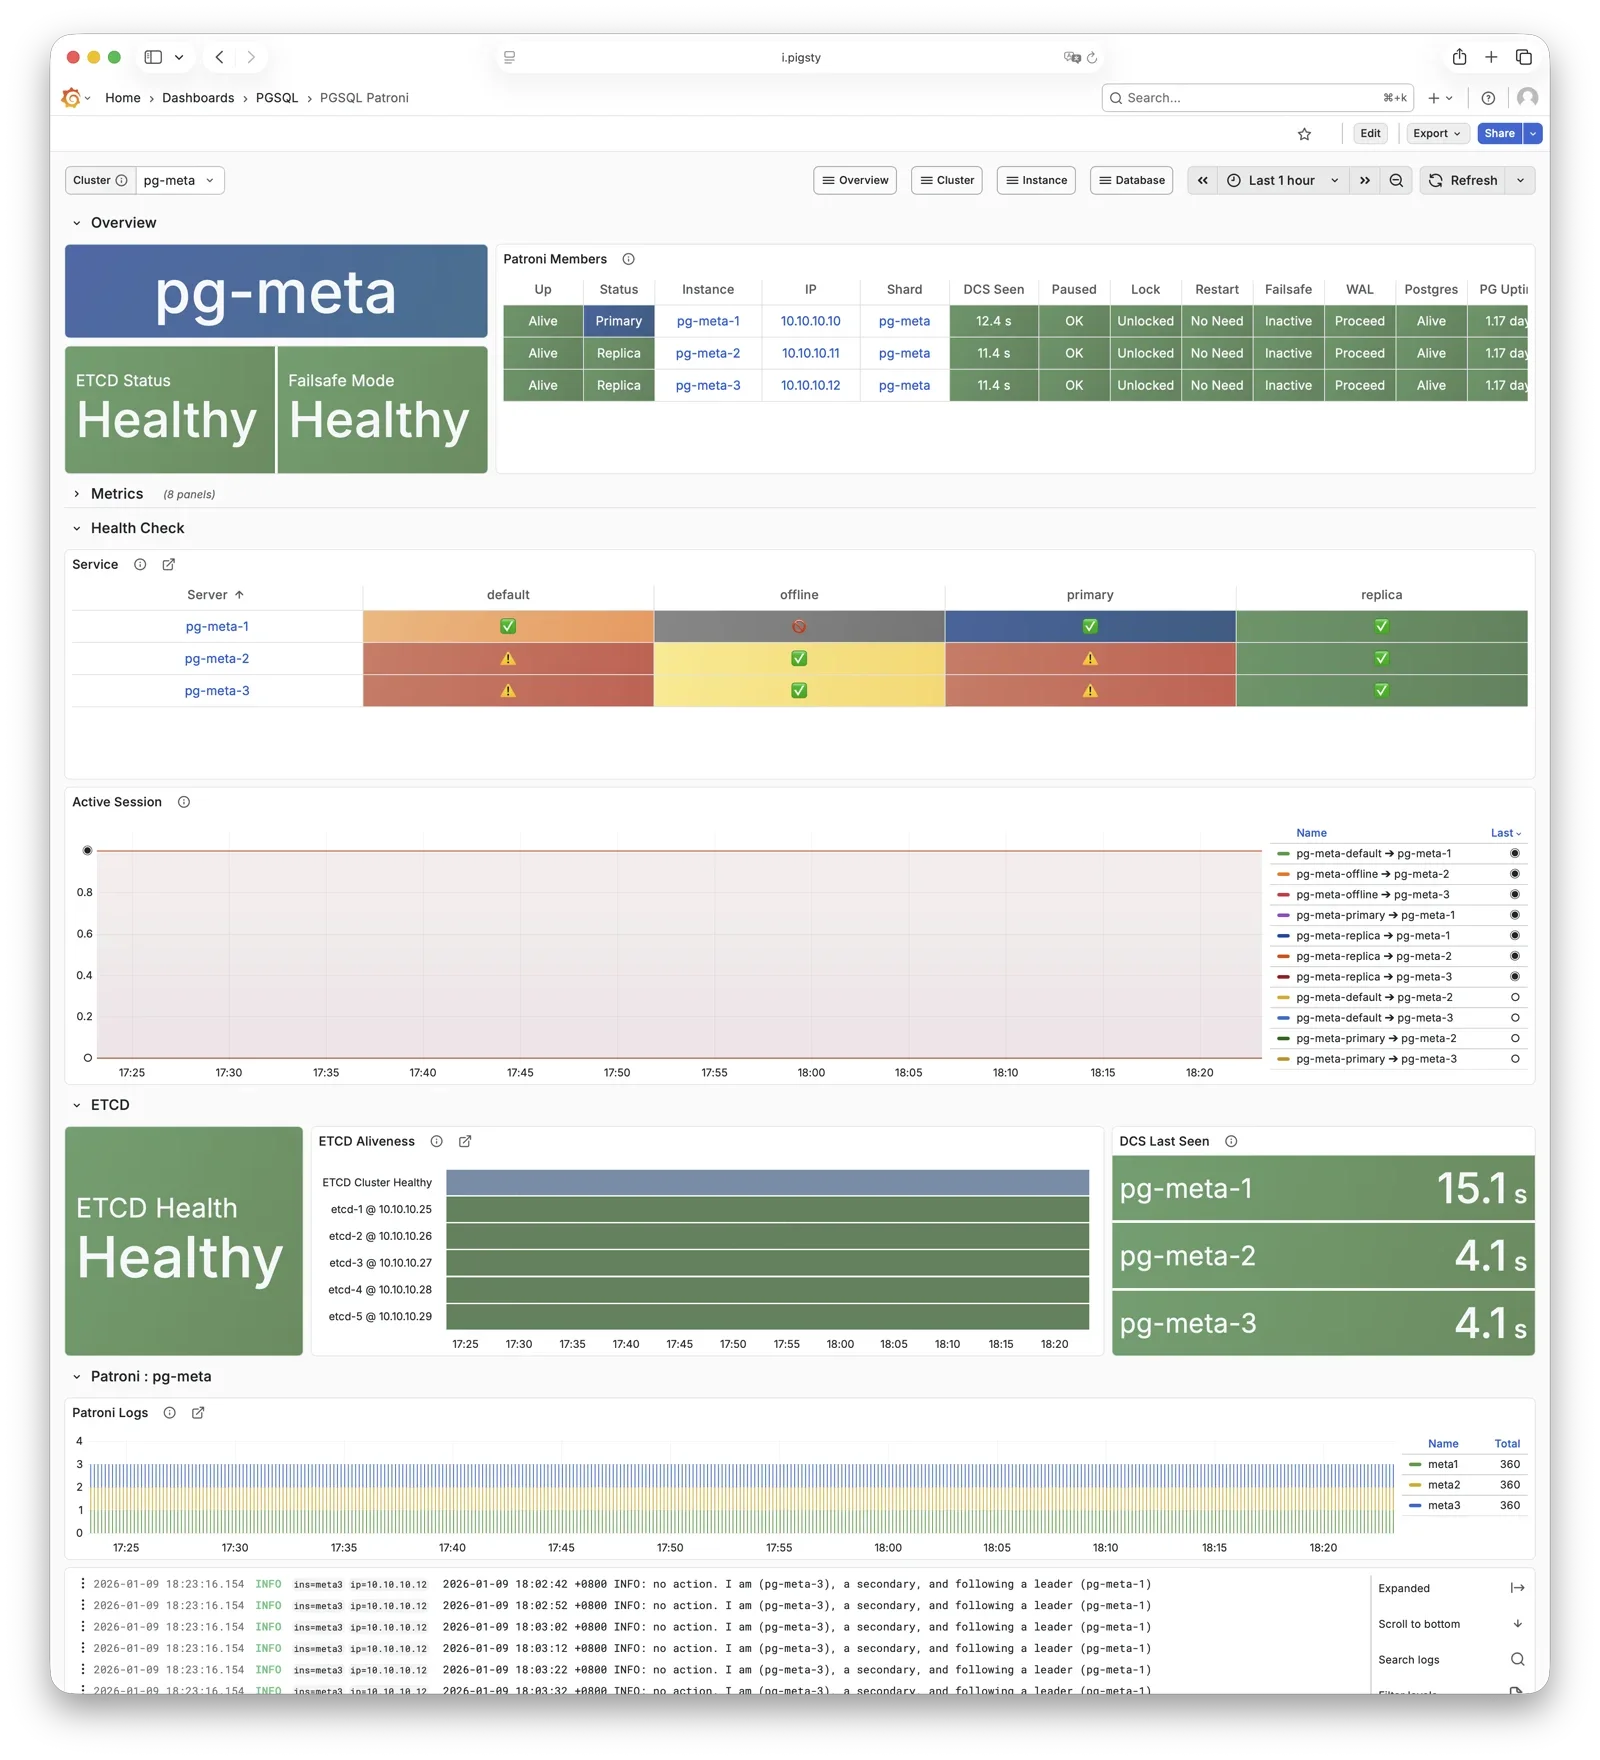
The HA subsystem consists of Patroni and etcd, responsible for PostgreSQL cluster failure detection, automatic failover, and configuration management.
How it works: Patroni runs on each node, managing the local PostgreSQL process and writing cluster state (leader, members, config) to etcd.
When the primary fails, Patroni coordinates election via etcd, promoting the healthiest replica to new primary. The entire process is automatic, with RTO typically under 45 seconds.
Key Interactions:
PostgreSQL: Starts, stops, reloads PG as parent process, controls its lifecycle
etcd: External dependency, writes/watches leader key for distributed consensus and failure detection
HAProxy: Provides health checks via REST API (:8008), reporting instance role
The backup subsystem consists of pgBackRest (optionally with MinIO as remote repository), responsible for data backup and point-in-time recovery (PITR).
Backup Types:
Full backup: Complete database copy
Incremental/differential backup: Only backs up changed data blocks
WAL archiving: Continuous transaction log archiving, enables any point-in-time recovery
Storage Backends:
local (default): Local disk, backups stored at pg_fs_bkup mount point
minio: S3-compatible object storage, supports centralized backup management and off-site DR
pg_exporter / pgbouncer_exporter connect to target services via local Unix socket, decoupled from HA topology. In slim install mode, these components can be disabled.
PostgreSQL is the PGSQL module core, listening on port 5432 by default for relational database services, deployed 1:1 with nodes.
Pigsty currently supports PostgreSQL 14-18 (lifecycle major versions), installed via binary packages from the PGDG official repo.
Pigsty also allows you to use other PG kernel forks to replace the default PostgreSQL kernel,
and install up to 451 extension plugins on top of the PG kernel.
PostgreSQL processes are managed by default by the HA agent—Patroni.
When a cluster has only one node, that instance is the primary; when the cluster has multiple nodes, other instances automatically join as replicas:
through physical replication, syncing data changes from the primary in real-time. Replicas can handle read-only requests and automatically take over when the primary fails.
You can access PostgreSQL directly, or through HAProxy and Pgbouncer connection pool.
Patroni is the PostgreSQL HA control component, listening on port 8008 by default.
Patroni takes over PostgreSQL startup, shutdown, configuration, and health status, writing leader and member information to etcd.
It handles automatic failover, maintains replication factor, coordinates parameter changes, and provides a REST API for HAProxy, monitoring, and administrators.
HAProxy uses Patroni health check endpoints to determine instance roles and route traffic to the correct primary or replica.
vip-manager monitors the leader key in etcd and automatically migrates the VIP when the primary changes.
Pgbouncer is a lightweight connection pooling middleware, listening on port 6432 by default, deployed 1:1 with PostgreSQL database and node.
Pgbouncer runs statelessly on each instance, connecting to PostgreSQL via local Unix socket, using Transaction Pooling by default
for pool management, absorbing burst client connections, stabilizing database sessions, reducing lock contention, and significantly improving performance under high concurrency.
Pigsty routes production traffic (read-write service 5433 / read-only service 5434) through Pgbouncer by default,
while only the default service (5436) and offline service (5438) bypass the pool for direct PostgreSQL connections.
Pool mode is controlled by pgbouncer_poolmode, defaulting to transaction (transaction-level pooling).
Connection pooling can be disabled via pgbouncer_enabled.
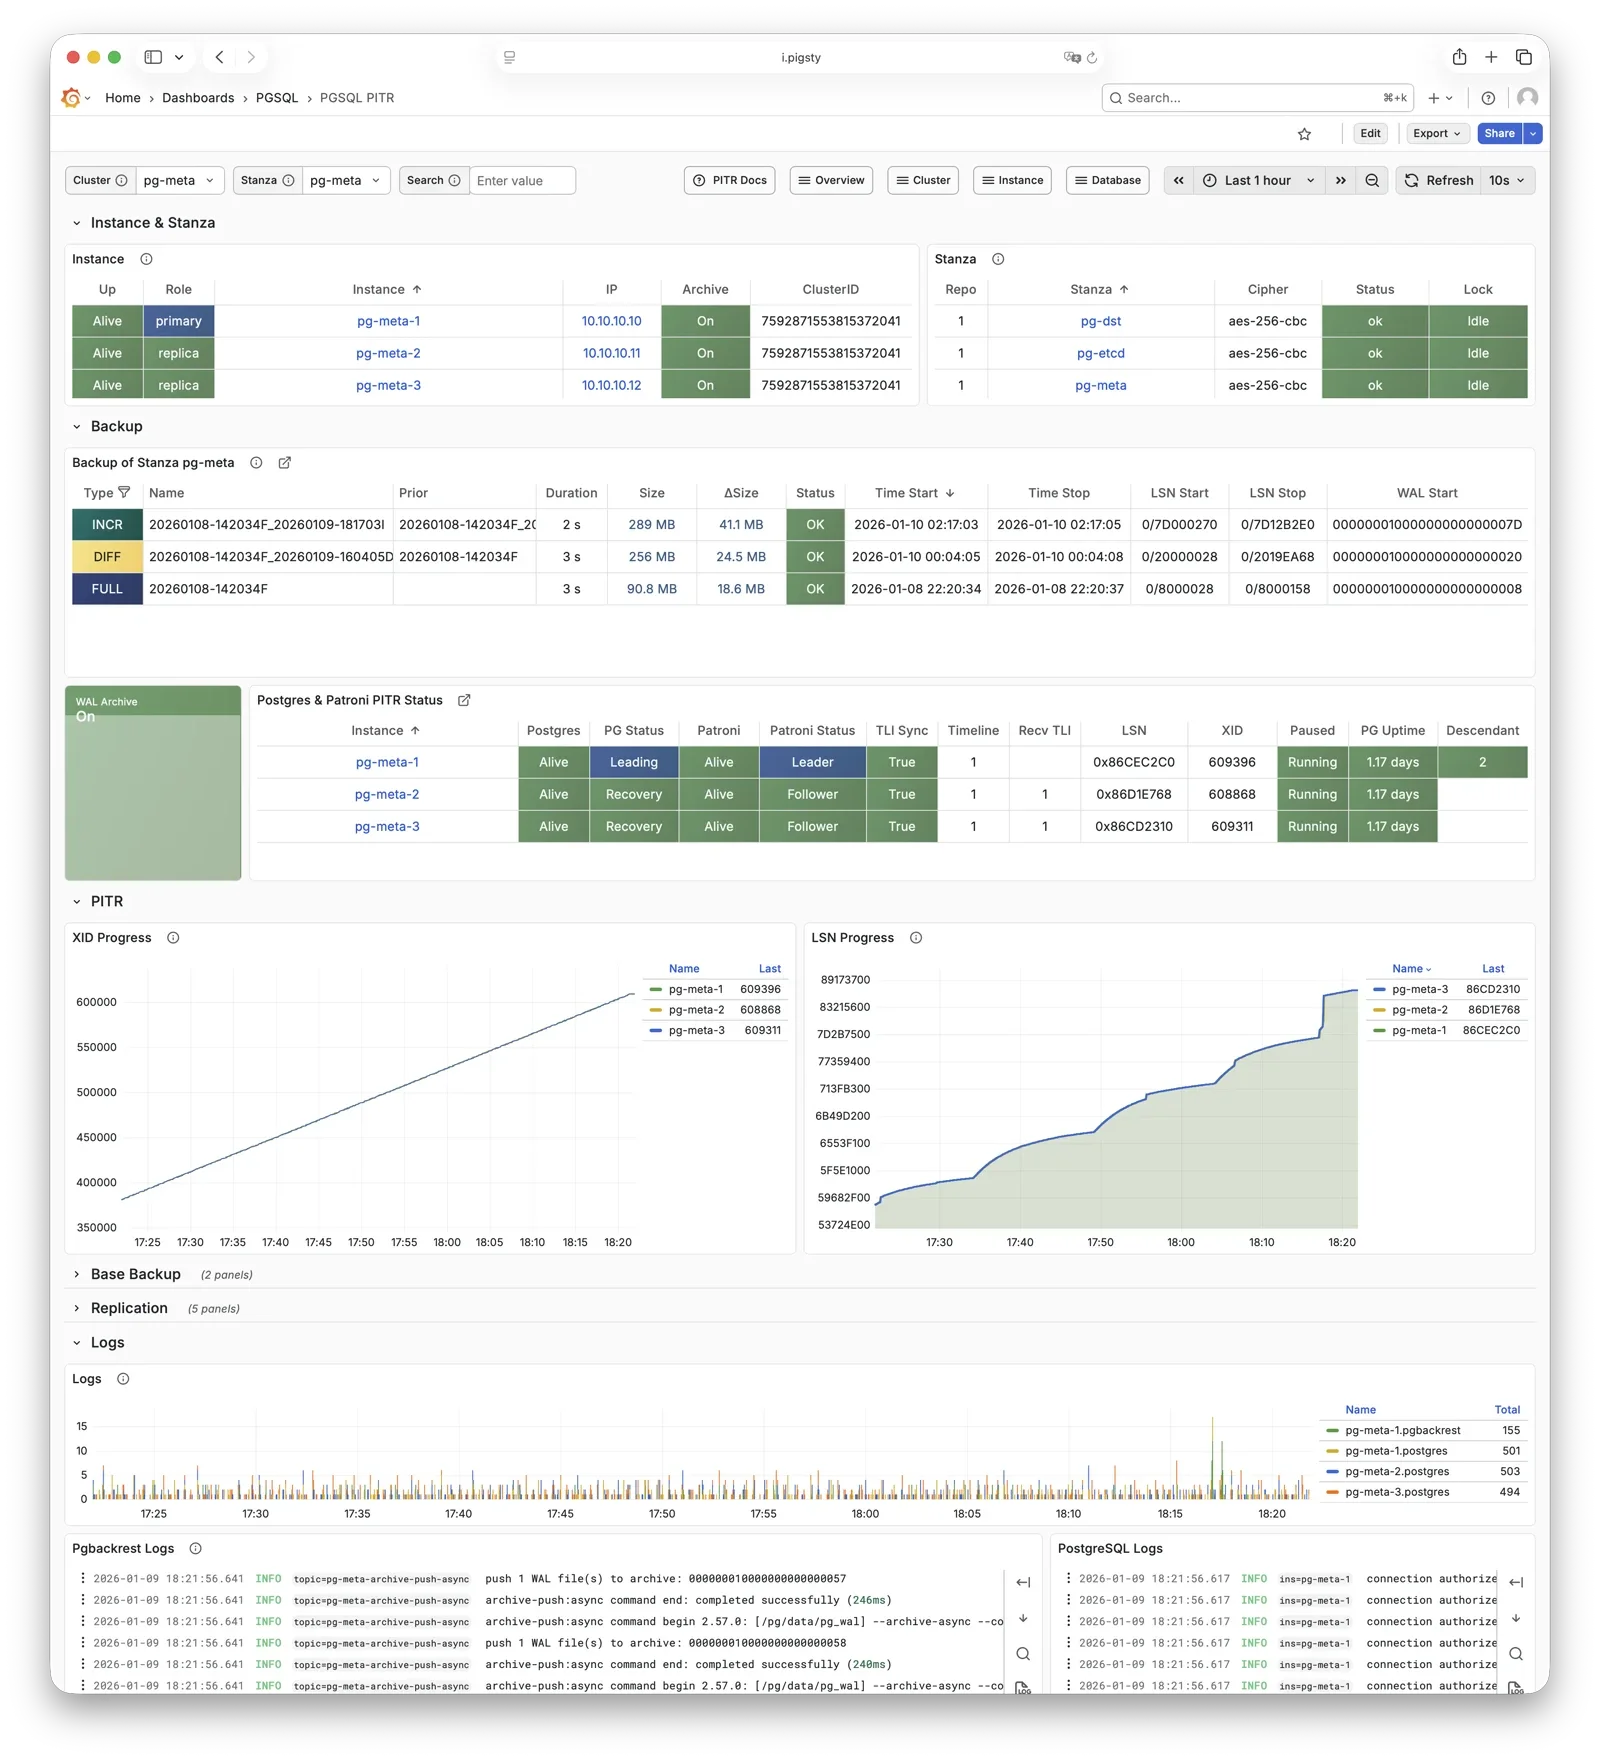
pgBackRest is a professional PostgreSQL backup/recovery tool, one of the strongest in the PG ecosystem, supporting full/incremental/differential backup and WAL archiving.
Pigsty uses pgBackRest for PostgreSQL PITR capability,
allowing you to roll back clusters to any point within the backup retention window.
pgBackRest works with PostgreSQL to create backup repositories on the primary, executing backup and archive tasks.
By default, it uses local backup repository (pgbackrest_method = local),
but can be configured for MinIO or other object storage for centralized backup management.
After initialization, pgbackrest_init_backup can automatically trigger the first full backup.
Recovery integrates with Patroni, supporting bootstrapping replicas as new primaries or standbys.
Offline service, direct to offline replica (ETL/analytics)
HAProxy uses Patroni REST API health checks to determine instance roles and route traffic to the appropriate primary or replica.
Service definitions are composed from pg_default_services and pg_services.
A dedicated HAProxy node group can be specified via pg_service_provider to handle higher traffic;
by default, HAProxy on local nodes publishes services.
vip-manager binds L2 VIP to the current primary node. This is an optional component; enable it if your network supports L2 VIP.
vip-manager runs on each PG node, monitoring the leader key written by Patroni in etcd,
and binds pg_vip_address to the current primary node’s network interface.
When cluster failover occurs, vip-manager immediately releases the VIP from the old primary and rebinds it on the new primary, switching traffic to the new primary.
This component is optional, enabled via pg_vip_enabled.
When enabled, ensure all nodes are in the same VLAN; otherwise, VIP migration will fail.
Public cloud networks typically don’t support L2 VIP; it’s recommended only for on-premises and private cloud environments.
pg_exporter exports PostgreSQL monitoring metrics, listening on port 9630 by default.
pg_exporter runs on each PG node, connecting to PostgreSQL via local Unix socket,
exporting rich metrics covering sessions, buffer hits, replication lag, transaction rates, etc., scraped by VictoriaMetrics on INFRA nodes.
pgbouncer_exporter exports Pgbouncer connection pool metrics, listening on port 9631 by default.
pgbouncer_exporter uses the same pg_exporter binary but with a dedicated metrics config file, supporting pgbouncer 1.8-1.25+.
pgbouncer_exporter reads Pgbouncer statistics views, providing pool utilization, wait queue, and hit rate metrics.
If Pgbouncer is disabled, this component is also disabled. In slim install, this component is not enabled.
pgbackrest_exporter exports backup status metrics, listening on port 9854 by default.
pgbackrest_exporter parses pgBackRest status, generating metrics for most recent backup time, size, type, etc. Combined with alerting policies, it quickly detects expired or failed backups, ensuring data safety.
Note that when there are many backups or using large network repositories, collection overhead can be significant, so pgbackrest_exporter has a default 2-minute collection interval.
In the worst case, you may see the latest backup status in the monitoring system 2 minutes after a backup completes.
etcd is a distributed consistent store (DCS), providing cluster metadata storage and leader election capability for Patroni.
etcd is deployed and managed by the independent ETCD module, not part of the PGSQL module itself, but critical for PostgreSQL HA.
Patroni writes cluster state, leader info, and config parameters to etcd; all nodes reach consensus through etcd.
vip-manager also reads the leader key from etcd to enable automatic VIP migration.
Vector is a high-performance log collection component, deployed by the NODE module, responsible for collecting PostgreSQL-related logs.
Vector runs on nodes, tracking PostgreSQL, Pgbouncer, Patroni, and pgBackRest log directories,
sending structured logs to VictoriaLogs on INFRA nodes for centralized storage and querying.
How Pigsty abstracts different functionality into modules, and the E-R diagrams for these modules.
The largest entity concept in Pigsty is a Deployment. The main entities and relationships (E-R diagram) in a deployment are shown below:
A deployment can also be understood as an Environment. For example, Production (Prod), User Acceptance Testing (UAT), Staging, Testing, Development (Devbox), etc.
Each environment corresponds to a Pigsty inventory that describes all entities and attributes in that environment.
Typically, an environment includes shared infrastructure (INFRA), which broadly includes ETCD (HA DCS) and MINIO (centralized backup repository),
serving multiple PostgreSQL database clusters (and other database module components). (Exception: there are also deployments without infrastructure)
In Pigsty, almost all database modules are organized as “Clusters”. Each cluster is an Ansible group containing several node resources.
For example, PostgreSQL HA database clusters, Redis, Etcd/MinIO all exist as clusters. An environment can contain multiple clusters.
Entity-Relationship model for INFRA infrastructure nodes in Pigsty, component composition, and naming conventions.
The INFRA module plays a special role in Pigsty: it’s not a traditional “cluster” but rather a management hub composed of a group of infrastructure nodes, providing core services for the entire Pigsty deployment.
Each INFRA node is an autonomous infrastructure service unit running core components like Nginx, Grafana, and VictoriaMetrics, collectively providing observability and management capabilities for managed database clusters.
There are two core entities in Pigsty’s INFRA module:
Node: A server running infrastructure components—can be bare metal, VM, container, or Pod.
Component: Various infrastructure services running on nodes, such as Nginx, Grafana, VictoriaMetrics, etc.
INFRA nodes typically serve as Admin Nodes, the control plane of Pigsty.
Component Composition
Each INFRA node runs the following core components:
Natural number, starting from 1, unique within group
With node sequence assigned at node level, Pigsty automatically generates unique identifiers for each entity based on rules:
Entity
Generation Rule
Example
Node
infra-{{ infra_seq }}
infra-1, infra-2
The INFRA module assigns infra-N format identifiers to nodes for distinguishing multiple infrastructure nodes in the monitoring system.
However, this doesn’t change the node’s hostname or system identity; nodes still use their existing hostname or IP address for identification.
Service Portal
INFRA nodes provide unified web service entry through Nginx. The infra_portal parameter defines services exposed through Nginx.
The default configuration only defines the home server:
infra_portal:home :{domain:i.pigsty }
Pigsty automatically configures reverse proxy endpoints for enabled components (Grafana, VictoriaMetrics, AlertManager, etc.). If you need to access these services via separate domains, you can explicitly add configurations:
Accessing Pigsty services via domain names is recommended over direct IP + port.
Deployment Scale
The number of INFRA nodes depends on deployment scale and HA requirements:
Scale
INFRA Nodes
Description
Dev/Test
1
Single-node deployment, all on one node
Small Prod
1-2
Single or dual node, can share with other services
Medium Prod
2-3
Dedicated INFRA nodes, redundant components
Large Prod
3+
Multiple INFRA nodes, component separation
In singleton deployment, INFRA components share the same node with PGSQL, ETCD, etc.
In small-scale deployments, INFRA nodes typically also serve as “Admin Node” / backup admin node and local software repository (/www/pigsty).
In larger deployments, these responsibilities can be separated to dedicated nodes.
Monitoring Label System
Pigsty’s monitoring system collects metrics from INFRA components themselves. Unlike database modules, each component in the INFRA module is treated as an independent monitoring object, distinguished by the cls (class) label.
Label
Description
Example
cls
Component type, each forming a “class”
nginx
ins
Instance name, format {component}-{infra_seq}
nginx-1
ip
INFRA node IP running the component
10.10.10.10
job
VictoriaMetrics scrape job, fixed as infra
infra
Using a two-node INFRA deployment (infra_seq: 1 and infra_seq: 2) as example, component monitoring labels are:
Component
cls
ins Example
Port
Nginx
nginx
nginx-1, nginx-2
9113
Grafana
grafana
grafana-1, grafana-2
3000
VictoriaMetrics
vmetrics
vmetrics-1, vmetrics-2
8428
VictoriaLogs
vlogs
vlogs-1, vlogs-2
9428
VictoriaTraces
vtraces
vtraces-1, vtraces-2
10428
VMAlert
vmalert
vmalert-1, vmalert-2
8880
Alertmanager
alertmanager
alertmanager-1, alertmanager-2
9059
Blackbox
blackbox
blackbox-1, blackbox-2
9115
All INFRA component metrics use a unified job="infra" label, distinguished by the cls label:
Entity-Relationship model for PostgreSQL clusters in Pigsty, including E-R diagram, entity definitions, and naming conventions.
The PGSQL module organizes PostgreSQL in production as clusters—logical entities composed of a group of database instances associated by primary-replica relationships.
Each cluster is an autonomous business unit consisting of at least one primary instance, exposing capabilities through services.
There are four core entities in Pigsty’s PGSQL module:
Cluster: An autonomous PostgreSQL business unit serving as the top-level namespace for other entities.
Service: A named abstraction that exposes capabilities, routes traffic, and exposes services using node ports.
Instance: A single PostgreSQL server consisting of running processes and database files on a single node.
Node: A hardware resource abstraction running Linux + Systemd environment—can be bare metal, VM, container, or Pod.
Along with two business entities—“Database” and “Role”—these form the complete logical view as shown below:
Examples
Let’s look at two concrete examples. Using the four-node Pigsty sandbox, there’s a three-node pg-test cluster:
With cluster name defined at cluster level and instance number/role assigned at instance level, Pigsty automatically generates unique identifiers for each entity based on rules:
Entity
Generation Rule
Example
Instance
{{ pg_cluster }}-{{ pg_seq }}
pg-test-1, pg-test-2, pg-test-3
Service
{{ pg_cluster }}-{{ pg_role }}
pg-test-primary, pg-test-replica, pg-test-offline
Node
Explicitly specified or borrowed from PG
pg-test-1, pg-test-2, pg-test-3
Because Pigsty adopts a 1:1 exclusive deployment model for nodes and PG instances, by default the host node identifier borrows from the PG instance identifier (node_id_from_pg).
You can also explicitly specify nodename to override, or disable nodename_overwrite to use the current default.
Sharding Identity Parameters
When using multiple PostgreSQL clusters (sharding) to serve the same business, two additional identity parameters are used: pg_shard and pg_group.
In this case, this group of PostgreSQL clusters shares the same pg_shard name with their own pg_group numbers, like this Citus cluster:
In this case, pg_cluster cluster names are typically composed of: {{ pg_shard }}{{ pg_group }}, e.g., pg-citus0, pg-citus1, etc.
Pigsty provides dedicated monitoring dashboards for horizontal sharding clusters, making it easy to compare performance and load across shards, but this requires using the above entity naming convention.
There are also other identity parameters for special scenarios, such as pg_upstream for specifying backup clusters/cascading replication upstream, gp_role for Greenplum cluster identity,
pg_exporters for external monitoring instances, pg_offline_query for offline query instances, etc. See PG_ID parameter docs.
Monitoring Label System
Pigsty provides an out-of-box monitoring system that uses the above identity parameters to identify various PostgreSQL entities.
For example, the cls, ins, ip labels correspond to cluster name, instance name, and node IP—the identifiers for these three core entities.
They appear along with the job label in all native monitoring metrics collected by VictoriaMetrics and VictoriaLogs log streams.
The job name for collecting PostgreSQL metrics is fixed as pgsql;
The job name for monitoring remote PG instances is fixed as pgrds.
The job name for collecting PostgreSQL CSV logs is fixed as postgres;
The job name for collecting pgbackrest logs is fixed as pgbackrest, other PG components collect logs via job: syslog.
Additionally, some entity identity labels appear in specific entity-related monitoring metrics, such as:
datname: Database name, if a metric belongs to a specific database.
relname: Table name, if a metric belongs to a specific table.
idxname: Index name, if a metric belongs to a specific index.
funcname: Function name, if a metric belongs to a specific function.
seqname: Sequence name, if a metric belongs to a specific sequence.
query: Query fingerprint, if a metric belongs to a specific query.
2.3 - E-R Model of Etcd Cluster
Entity-Relationship model for ETCD clusters in Pigsty, including E-R diagram, entity definitions, and naming conventions.
The ETCD module organizes ETCD in production as clusters—logical entities composed of a group of ETCD instances associated through the Raft consensus protocol.
Each cluster is an autonomous distributed key-value storage unit consisting of at least one ETCD instance, exposing service capabilities through client ports.
There are three core entities in Pigsty’s ETCD module:
Cluster: An autonomous ETCD service unit serving as the top-level namespace for other entities.
Instance: A single ETCD server process running on a node, participating in Raft consensus.
Node: A hardware resource abstraction running Linux + Systemd environment, implicitly declared.
Compared to PostgreSQL clusters, the ETCD cluster model is simpler, without Services or complex Role distinctions.
All ETCD instances are functionally equivalent, electing a Leader through the Raft protocol while others become Followers.
During scale-out intermediate states, non-voting Learner instance members are also allowed.
Examples
Let’s look at a concrete example with a three-node ETCD cluster:
Natural number, starting from 1, unique within cluster
With cluster name defined at cluster level and instance number assigned at instance level, Pigsty automatically generates unique identifiers for each entity based on rules:
Entity
Generation Rule
Example
Instance
{{ etcd_cluster }}-{{ etcd_seq }}
etcd-1, etcd-2, etcd-3
The ETCD module does not assign additional identity to host nodes; nodes are identified by their existing hostname or IP address.
Ports & Protocols
Each ETCD instance listens on the following two ports:
ETCD clusters enable TLS encrypted communication by default and use RBAC authentication mechanism. Clients need correct certificates and passwords to access ETCD services.
Cluster Size
As a distributed coordination service, ETCD cluster size directly affects availability, requiring more than half (quorum) of nodes to be alive to maintain service.
Cluster Size
Quorum
Fault Tolerance
Use Case
1 node
1
0
Dev, test, demo
3 nodes
2
1
Small-medium production
5 nodes
3
2
Large-scale production
Therefore, even-numbered ETCD clusters are meaningless, and clusters over five nodes are uncommon. Typical sizes are single-node, three-node, and five-node.
Monitoring Label System
Pigsty provides an out-of-box monitoring system that uses the above identity parameters to identify various ETCD entities.
For example, the cls, ins, ip labels correspond to cluster name, instance name, and node IP—the identifiers for these three core entities.
They appear along with the job label in all ETCD monitoring metrics collected by VictoriaMetrics.
The job name for collecting ETCD metrics is fixed as etcd.
2.4 - E-R Model of MinIO Cluster
Entity-Relationship model for MinIO clusters in Pigsty, including E-R diagram, entity definitions, and naming conventions.
The MinIO module organizes MinIO in production as clusters—logical entities composed of a group of distributed MinIO instances, collectively providing highly available object storage services.
Each cluster is an autonomous S3-compatible object storage unit consisting of at least one MinIO instance, exposing service capabilities through the S3 API port.
There are three core entities in Pigsty’s MinIO module:
Cluster: An autonomous MinIO service unit serving as the top-level namespace for other entities.
Instance: A single MinIO server process running on a node, managing local disk storage.
Node: A hardware resource abstraction running Linux + Systemd environment, implicitly declared.
Additionally, MinIO has the concept of Storage Pool, used for smooth cluster scaling.
A cluster can contain multiple storage pools, each composed of a group of nodes and disks.
Deployment Modes
MinIO supports three main deployment modes for different scenarios:
SNSD mode can use any directory as storage for quick experimentation; SNMD and MNMD modes require real disk mount points, otherwise startup is refused.
Examples
Let’s look at a concrete multi-node multi-drive example with a four-node MinIO cluster:
Natural number, starting from 1, unique within cluster
With cluster name defined at cluster level and instance number assigned at instance level, Pigsty automatically generates unique identifiers for each entity based on rules:
Entity
Generation Rule
Example
Instance
{{ minio_cluster }}-{{ minio_seq }}
minio-1, minio-2, minio-3, minio-4
The MinIO module does not assign additional identity to host nodes; nodes are identified by their existing hostname or IP address.
The minio_node parameter generates node names for MinIO cluster internal use (written to /etc/hosts for cluster discovery), not host node identity.
Core Configuration Parameters
Beyond identity parameters, the following parameters are critical for MinIO cluster configuration:
For example, the cls, ins, ip labels correspond to cluster name, instance name, and node IP—the identifiers for these three core entities.
They appear along with the job label in all MinIO monitoring metrics collected by VictoriaMetrics.
The job name for collecting MinIO metrics is fixed as minio.
2.5 - E-R Model of Redis Cluster
Entity-Relationship model for Redis clusters in Pigsty, including E-R diagram, entity definitions, and naming conventions.
The Redis module organizes Redis in production as clusters—logical entities composed of a group of Redis instances deployed on one or more nodes.
Each cluster is an autonomous high-performance cache/storage unit consisting of at least one Redis instance, exposing service capabilities through ports.
There are three core entities in Pigsty’s Redis module:
Cluster: An autonomous Redis service unit serving as the top-level namespace for other entities.
Instance: A single Redis server process running on a specific port on a node.
Node: A hardware resource abstraction running Linux + Systemd environment, can host multiple Redis instances, implicitly declared.
Unlike PostgreSQL, Redis uses a single-node multi-instance deployment model: one physical/virtual machine node typically deploys multiple Redis instances
to fully utilize multi-core CPUs. Therefore, nodes and instances have a 1:N relationship. Additionally, production typically advises against Redis instances with memory > 12GB.
Operating Modes
Redis has three different operating modes, specified by the redis_mode parameter:
Three sentinel instances on a single node for monitoring standalone clusters. Sentinel clusters specify monitored standalone clusters via redis_sentinel_monitor:
JSON object, key is port, value is instance config
With cluster name defined at cluster level and node number/instance definition assigned at node level, Pigsty automatically generates unique identifiers for each entity:
Entity
Generation Rule
Example
Instance
{{ redis_cluster }}-{{ redis_node }}-{{ port }}
redis-ms-1-6379, redis-ms-1-6380
The Redis module does not assign additional identity to host nodes; nodes are identified by their existing hostname or IP address.
redis_node is used for instance naming, not host node identity.
Instance Definition
redis_instances is a JSON object with port number as key and instance config as value:
redis_instances:6379:{}# Primary instance, no extra config6380:{replica_of:'10.10.10.10 6379'}# Replica, specify upstream primary6381:{replica_of:'10.10.10.10 6379'}# Replica, specify upstream primary
Each Redis instance listens on a unique port within the node. You can choose any port number,
but avoid system reserved ports (< 1024) or conflicts with Pigsty used ports.
The replica_of parameter sets replication relationship in standalone mode, format '<ip> <port>', specifying upstream primary address and port.
Additionally, each Redis node runs a Redis Exporter collecting metrics from all local instances:
For example, the cls, ins, ip labels correspond to cluster name, instance name, and node IP—the identifiers for these three core entities.
They appear along with the job label in all Redis monitoring metrics collected by VictoriaMetrics.
The job name for collecting Redis metrics is fixed as redis.
3 - Infra as Code
Pigsty uses Infrastructure as Code (IaC) philosophy to manage all components, providing declarative management for large-scale clusters.
Pigsty follows the IaC and GitOPS philosophy: use a declarative config inventory to describe the entire environment, and materialize it through idempotent playbooks.
Users describe their desired state declaratively through parameters, and playbooks idempotently adjust target nodes to reach that state.
This is similar to Kubernetes CRDs & Operators, but Pigsty implements this functionality on bare metal and virtual machines through Ansible.
Pigsty was born to solve the operational management problem of ultra-large-scale PostgreSQL clusters. The idea behind it is simple — we need the ability to replicate the entire infrastructure (100+ database clusters + PG/Redis + observability) on ready servers within ten minutes.
No GUI + ClickOps can complete such a complex task in such a short time, making CLI + IaC the only choice — it provides precise, efficient control.
The config inventory pigsty.yml file describes the state of the entire deployment. Whether it’s production (prod), staging, test, or development (devbox) environments,
the difference between infrastructures lies only in the config inventory, while the deployment delivery logic is exactly the same.
You can use git for version control and auditing of this deployment “seed/gene”, and Pigsty even supports storing the config inventory as database tables in PostgreSQL CMDB, further achieving Infra as Data capability.
Seamlessly integrate with your existing workflows.
IaC is designed for professional users and enterprise scenarios but is also deeply optimized for individual developers and SMBs.
Even if you’re not a professional DBA, you don’t need to understand these hundreds of adjustment knobs and switches. All parameters come with well-performing default values.
You can get an out-of-the-box single-node database with zero configuration;
Simply add two more IP addresses to get an enterprise-grade high-availability PostgreSQL cluster.
Declare Modules
Take the following default config snippet as an example. This config describes a node 10.10.10.10 with INFRA, NODE, ETCD, and PGSQL modules installed.
# monitoring, alerting, DNS, NTP and other infrastructure cluster...infra:{hosts:{10.10.10.10:{infra_seq:1}}}# minio cluster, s3 compatible object storageminio:{hosts:{10.10.10.10:{minio_seq: 1 } }, vars:{minio_cluster:minio } }# etcd cluster, used as DCS for PostgreSQL high availabilityetcd:{hosts:{10.10.10.10:{etcd_seq: 1 } }, vars:{etcd_cluster:etcd } }# PGSQL example cluster: pg-metapg-meta:{hosts:{10.10.10.10:{pg_seq: 1, pg_role: primary }, vars:{pg_cluster:pg-meta } }
To actually install these modules, execute the following playbooks:
./infra.yml -l 10.10.10.10 # Initialize infra module on node 10.10.10.10./etcd.yml -l 10.10.10.10 # Initialize etcd module on node 10.10.10.10./minio.yml -l 10.10.10.10 # Initialize minio module on node 10.10.10.10./pgsql.yml -l 10.10.10.10 # Initialize pgsql module on node 10.10.10.10
Declare Clusters
You can declare PostgreSQL database clusters by installing the PGSQL module on multiple nodes, making them a service unit:
For example, to deploy a three-node high-availability PostgreSQL cluster using streaming replication on the following three Pigsty-managed nodes,
you can add the following definition to the all.children section of the config file pigsty.yml:
Not only can you define clusters declaratively, but you can also define databases, users, services, and HBA rules within the cluster. For example, the following config file deeply customizes the content of the default pg-meta single-node database cluster:
Including: declaring six business databases and seven business users, adding an extra standby service (synchronous standby, providing read capability with no replication delay), defining some additional pg_hba rules, an L2 VIP address pointing to the cluster primary, and a customized backup strategy.
pg-meta:hosts:{10.10.10.10:{pg_seq: 1, pg_role: primary , pg_offline_query:true}}vars:pg_cluster:pg-metapg_databases:# define business databases on this cluster, array of database definition- name:meta # REQUIRED, `name` is the only mandatory field of a database definitionbaseline:cmdb.sql # optional, database sql baseline path, (relative path among ansible search path, e.g files/)pgbouncer:true# optional, add this database to pgbouncer database list? true by defaultschemas:[pigsty] # optional, additional schemas to be created, array of schema namesextensions: # optional, additional extensions to be installed:array of `{name[,schema]}`- {name: postgis , schema:public }- {name:timescaledb }comment:pigsty meta database # optional, comment string for this databaseowner:postgres # optional, database owner, postgres by defaulttemplate:template1 # optional, which template to use, template1 by defaultencoding:UTF8 # optional, database encoding, UTF8 by default. (MUST same as template database)locale:C # optional, database locale, C by default. (MUST same as template database)lc_collate:C # optional, database collate, C by default. (MUST same as template database)lc_ctype:C # optional, database ctype, C by default. (MUST same as template database)tablespace:pg_default # optional, default tablespace, 'pg_default' by default.allowconn:true# optional, allow connection, true by default. false will disable connect at allrevokeconn:false# optional, revoke public connection privilege. false by default. (leave connect with grant option to owner)register_datasource:true# optional, register this database to grafana datasources? true by defaultconnlimit:-1# optional, database connection limit, default -1 disable limitpool_auth_user:dbuser_meta # optional, all connection to this pgbouncer database will be authenticated by this userpool_mode:transaction # optional, pgbouncer pool mode at database level, default transactionpool_size:64# optional, pgbouncer pool size at database level, default 64pool_reserve:32# optional, pgbouncer pool size reserve at database level, default 32pool_size_min:0# optional, pgbouncer pool size min at database level, default 0pool_connlimit:100# optional, max database connections at database level, default 100- {name: grafana ,owner: dbuser_grafana ,revokeconn: true ,comment:grafana primary database }- {name: bytebase ,owner: dbuser_bytebase ,revokeconn: true ,comment:bytebase primary database }- {name: kong ,owner: dbuser_kong ,revokeconn: true ,comment:kong the api gateway database }- {name: gitea ,owner: dbuser_gitea ,revokeconn: true ,comment:gitea meta database }- {name: wiki ,owner: dbuser_wiki ,revokeconn: true ,comment:wiki meta database }pg_users:# define business users/roles on this cluster, array of user definition- name:dbuser_meta # REQUIRED, `name` is the only mandatory field of a user definitionpassword:DBUser.Meta # optional, password, can be a scram-sha-256 hash string or plain textlogin:true# optional, can log in, true by default (new biz ROLE should be false)superuser:false# optional, is superuser? false by defaultcreatedb:false# optional, can create database? false by defaultcreaterole:false# optional, can create role? false by defaultinherit:true# optional, can this role use inherited privileges? true by defaultreplication:false# optional, can this role do replication? false by defaultbypassrls:false# optional, can this role bypass row level security? false by defaultpgbouncer:true# optional, add this user to pgbouncer user-list? false by default (production user should be true explicitly)connlimit:-1# optional, user connection limit, default -1 disable limitexpire_in:3650# optional, now + n days when this role is expired (OVERWRITE expire_at)expire_at:'2030-12-31'# optional, YYYY-MM-DD 'timestamp' when this role is expired (OVERWRITTEN by expire_in)comment:pigsty admin user # optional, comment string for this user/roleroles: [dbrole_admin] # optional, belonged roles. default roles are:dbrole_{admin,readonly,readwrite,offline}parameters:{}# optional, role level parameters with `ALTER ROLE SET`pool_mode:transaction # optional, pgbouncer pool mode at user level, transaction by defaultpool_connlimit:-1# optional, max database connections at user level, default -1 disable limit- {name: dbuser_view ,password: DBUser.Viewer ,pgbouncer: true ,roles: [dbrole_readonly], comment:read-only viewer for meta database}- {name: dbuser_grafana ,password: DBUser.Grafana ,pgbouncer: true ,roles: [dbrole_admin] ,comment:admin user for grafana database }- {name: dbuser_bytebase ,password: DBUser.Bytebase ,pgbouncer: true ,roles: [dbrole_admin] ,comment:admin user for bytebase database }- {name: dbuser_kong ,password: DBUser.Kong ,pgbouncer: true ,roles: [dbrole_admin] ,comment:admin user for kong api gateway }- {name: dbuser_gitea ,password: DBUser.Gitea ,pgbouncer: true ,roles: [dbrole_admin] ,comment:admin user for gitea service }- {name: dbuser_wiki ,password: DBUser.Wiki ,pgbouncer: true ,roles: [dbrole_admin] ,comment:admin user for wiki.js service }pg_services:# extra services in addition to pg_default_services, array of service definition# standby service will route {ip|name}:5435 to sync replica's pgbouncer (5435->6432 standby)- name: standby # required, service name, the actual svc name will be prefixed with `pg_cluster`, e.g:pg-meta-standbyport:5435# required, service exposed port (work as kubernetes service node port mode)ip:"*"# optional, service bind ip address, `*` for all ip by defaultselector:"[]"# required, service member selector, use JMESPath to filter inventorydest:default # optional, destination port, default|postgres|pgbouncer|<port_number>, 'default' by defaultcheck:/sync # optional, health check url path, / by defaultbackup:"[? pg_role == `primary`]"# backup server selectormaxconn:3000# optional, max allowed front-end connectionbalance: roundrobin # optional, haproxy load balance algorithm (roundrobin by default, other:leastconn)options:'inter 3s fastinter 1s downinter 5s rise 3 fall 3 on-marked-down shutdown-sessions slowstart 30s maxconn 3000 maxqueue 128 weight 100'pg_hba_rules:- {user: dbuser_view , db: all ,addr: infra ,auth: pwd ,title:'allow grafana dashboard access cmdb from infra nodes'}pg_vip_enabled:truepg_vip_address:10.10.10.2/24pg_vip_interface:eth1node_crontab:# make a full backup 1 am everyday- '00 01 * * * postgres /pg/bin/pg-backup full'
Declare Access Control
You can also deeply customize Pigsty’s access control capabilities through declarative configuration. For example, the following config file provides deep security customization for the pg-meta cluster:
Uses the three-node core cluster template: crit.yml, to ensure data consistency is prioritized with zero data loss during failover.
Enables L2 VIP and restricts database and connection pool listening addresses to local loopback IP + internal network IP + VIP three specific addresses.
The template enforces Patroni’s SSL API and Pgbouncer’s SSL, and in HBA rules, enforces SSL usage for accessing the database cluster.
Also enables the $libdir/passwordcheck extension in pg_libs to enforce password strength security policy.
Finally, a separate pg-meta-delay cluster is declared as pg-meta’s delayed replica from one hour ago, for emergency data deletion recovery.
pg-meta:# 3 instance postgres cluster `pg-meta`hosts:10.10.10.10:{pg_seq: 1, pg_role:primary }10.10.10.11:{pg_seq: 2, pg_role:replica }10.10.10.12:{pg_seq: 3, pg_role: replica , pg_offline_query:true}vars:pg_cluster:pg-metapg_conf:crit.ymlpg_users:- {name: dbuser_meta , password: DBUser.Meta , pgbouncer: true , roles: [ dbrole_admin ] , comment:pigsty admin user }- {name: dbuser_view , password: DBUser.Viewer , pgbouncer: true , roles: [ dbrole_readonly ] , comment:read-only viewer for meta database }pg_databases:- {name: meta ,baseline: cmdb.sql ,comment: pigsty meta database ,schemas: [pigsty] ,extensions:[{name: postgis, schema:public}, {name: timescaledb}]}pg_default_service_dest:postgrespg_services:- {name: standby ,src_ip:"*",port: 5435 , dest: default ,selector:"[]", backup:"[? pg_role == `primary`]"}pg_vip_enabled:truepg_vip_address:10.10.10.2/24pg_vip_interface:eth1pg_listen:'${ip},${vip},${lo}'patroni_ssl_enabled:truepgbouncer_sslmode:requirepgbackrest_method:miniopg_libs:'timescaledb, $libdir/passwordcheck, pg_stat_statements, auto_explain'# add passwordcheck extension to enforce strong passwordpg_default_roles:# default roles and users in postgres cluster- {name: dbrole_readonly ,login: false ,comment:role for global read-only access }- {name: dbrole_offline ,login: false ,comment:role for restricted read-only access }- {name: dbrole_readwrite ,login: false ,roles: [dbrole_readonly] ,comment:role for global read-write access }- {name: dbrole_admin ,login: false ,roles: [pg_monitor, dbrole_readwrite] ,comment:role for object creation }- {name: postgres ,superuser: true ,expire_in: 7300 ,comment:system superuser }- {name: replicator ,replication: true ,expire_in: 7300 ,roles: [pg_monitor, dbrole_readonly] ,comment:system replicator }- {name: dbuser_dba ,superuser: true ,expire_in: 7300 ,roles: [dbrole_admin] ,pgbouncer: true ,pool_mode: session, pool_connlimit: 16 , comment:pgsql admin user }- {name: dbuser_monitor ,roles: [pg_monitor] ,expire_in: 7300 ,pgbouncer: true ,parameters:{log_min_duration_statement: 1000 } ,pool_mode: session ,pool_connlimit: 8 ,comment:pgsql monitor user }pg_default_hba_rules:# postgres host-based auth rules by default- {user:'${dbsu}',db: all ,addr: local ,auth: ident ,title:'dbsu access via local os user ident'}- {user:'${dbsu}',db: replication ,addr: local ,auth: ident ,title:'dbsu replication from local os ident'}- {user:'${repl}',db: replication ,addr: localhost ,auth: ssl ,title:'replicator replication from localhost'}- {user:'${repl}',db: replication ,addr: intra ,auth: ssl ,title:'replicator replication from intranet'}- {user:'${repl}',db: postgres ,addr: intra ,auth: ssl ,title:'replicator postgres db from intranet'}- {user:'${monitor}',db: all ,addr: localhost ,auth: pwd ,title:'monitor from localhost with password'}- {user:'${monitor}',db: all ,addr: infra ,auth: ssl ,title:'monitor from infra host with password'}- {user:'${admin}',db: all ,addr: infra ,auth: ssl ,title:'admin @ infra nodes with pwd & ssl'}- {user:'${admin}',db: all ,addr: world ,auth: cert ,title:'admin @ everywhere with ssl & cert'}- {user: '+dbrole_readonly',db: all ,addr: localhost ,auth: ssl ,title:'pgbouncer read/write via local socket'}- {user: '+dbrole_readonly',db: all ,addr: intra ,auth: ssl ,title:'read/write biz user via password'}- {user: '+dbrole_offline' ,db: all ,addr: intra ,auth: ssl ,title:'allow etl offline tasks from intranet'}pgb_default_hba_rules:# pgbouncer host-based authentication rules- {user:'${dbsu}',db: pgbouncer ,addr: local ,auth: peer ,title:'dbsu local admin access with os ident'}- {user: 'all' ,db: all ,addr: localhost ,auth: pwd ,title:'allow all user local access with pwd'}- {user:'${monitor}',db: pgbouncer ,addr: intra ,auth: ssl ,title:'monitor access via intranet with pwd'}- {user:'${monitor}',db: all ,addr: world ,auth: deny ,title:'reject all other monitor access addr'}- {user:'${admin}',db: all ,addr: intra ,auth: ssl ,title:'admin access via intranet with pwd'}- {user:'${admin}',db: all ,addr: world ,auth: deny ,title:'reject all other admin access addr'}- {user: 'all' ,db: all ,addr: intra ,auth: ssl ,title:'allow all user intra access with pwd'}# OPTIONAL delayed cluster for pg-metapg-meta-delay:# delayed instance for pg-meta (1 hour ago)hosts:{10.10.10.13:{pg_seq: 1, pg_role: primary, pg_upstream: 10.10.10.10, pg_delay:1h } }vars:{pg_cluster:pg-meta-delay }
Citus Distributed Cluster
Below is a declarative configuration for a four-node Citus distributed cluster:
all:children:pg-citus0:# citus coordinator, pg_group = 0hosts:{10.10.10.10:{pg_seq: 1, pg_role:primary } }vars:{pg_cluster: pg-citus0 , pg_group:0}pg-citus1:# citus data node 1hosts:{10.10.10.11:{pg_seq: 1, pg_role:primary } }vars:{pg_cluster: pg-citus1 , pg_group:1}pg-citus2:# citus data node 2hosts:{10.10.10.12:{pg_seq: 1, pg_role:primary } }vars:{pg_cluster: pg-citus2 , pg_group:2}pg-citus3:# citus data node 3, with an extra replicahosts:10.10.10.13:{pg_seq: 1, pg_role:primary }10.10.10.14:{pg_seq: 2, pg_role:replica }vars:{pg_cluster: pg-citus3 , pg_group:3}vars:# global parameters for all citus clusterspg_mode: citus # pgsql cluster mode:cituspg_shard: pg-citus # citus shard name:pg-cituspatroni_citus_db:meta # citus distributed database namepg_dbsu_password:DBUser.Postgres# all dbsu password access for citus clusterpg_users:[{name: dbuser_meta ,password: DBUser.Meta ,pgbouncer: true ,roles:[dbrole_admin ] } ]pg_databases:[{name: meta ,extensions:[{name:citus }, { name: postgis }, { name: timescaledb } ] } ]pg_hba_rules:- {user: 'all' ,db: all ,addr: 127.0.0.1/32 ,auth: ssl ,title:'all user ssl access from localhost'}- {user: 'all' ,db: all ,addr: intra ,auth: ssl ,title:'all user ssl access from intranet'}
Redis Clusters
Below are declarative configuration examples for Redis primary-replica cluster, sentinel cluster, and Redis Cluster:
Below is a declarative configuration example for a three-node Etcd cluster:
etcd:# dcs service for postgres/patroni ha consensushosts:# 1 node for testing, 3 or 5 for production10.10.10.10:{etcd_seq:1}# etcd_seq required10.10.10.11:{etcd_seq:2}# assign from 1 ~ n10.10.10.12:{etcd_seq:3}# odd number pleasevars:# cluster level parameter override roles/etcdetcd_cluster:etcd # mark etcd cluster name etcdetcd_safeguard:false# safeguard against purgingetcd_clean:true# purge etcd during init process
MinIO Cluster
Below is a declarative configuration example for a three-node MinIO cluster:
minio:hosts:10.10.10.10:{minio_seq:1}10.10.10.11:{minio_seq:2}10.10.10.12:{minio_seq:3}vars:minio_cluster:miniominio_data:'/data{1...2}'# use two disks per nodeminio_node:'${minio_cluster}-${minio_seq}.pigsty'# node name patternhaproxy_services:- name:minio # [required] service name, must be uniqueport:9002# [required] service port, must be uniqueoptions:- option httpchk- option http-keep-alive- http-check send meth OPTIONS uri /minio/health/live- http-check expect status 200servers:- {name: minio-1 ,ip: 10.10.10.10 , port: 9000 , options:'check-ssl ca-file /etc/pki/ca.crt check port 9000'}- {name: minio-2 ,ip: 10.10.10.11 , port: 9000 , options:'check-ssl ca-file /etc/pki/ca.crt check port 9000'}- {name: minio-3 ,ip: 10.10.10.12 , port: 9000 , options:'check-ssl ca-file /etc/pki/ca.crt check port 9000'}
3.1 - Inventory
Describe your infrastructure and clusters using declarative configuration files
Every Pigsty deployment corresponds to an Inventory that describes key properties of the infrastructure and database clusters.
You can directly edit this configuration file to customize your deployment, or use the configure wizard script provided by Pigsty to automatically generate an appropriate configuration file.
Configuration Structure
The inventory uses standard Ansible YAML configuration format, consisting of two parts: global parameters (all.vars) and multiple groups (all.children).
You can define new clusters in all.children and describe the infrastructure using global variables: all.vars, which looks like this:
all: # Top-level object:allvars:{...} # Global parameterschildren:# Group definitionsinfra: # Group definition:'infra'hosts:{...} # Group members:'infra'vars:{...} # Group parameters:'infra'etcd:{...} # Group definition:'etcd'pg-meta:{...} # Group definition:'pg-meta'pg-test:{...} # Group definition:'pg-test'redis-test:{...} # Group definition:'redis-test'# ...
Cluster Definition
Each Ansible group may represent a cluster, which can be a node cluster, PostgreSQL cluster, Redis cluster, Etcd cluster, MinIO cluster, etc.
A cluster definition consists of two parts: cluster members (hosts) and cluster parameters (vars).
You can define cluster members in <cls>.hosts and describe the cluster using configuration parameters in <cls>.vars.
Here’s an example of a 3-node high-availability PostgreSQL cluster definition:
all:children:# Ansible group listpg-test:# Ansible group namehosts:# Ansible group instances (cluster members)10.10.10.11:{pg_seq: 1, pg_role:primary }# Host 110.10.10.12:{pg_seq: 2, pg_role:replica }# Host 210.10.10.13:{pg_seq: 3, pg_role:offline }# Host 3vars:# Ansible group variables (cluster parameters)pg_cluster:pg-test
Cluster-level vars (cluster parameters) override global parameters, and instance-level vars override both cluster parameters and global parameters.
Splitting Configuration
If your deployment is large or you want to better organize configuration files,
you can split the inventory into multiple files for easier management and maintenance.
inventory/├── hosts.yml # Host and cluster definitions├── group_vars/│ ├── all.yml # Global default variables (corresponds to all.vars)│ ├── infra.yml # infra group variables│ ├── etcd.yml # etcd group variables│ └── pg-meta.yml # pg-meta cluster variables└── host_vars/├── 10.10.10.10.yml # Specific host variables└── 10.10.10.11.yml
You can place cluster member definitions in the hosts.yml file and put cluster-level configuration parameters in corresponding files under the group_vars directory.
Switching Configuration
You can temporarily specify a different inventory file when running playbooks using the -i parameter.
Additionally, Ansible supports multiple configuration methods. You can use local yaml|ini configuration files, or use CMDB and any dynamic configuration scripts as configuration sources.
In Pigsty, we specify pigsty.yml in the same directory as the default inventory through ansible.cfg in the Pigsty home directory. You can modify it as needed.
[defaults]inventory=pigsty.yml
Additionally, Pigsty supports using a CMDB metabase to store the inventory, facilitating integration with existing systems.
3.2 - Configure
Use the configure script to automatically generate recommended configuration files based on your environment.
Pigsty provides a configure script as a configuration wizard that automatically generates an appropriate pigsty.yml configuration file based on your current environment.
This is an optional script: if you already understand how to configure Pigsty, you can directly edit the pigsty.yml configuration file and skip the wizard.
Quick Start
Enter the pigsty source home directory and run ./configure to automatically start the configuration wizard. Without any arguments, it defaults to the meta single-node configuration template:
cd ~/pigsty
./configure          # Interactive configuration wizard, auto-detect environment and generate config
This command will use the selected template as a base, detect the current node’s IP address and region, and generate a pigsty.yml configuration file suitable for the current environment.
Features
The configure script performs the following adjustments based on environment and input, generating a pigsty.yml configuration file in the current directory.
Detects the current node IP address; if multiple IPs exist, prompts the user to input a primary IP address as the node’s identity
Uses the IP address to replace the placeholder 10.10.10.10 in the configuration template and sets it as the admin_ip parameter value
Detects the current region, setting region to default (global default repos) or china (using Chinese mirror repos)
For micro instances (vCPU < 4), uses the tiny parameter template for node_tune and pg_conf to optimize resource usage
If -v PG major version is specified, sets pg_version and all PG alias parameters to the corresponding major version
If -g is specified, replaces all default passwords with randomly generated strong passwords for enhanced security (strongly recommended)
When PG major version ≥ 17, prioritizes the built-in C.UTF-8 locale, or the OS-supported C.UTF-8
Checks if the core dependency ansible for deployment is available in the current environment
Also checks if the deployment target node is SSH-reachable and can execute commands with sudo (-s to skip)
Usage Examples
# Basic usage./configure # Interactive configuration wizard./configure -i 10.10.10.10 # Specify primary IP address# Specify configuration template./configure -c meta # Use default single-node template (default)./configure -c rich # Use feature-rich single-node template./configure -c slim # Use minimal template (PGSQL + ETCD only)./configure -c ha/full # Use 4-node HA sandbox template./configure -c ha/trio # Use 3-node HA template./configure -c app/supa # Use Supabase self-hosted template# Specify PostgreSQL version./configure -v 18# Use PostgreSQL 18./configure -v 16# Use PostgreSQL 16./configure -c rich -v 15# rich template + PG 15# Region and proxy./configure -r china # Use Chinese mirrors./configure -r europe # Use European mirrors./configure -x # Import current proxy environment variables# Skip and automation./configure -s # Skip IP detection, keep placeholder./configure -n -i 10.10.10.10 # Non-interactive mode with specified IP./configure -c ha/full -s # 4-node template, skip IP replacement# Security enhancement./configure -g # Generate random passwords./configure -c meta -g -i 10.10.10.10 # Complete production configuration# Specify output and SSH port./configure -o prod.yml # Output to prod.yml./configure -p 2222# Use SSH port 2222
Command Arguments
./configure
[-c|--conf <template>]# Configuration template name (meta|rich|slim|ha/full|...)[-i|--ip <ipaddr>]# Specify primary IP address[-v|--version <pgver>]# PostgreSQL major version (13|14|15|16|17|18)[-r|--region <region>]# Upstream software repo region (default|china|europe)[-o|--output <file>]# Output configuration file path (default: pigsty.yml)[-s|--skip]# Skip IP address detection and replacement[-x|--proxy]# Import proxy settings from environment variables[-n|--non-interactive]# Non-interactive mode (don't ask any questions)[-p|--port <port>]# Specify SSH port[-g|--generate]# Generate random passwords[-h|--help]# Display help information
Argument Details
Argument
Description
-c, --conf
Generate config from conf/<template>.yml, supports subdirectories like ha/full
-i, --ip
Replace placeholder 10.10.10.10 in config template with specified IP
-v, --version
Specify PostgreSQL major version (13-18), keeps template default if not specified
-r, --region
Set software repo mirror region: default, china (Chinese mirrors), europe (European)
-o, --output
Specify output file path, defaults to pigsty.yml
-s, --skip
Skip IP address detection and replacement, keep 10.10.10.10 placeholder in template
-x, --proxy
Write current environment proxy variables (HTTP_PROXY, HTTPS_PROXY, ALL_PROXY, NO_PROXY) to config
-n, --non-interactive
Non-interactive mode, don’t ask any questions (requires -i to specify IP)
-p, --port
Specify SSH port (when using non-default port 22)
-g, --generate
Generate random values for passwords in config file, improving security (strongly recommended)
Execution Flow
The configure script executes detection and configuration in the following order:
When using the -g argument, the script generates 24-character random strings for the following passwords:
Password Parameter
Description
grafana_admin_password
Grafana admin password
pg_admin_password
PostgreSQL admin password
pg_monitor_password
PostgreSQL monitor user password
pg_replication_password
PostgreSQL replication user password
patroni_password
Patroni API password
haproxy_admin_password
HAProxy admin password
minio_secret_key
MinIO Secret Key
etcd_root_password
ETCD Root password
It also replaces the following placeholder passwords:
DBUser.Meta → random password
DBUser.Viewer → random password
S3User.Backup → random password
S3User.Meta → random password
S3User.Data → random password
$ ./configure -g
[INFO] generating random passwords...
    grafana_admin_password   : xK9mL2nP4qR7sT1vW3yZ5bD8
    pg_admin_password        : aB3cD5eF7gH9iJ1kL2mN4oP6
    ...
[INFO] random passwords generated, check and save them
Configuration Templates
The script reads configuration templates from the conf/ directory, supporting the following templates:
Core Templates
Template
Description
meta
Default template: Single-node installation with INFRA + NODE + ETCD + PGSQL
rich
Feature-rich version: Includes almost all extensions, MinIO, local repo
slim
Minimal version: PostgreSQL + ETCD only, no monitoring infrastructure
fat
Complete version: rich base with more extensions installed
$ ./configure
configure pigsty v4.2.0 begin
[ OK ]region= china
[ OK ]kernel= Linux
[ OK ]machine= x86_64
[ OK ]package= rpm,dnf
[ OK ]vendor= rocky (Rocky Linux)[ OK ]version=9(9.5)[ OK ]sudo= vagrant ok
[ OK ]ssh= vagrant@127.0.0.1 ok
[WARN] Multiple IP address candidates found:
(1) 192.168.121.193 inet 192.168.121.193/24 brd 192.168.121.255 scope global dynamic noprefixroute eth0
(2) 10.10.10.10 inet 10.10.10.10/24 brd 10.10.10.255 scope global noprefixroute eth1
[ OK ]primary_ip= 10.10.10.10 (from demo)[ OK ]admin= vagrant@10.10.10.10 ok
[ OK ]mode= meta (el9)[ OK ]locale= C.UTF-8
[ OK ]ansible= ready
[ OK ] pigsty configured
[WARN] don't forget to check it and change passwords!
proceed with ./deploy.yml
Environment Variables
The script supports the following environment variables:
Environment Variable
Description
Default
PIGSTY_HOME
Pigsty installation directory
~/pigsty
METADB_URL
Metabase connection URL
service=meta
HTTP_PROXY
HTTP proxy
-
HTTPS_PROXY
HTTPS proxy
-
ALL_PROXY
Universal proxy
-
NO_PROXY
Proxy whitelist
Built-in default
Notes
Passwordless access: Before running configure, ensure the current user has passwordless sudo privileges and passwordless SSH to localhost. This can be automatically configured via the bootstrap script.
IP address selection: Choose an internal IP as the primary IP address, not a public IP or 127.0.0.1.
Password security: In production environments, always modify default passwords in the configuration file, or use the -g argument to generate random passwords.
Configuration review: After the script completes, it’s recommended to review the generated pigsty.yml file to confirm the configuration meets expectations.
Multiple executions: You can run configure multiple times to regenerate configuration; each run will overwrite the existing pigsty.yml.
macOS limitations: When running on macOS, the script skips some Linux-specific checks and uses placeholder IP 10.10.10.10. macOS can only serve as an admin node.
FAQ
How to use a custom configuration template?
Place your configuration file in the conf/ directory, then specify it with the -c argument:
Inventory: Understand the Ansible inventory structure
Parameters: Understand Pigsty parameter hierarchy and priority
Templates: View all available configuration templates
Installation: Understand the complete installation process
Metabase: Use PostgreSQL as a dynamic configuration source
3.3 - Parameters
Fine-tune Pigsty customization using configuration parameters
In the inventory, you can use various parameters to fine-tune Pigsty customization. These parameters cover everything from infrastructure settings to database configuration.
Parameter List
Pigsty provides approximately 380+ configuration parameters distributed across 8 default modules for fine-grained control of various system aspects. See Reference - Parameter List for the complete list.
Parameters are key-value pairs that describe entities. The Key is a string, and the Value can be one of five types: boolean, string, number, array, or object.
Exceptions are etcd_cluster and minio_cluster which have default values.
This assumes each deployment has only one etcd cluster for DCS and one optional MinIO cluster for centralized backup storage, so they are assigned default cluster names etcd and minio.
However, you can still deploy multiple etcd or MinIO clusters using different names.
3.4 - Conf Templates
Use pre-made configuration templates to quickly generate configuration files adapted to your environment
In Pigsty, deployment blueprint details are defined by the inventory, which is the pigsty.yml configuration file. You can customize it through declarative configuration.
However, writing configuration files directly can be daunting for new users. To address this, we provide some ready-to-use configuration templates covering common usage scenarios.
Each template is a predefined pigsty.yml configuration file containing reasonable defaults suitable for specific scenarios.
You can choose a template as your customization starting point, then modify it as needed to meet your specific requirements.
Using Templates
Pigsty provides the configure script as an optional configuration wizard that generates an inventory with good defaults based on your environment and input.
Use ./configure -c <conf> to specify a configuration template, where <conf> is the path relative to the conf directory (the .yml suffix can be omitted).
./configure # Default to meta.yml configuration template./configure -c meta # Explicitly specify meta.yml single-node template./configure -c rich # Use feature-rich template with all extensions and MinIO./configure -c slim # Use minimal single-node template# Use different database kernels./configure -c pgsql # Native PostgreSQL kernel, basic features (13~18)./configure -c citus # Citus distributed HA PostgreSQL (14~17)./configure -c mssql # Babelfish kernel, SQL Server protocol compatible (17)./configure -c polar # PolarDB PG kernel, Aurora/RAC style (15)./configure -c ivory # IvorySQL kernel, Oracle syntax compatible (18)./configure -c mysql # OpenHalo kernel, MySQL compatible (14)./configure -c pgtde # Percona PostgreSQL Server transparent encryption (18)./configure -c oriole # OrioleDB kernel, OLTP enhanced (17)./configure -c supabase # Supabase self-hosted configuration (15~18)# Use multi-node HA templates./configure -c ha/dual # Use 2-node HA template./configure -c ha/trio # Use 3-node HA template./configure -c ha/full # Use 4-node HA template
If no template is specified, Pigsty defaults to the meta.yml single-node configuration template.
Template List
Main Templates
The following are single-node configuration templates for installing Pigsty on a single server:
The following configuration templates are for development and testing purposes:
Template
Description
build.yml
Open source build config for EL 9/10, Debian 12/13, Ubuntu 22.04/24.04
3.5 - Use CMDB as Config Inventory
Use PostgreSQL as a CMDB metabase to store Ansible inventory.
Pigsty allows you to use a PostgreSQL metabase as a dynamic configuration source, replacing static YAML configuration files for more powerful configuration management capabilities.
Overview
CMDB (Configuration Management Database) is a method of storing configuration information in a database for management.
In Pigsty, the default configuration source is a static YAML file pigsty.yml,
which serves as Ansible’s inventory.
This approach is simple and direct, but when infrastructure scales and requires complex, fine-grained management and external integration, a single static file becomes insufficient.
Feature
Static YAML File
CMDB Metabase
Querying
Manual search/grep
SQL queries with any conditions, aggregation analysis
Database transactions naturally support concurrency
External Integration
Requires YAML parsing
Standard SQL interface, easy integration with any language
Scalability
Difficult to maintain when file becomes too large
Scales to physical limits
Dynamic Generation
Static file, changes require manual application
Immediate effect, real-time configuration changes
Pigsty provides the CMDB database schema in the sample database pg-meta.meta schema baseline definition.
How It Works
The core idea of CMDB is to replace the static configuration file with a dynamic script.
Ansible supports using executable scripts as inventory, as long as the script outputs inventory data in JSON format.
When you enable CMDB, Pigsty creates a dynamic inventory script named inventory.sh:
#!/bin/bash
psql ${METADB_URL} -AXtwc 'SELECT text FROM pigsty.inventory;'
This script’s function is simple: every time Ansible needs to read the inventory, it queries configuration data from the PostgreSQL database’s pigsty.inventory view and returns it in JSON format.
The overall architecture is as follows:
flowchart LR
    conf["bin/inventory_conf"]
    tocmdb["bin/inventory_cmdb"]
    load["bin/inventory_load"]
    ansible["🚀 Ansible"]

    subgraph static["📄 Static Config Mode"]
        yml[("pigsty.yml")]
    end

    subgraph dynamic["🗄️ CMDB Dynamic Mode"]
        sh["inventory.sh"]
        cmdb[("PostgreSQL CMDB")]
    end

    conf -->|"switch"| yml
    yml -->|"load config"| load
    load -->|"write"| cmdb
    tocmdb -->|"switch"| sh
    sh --> cmdb

    yml --> ansible
    cmdb --> ansible
Data Model
The CMDB database schema is defined in files/cmdb.sql, with all objects in the pigsty schema.
Core Tables
Table
Description
Primary Key
pigsty.group
Cluster/group definitions, corresponds to Ansible groups
cls
pigsty.host
Host definitions, belongs to a group
(cls, ip)
pigsty.global_var
Global variables, corresponds to all.vars
key
pigsty.group_var
Group variables, corresponds to all.children.<cls>.vars
CREATETABLEpigsty.group(clsTEXTPRIMARYKEY,-- Cluster name, primary key
ctimeTIMESTAMPTZDEFAULTnow(),-- Creation time
mtimeTIMESTAMPTZDEFAULTnow()-- Modification time
);
Host Table pigsty.host
CREATETABLEpigsty.host(clsTEXTNOTNULLREFERENCESpigsty.group(cls),-- Parent cluster
ipINETNOTNULL,-- Host IP address
ctimeTIMESTAMPTZDEFAULTnow(),mtimeTIMESTAMPTZDEFAULTnow(),PRIMARYKEY(cls,ip));
Global Variables Table pigsty.global_var
CREATETABLEpigsty.global_var(keyTEXTPRIMARYKEY,-- Variable name
valueJSONBNULL,-- Variable value (JSON format)
mtimeTIMESTAMPTZDEFAULTnow()-- Modification time
);
Modifies ansible.cfg to set inventory to inventory.sh
The generated inventory.sh contents:
#!/bin/bash
psql ${METADB_URL} -AXtwc 'SELECT text FROM pigsty.inventory;'
inventory_conf
Switch back to using static YAML configuration file:
bin/inventory_conf
The script modifies ansible.cfg to set inventory back to pigsty.yml.
Usage Workflow
First-time CMDB Setup
Initialize CMDB schema (usually done automatically during Pigsty installation):
psql -f ~/pigsty/files/cmdb.sql
Load configuration to database:
bin/inventory_load
Switch to CMDB mode:
bin/inventory_cmdb
Verify configuration:
ansible all --list-hosts # List all hostsansible-inventory --list # View complete inventory
Query Configuration
After enabling CMDB, you can flexibly query configuration using SQL:
-- View all clusters
SELECTclsFROMpigsty.group;-- View all hosts in a cluster
SELECTipFROMpigsty.hostWHEREcls='pg-meta';-- View global variables
SELECTkey,valueFROMpigsty.global_var;-- View cluster variables
SELECTkey,valueFROMpigsty.group_varWHEREcls='pg-meta';-- View all PostgreSQL clusters
SELECTcls,name,pg_databases,pg_usersFROMpigsty.pg_cluster;-- View all PostgreSQL instances
SELECTcls,ins,ip,seq,roleFROMpigsty.pg_instance;-- View all database definitions
SELECTcls,datname,owner,encodingFROMpigsty.pg_database;-- View all user definitions
SELECTcls,name,login,superuserFROMpigsty.pg_users;
Modify Configuration
You can modify configuration directly via SQL:
-- Add new cluster
INSERTINTOpigsty.group(cls)VALUES('pg-new');-- Add cluster variable
INSERTINTOpigsty.group_var(cls,key,value)VALUES('pg-new','pg_cluster','"pg-new"');-- Add host
INSERTINTOpigsty.host(cls,ip)VALUES('pg-new','10.10.10.20');-- Add host variables
INSERTINTOpigsty.host_var(cls,ip,key,value)VALUES('pg-new','10.10.10.20','pg_seq','1'),('pg-new','10.10.10.20','pg_role','"primary"');-- Modify global variable
UPDATEpigsty.global_varSETvalue='"new-value"'WHEREkey='some_param';-- Delete cluster (cascades to hosts and variables)
DELETEFROMpigsty.groupWHEREcls='pg-old';
Changes take effect immediately without reloading or restarting any service.
Track configuration changes using the mtime field:
-- View recently modified global variables
SELECTkey,value,mtimeFROMpigsty.global_varORDERBYmtimeDESCLIMIT10;-- View changes after a specific time
SELECT*FROMpigsty.group_varWHEREmtime>'2024-01-01'::timestamptz;
Integration with External Systems
CMDB uses standard PostgreSQL, making it easy to integrate with other systems:
Web Management Interface: Expose configuration data through REST API (e.g., PostgREST)
CI/CD Pipelines: Read/write database directly in deployment scripts
Monitoring & Alerting: Generate monitoring rules based on configuration data
ITSM Systems: Sync with enterprise CMDB systems
Considerations
Data Consistency: After modifying configuration, you need to re-run the corresponding Ansible playbooks to apply changes to the actual environment
Backup: Configuration data in CMDB is critical, ensure regular backups
Permissions: Configure appropriate database access permissions for CMDB to avoid accidental modifications
Transactions: When making batch configuration changes, perform them within a transaction for rollback on errors
Connection Pooling: The inventory.sh script creates a new connection on each execution; if Ansible runs frequently, consider using connection pooling
Summary
CMDB is Pigsty’s advanced configuration management solution, suitable for scenarios requiring large-scale cluster management, complex queries, external integration, or fine-grained access control. By storing configuration data in PostgreSQL, you can fully leverage the database’s powerful capabilities to manage infrastructure configuration.
Feature
Description
Storage
PostgreSQL pigsty schema
Dynamic Inventory
inventory.sh script
Config Load
bin/inventory_load
Switch to CMDB
bin/inventory_cmdb
Switch to YAML
bin/inventory_conf
Core View
pigsty.inventory
4 - High Availability
Pigsty uses Patroni to implement PostgreSQL high availability, ensuring automatic failover when the primary becomes unavailable.
Overview
Pigsty’s PostgreSQL clusters come with out-of-the-box high availability, powered by Patroni, Etcd, and HAProxy.
When your PostgreSQL cluster has two or more instances, you automatically have self-healing database high availability without any additional configuration — as long as any instance in the cluster survives, the cluster can provide complete service. Clients only need to connect to any node in the cluster to get full service without worrying about primary-replica topology changes.
With default configuration, the primary failure Recovery Time Objective (RTO) ≈ 45s, and Recovery Point Objective (RPO) < 1MB; for replica failures, RPO = 0 and RTO ≈ 0 (brief interruption). In consistency-first mode, failover can guarantee zero data loss: RPO = 0. All these metrics can be configured as needed based on your actual hardware conditions and reliability requirements.
Pigsty includes built-in HAProxy load balancers for automatic traffic switching, providing DNS/VIP/LVS and other access methods for clients. Failover and switchover are almost transparent to the business side except for brief interruptions - applications don’t need to modify connection strings or restart.
The minimal maintenance window requirements bring great flexibility and convenience: you can perform rolling maintenance and upgrades on the entire cluster without application coordination. The feature that hardware failures can wait until the next day to handle lets developers, operations, and DBAs sleep well during incidents.
Many large organizations and core institutions have been using Pigsty in production for extended periods. The largest deployment has 25K CPU cores and 220+ PostgreSQL ultra-large instances (64c / 512g / 3TB NVMe SSD). In this deployment case, dozens of hardware failures and various incidents occurred over five years, yet overall availability of over 99.999% was maintained.
What problems does High Availability solve?
Elevates data security C/IA availability to a new level: RPO ≈ 0, RTO < 45s.
Gains seamless rolling maintenance capability, minimizing maintenance window requirements and bringing great convenience.
Hardware failures can self-heal immediately without human intervention, allowing operations and DBAs to sleep well.
Replicas can handle read-only requests, offloading primary load and fully utilizing resources.
What are the costs of High Availability?
Infrastructure dependency: HA requires DCS (etcd/zk/consul) for consensus.
Higher starting threshold: A meaningful HA deployment requires at least three nodes.
Extra resource consumption: Each new replica consumes additional resources, though this is usually not a major concern.
Since replication happens in real-time, all changes are immediately applied to replicas. Therefore, streaming replication-based HA solutions cannot handle data deletion or modification caused by human errors and software defects. (e.g., DROP TABLE or DELETE data)
Such failures require using delayed clusters or performing point-in-time recovery using previous base backups and WAL archives.
Configuration Strategy
RTO
RPO
Standalone + Nothing
Data permanently lost, unrecoverable
All data lost
Standalone + Base Backup
Depends on backup size and bandwidth (hours)
Lose data since last backup (hours to days)
Standalone + Base Backup + WAL Archive
Depends on backup size and bandwidth (hours)
Lose unarchived data (tens of MB)
Primary-Replica + Manual Failover
~10 minutes
Lose data in replication lag (~100KB)
Primary-Replica + Auto Failover
Within 1 minute
Lose data in replication lag (~100KB)
Primary-Replica + Auto Failover + Sync Commit
Within 1 minute
No data loss
How It Works
In Pigsty, the high availability architecture works as follows:
PostgreSQL uses standard streaming replication to build physical replicas; replicas take over when the primary fails.
Patroni manages PostgreSQL server processes and handles high availability matters.
Etcd provides distributed configuration storage (DCS) capability and is used for leader election after failures.
Patroni relies on Etcd to reach cluster leader consensus and provides health check interfaces externally.
HAProxy exposes cluster services externally and uses Patroni health check interfaces to automatically distribute traffic to healthy nodes.
vip-manager provides an optional Layer 2 VIP, retrieves leader information from Etcd, and binds the VIP to the node where the cluster primary resides.
When the primary fails, a new round of leader election is triggered. The healthiest replica in the cluster (highest LSN position, minimum data loss) wins and is promoted to the new primary. After the winning replica is promoted, read-write traffic is immediately routed to the new primary.
The impact of primary failure is brief write service unavailability: write requests will be blocked or fail directly from primary failure until new primary promotion, with unavailability typically lasting 15 to 30 seconds, usually not exceeding 1 minute.
When a replica fails, read-only traffic is routed to other replicas. Only when all replicas fail will read-only traffic ultimately be handled by the primary.
The impact of replica failure is partial read-only query interruption: queries currently running on that replica will abort due to connection reset and be immediately taken over by other available replicas.
Failure detection is performed jointly by Patroni and Etcd. The cluster leader holds a lease; if the cluster leader fails to renew the lease in time (10s) due to failure, the lease is released, triggering a Failover and new cluster election.
Even without any failures, you can proactively change the cluster primary through Switchover.
In this case, write queries on the primary will experience a brief interruption and be immediately routed to the new primary. This operation is typically used for rolling maintenance/upgrades of database servers.
4.1 - RPO Trade-offs
Trade-off analysis for RPO (Recovery Point Objective), finding the optimal balance between availability and data loss.
RPO (Recovery Point Objective) defines the maximum amount of data loss allowed when the primary fails.
For scenarios where data integrity is critical, such as financial transactions, RPO = 0 is typically required, meaning no data loss is allowed.
However, stricter RPO targets come at a cost: higher write latency, reduced system throughput, and the risk that replica failures may cause primary unavailability.
For typical scenarios, some data loss is acceptable (e.g., up to 1MB) in exchange for higher availability and performance.
Trade-offs
In asynchronous replication scenarios, there is typically some replication lag between replicas and the primary (depending on network and throughput, normally in the range of 10KB-100KB / 100µs-10ms).
This means when the primary fails, replicas may not have fully synchronized with the latest data. If a failover occurs, the new primary may lose some unreplicated data.
The upper limit of potential data loss is controlled by the pg_rpo parameter, which defaults to 1048576 (1MB), meaning up to 1MiB of data loss can be tolerated during failover.
When the cluster primary fails, if any replica has replication lag within this threshold, Pigsty will automatically promote that replica to be the new primary.
However, when all replicas exceed this threshold, Pigsty will refuse [automatic failover] to prevent data loss.
Manual intervention is then required to decide whether to wait for the primary to recover (which may never happen) or accept the data loss and force-promote a replica.
You need to configure this value based on your business requirements, making a trade-off between availability and consistency.
Increasing this value improves the success rate of automatic failover but also increases the upper limit of potential data loss.
When you set pg_rpo = 0, Pigsty enables synchronous replication, ensuring the primary only returns write success after at least one replica has persisted the data.
This configuration ensures zero replication lag but introduces significant write latency and reduces overall throughput.
flowchart LR
    A([Primary Failure]) --> B{Synchronous<br/>Replication?}

    B -->|No| C{Lag < RPO?}
    B -->|Yes| D{Sync Replica<br/>Available?}

    C -->|Yes| E[Lossy Auto Failover<br/>RPO < 1MB]
    C -->|No| F[Refuse Auto Failover<br/>Wait for Primary Recovery<br/>or Manual Intervention]

    D -->|Yes| G[Lossless Auto Failover<br/>RPO = 0]
    D -->|No| H{Strict Mode?}

    H -->|No| C
    H -->|Yes| F

    style A fill:#dc3545,stroke:#b02a37,color:#fff
    style E fill:#F0AD4E,stroke:#146c43,color:#fff
    style G fill:#198754,stroke:#146c43,color:#fff
    style F fill:#BE002F,stroke:#565e64,color:#fff
Protection Modes
Pigsty provides three protection modes to help users make trade-offs under different RPO requirements, similar to Oracle Data Guard protection modes.
Maximum Performance
Default mode, asynchronous replication, transactions commit with only local WAL persistence, no waiting for replicas, replica failures are completely transparent to the primary
Primary failure may lose unsent/unreceived WAL (typically < 1MB, normally 10ms/100ms, 10KB/100KB range under normal network conditions)
Optimized for performance, suitable for typical business scenarios that tolerate minor data loss during failures
Under normal conditions, waits for at least one replica confirmation, achieving zero data loss. When all sync replicas fail, automatically degrades to async mode to continue service
Balances data safety and service availability, recommended configuration for production critical business
When all sync replicas fail, primary refuses writes to prevent data loss, transactions must be persisted on at least one replica before returning success
Suitable for financial transactions, medical records, and other scenarios with extremely high data integrity requirements
Typically, you only need to set the pg_rpo parameter to 0 to enable the synchronous_mode switch, activating Maximum Availability mode.
If you use pg_conf = crit.yml template, it additionally enables the synchronous_mode_strict strict mode switch, activating Maximum Protection mode.
Additionally, you can enable watchdog to fence the primary directly during node/Patroni freeze scenarios instead of degrading, achieving behavior equivalent to Oracle Maximum Protection mode.
You can also directly configure these Patroni parameters as needed. Refer to Patroni and PostgreSQL documentation to achieve stronger data protection, such as:
Specify the synchronous replica list, configure more sync replicas to improve disaster tolerance, use quorum synchronous commit, or even require all replicas to perform synchronous commit.
Configuresynchronous_commit: 'remote_apply' to strictly ensure primary-replica read-write consistency. (Oracle Maximum Protection mode is equivalent to remote_write)
Recommendations
Maximum Performance mode (asynchronous replication) is the default mode used by Pigsty and is sufficient for the vast majority of workloads.
Tolerating minor data loss during failures (typically in the range of a few KB to hundreds of KB) in exchange for higher throughput and availability is the recommended configuration for typical business scenarios.
In this case, you can adjust the maximum allowed data loss through the pg_rpo parameter to suit different business needs.
Maximum Availability mode (synchronous replication) is suitable for scenarios with high data integrity requirements that cannot tolerate data loss.
In this mode, a minimum of two-node PostgreSQL cluster (one primary, one replica) is required.
Set pg_rpo to 0 to enable this mode.
Maximum Protection mode (strict synchronous replication) is suitable for financial transactions, medical records, and other scenarios with extremely high data integrity requirements. We recommend using at least a three-node cluster (one primary, two replicas),
because with only two nodes, if the replica fails, the primary will stop writes, causing service unavailability, which reduces overall system reliability. With three nodes, if only one replica fails, the primary can continue to serve.
4.2 - Failure Model
Detailed analysis of worst-case, best-case, and average RTO calculation logic and results across three classic failure detection/recovery paths
Patroni failures can be classified into 10 categories by failure target, and further consolidated into five categories based on detection path, which are detailed in this section.
#
Failure Scenario
Description
Final Path
1
PG process crash
crash, OOM killed
Active Detection
2
PG connection refused
max_connections
Active Detection
3
PG zombie
Process alive but unresponsive
Active Detection (timeout)
4
Patroni process crash
kill -9, OOM
Passive Detection
5
Patroni zombie
Process alive but stuck
Watchdog
6
Node down
Power outage, hardware failure
Passive Detection
7
Node zombie
IO hang, CPU starvation
Watchdog
8
Primary ↔ DCS network failure
Firewall, switch failure
Network Partition
9
Storage failure
Disk failure, disk full, mount failure
Active Detection or Watchdog
10
Manual switchover
Switchover/Failover
Manual Trigger
However, for RTO calculation purposes, all failures ultimately converge to two paths. This section explores the upper bound, lower bound, and average RTO for these two scenarios.
flowchart LR
    A([Primary Failure]) --> B{Patroni<br/>Detected?}

    B -->|PG Crash| C[Attempt Local Restart]
    B -->|Node Down| D[Wait TTL Expiration]

    C -->|Success| E([Local Recovery])
    C -->|Fail/Timeout| F[Release Leader Lock]

    D --> F
    F --> G[Replica Election]
    G --> H[Execute Promote]
    H --> I[HAProxy Detects]
    I --> J([Service Restored])

    style A fill:#dc3545,stroke:#b02a37,color:#fff
    style E fill:#198754,stroke:#146c43,color:#fff
    style J fill:#198754,stroke:#146c43,color:#fff
4.2.1 - Model of Patroni Passive Failure
Failover path triggered by node crash causing leader lease expiration and cluster election
RTO Timeline
Failure Model
Phase
Best
Worst
Average
Description
Lease Expiration
ttl - loop
ttl
ttl - loop/2
Best: crash just before refresh Worst: crash right after refresh
Replica Detect
0
loop
loop / 2
Best: exactly at check point Worst: just missed check point
Election Promote
0
2
1
Best: direct lock and promote Worst: API timeout + Promote
HAProxy Check
(rise-1) × fastinter
(rise-1) × fastinter + inter
(rise-1) × fastinter + inter/2
Best: state change before check Worst: state change right after check
Key Difference Between Passive and Active Failover:
Scenario
Patroni Status
Lease Handling
Primary Wait Time
Active Failover (PG crash)
Alive, healthy
Actively tries to restart PG, releases lease on timeout
primary_start_timeout
Passive Failover (Node crash)
Dies with node
Cannot actively release, must wait for TTL expiration
ttl
In passive failover scenarios, Patroni dies along with the node and cannot actively release the Leader Key.
The lease in DCS can only trigger cluster election after TTL naturally expires.
Timeline Analysis
Phase 1: Lease Expiration
The Patroni primary refreshes the Leader Key every loop_wait cycle, resetting TTL to the configured value.
Timeline:
     t-loop        t          t+ttl-loop    t+ttl
       |           |              |           |
    Last Refresh  Failure      Best Case   Worst Case
       |←── loop ──→|              |           |
       |←──────────── ttl ─────────────────────→|
Best case: Failure occurs just before lease refresh (elapsed loop since last refresh), remaining TTL = ttl - loop
Worst case: Failure occurs right after lease refresh, must wait full ttl
Best case: Replica happens to wake when lease expires, wait 0
Worst case: Replica just entered sleep when lease expires, wait loop
Average case: loop/2
Tdetect=⎩⎨⎧0loop/2loopBestAverageWorst
Phase 3: Lock Contest & Promote
When replicas detect Leader Key expiration, they start the election process. The replica that acquires the Leader Key executes pg_ctl promote to become the new primary.
Via REST API, parallel queries to check each replica’s replication position, typically 10ms, hardcoded 2s timeout.
Compare WAL positions to determine the best candidate, replicas attempt to create Leader Key (CAS atomic operation)
Execute pg_ctl promote to become primary (very fast, typically negligible)
Four Mode Calculation Results (unit: seconds, format: min / avg / max)
Phase
fast
norm
safe
wide
Lease Expiration
15 / 17 / 20
25 / 27 / 30
50 / 55 / 60
100 / 110 / 120
Replica Detection
0 / 3 / 5
0 / 3 / 5
0 / 5 / 10
0 / 10 / 20
Lock Contest & Promote
0 / 1 / 2
0 / 1 / 2
0 / 1 / 2
0 / 1 / 2
Health Check
1 / 2 / 2
2 / 3 / 4
3 / 5 / 6
4 / 6 / 8
Total
16 / 23 / 29
27 / 34 / 41
53 / 66 / 78
104 / 127 / 150
4.2.2 - Model of Patroni Active Failure
PostgreSQL primary process crashes while Patroni stays alive and attempts restart, triggering failover after timeout
RTO Timeline
Failure Model
Item
Best
Worst
Average
Description
Crash Found
0
loop
loop/2
Best: PG crashes right before check Worst: PG crashes right after check
Restart Timeout
0
start
start
Best: PG recovers instantly Worst: Wait full start timeout before releasing lease
Replica Detect
0
loop
loop/2
Best: Right at check point Worst: Just missed check point
Elect Promote
0
2
1
Best: Acquire lock and promote directly Worst: API timeout + Promote
HAProxy Check
(rise-1) × fastinter
(rise-1) × fastinter + inter
(rise-1) × fastinter + inter/2
Best: State changes before check Worst: State changes right after check
Key Difference Between Active and Passive Failure:
Scenario
Patroni Status
Lease Handling
Main Wait Time
Active Failure (PG crash)
Alive, healthy
Actively tries to restart PG, releases lease after timeout
primary_start_timeout
Passive Failure (node down)
Dies with node
Cannot actively release, must wait for TTL expiry
ttl
In active failure scenarios, Patroni remains alive and can actively detect PG crash and attempt restart.
If restart succeeds, service self-heals; if timeout expires without recovery, Patroni actively releases the Leader Key, triggering cluster election.
Timing Analysis
Phase 1: Failure Detection
Patroni checks PostgreSQL status every loop_wait cycle (via pg_isready or process check).
Timeline:
    Last check      PG crash      Next check
       |              |              |
       |←── 0~loop ──→|              |
Best case: PG crashes right before Patroni check, detected immediately, wait 0
Worst case: PG crashes right after check, wait for next cycle, wait loop
Average case: loop/2
Tdetect=⎩⎨⎧0loop/2loopBestAverageWorst
Phase 2: Restart Timeout
After Patroni detects PG crash, it attempts to restart PostgreSQL. This phase has two possible outcomes:
Note: Average case assumes failover is required. If PG can quickly self-heal, overall RTO will be significantly lower.
Phase 3: Standby Detection
Standbys wake up on loop_wait cycle and check Leader Key status in DCS. When primary Patroni releases the Leader Key, standbys discover this and begin election.
Timeline:
    Lease released    Standby wakes
       |                  |
       |←── 0~loop ──────→|
Best case: Standby wakes right when lease is released, wait 0
Worst case: Standby just went to sleep when lease released, wait loop
Average case: loop/2
Tstandby=⎩⎨⎧0loop/2loopBestAverageWorst
Phase 4: Lock & Promote
After standbys discover Leader Key vacancy, election begins. The standby that acquires the Leader Key executes pg_ctl promote to become the new primary.
Via REST API, parallel queries to check each standby’s replication position, typically 10ms, hardcoded 2s timeout.
Compare WAL positions to determine best candidate, standbys attempt to create Leader Key (CAS atomic operation)
Execute pg_ctl promote to become primary (very fast, typically negligible)
Calculation Results for Four Modes (unit: seconds, format: min / avg / max)
Phase
fast
norm
safe
wide
Failure Detection
0 / 3 / 5
0 / 3 / 5
0 / 5 / 10
0 / 10 / 20
Restart Timeout
0 / 15 / 15
0 / 25 / 25
0 / 45 / 45
0 / 95 / 95
Standby Detection
0 / 3 / 5
0 / 3 / 5
0 / 5 / 10
0 / 10 / 20
Lock & Promote
0 / 1 / 2
0 / 1 / 2
0 / 1 / 2
0 / 1 / 2
Health Check
1 / 2 / 2
2 / 3 / 4
3 / 5 / 6
4 / 6 / 8
Total
1 / 24 / 29
2 / 35 / 41
3 / 61 / 73
4 / 122 / 145
Comparison with Passive Failure
Phase
Active Failure (PG crash)
Passive Failure (node down)
Description
Detection Mechanism
Patroni active detection
TTL passive expiry
Active detection discovers failure faster
Core Wait
start
ttl
start is usually less than ttl, but requires additional failure detection time
Lease Handling
Active release
Passive expiry
Active release is more timely
Self-healing Possible
Yes
No
Active detection can attempt local recovery
RTO Comparison (Average case):
Mode
Active Failure (PG crash)
Passive Failure (node down)
Difference
fast
24s
23s
+1s
norm
35s
34s
+1s
safe
61s
66s
-5s
wide
122s
127s
-5s
Analysis: In fast and norm modes, active failure RTO is slightly higher than passive failure because it waits for primary_start_timeout (start);
but in safe and wide modes, since start < ttl - loop, active failure is actually faster.
However, active failure has the possibility of self-healing, with potentially extremely short RTO in best case scenarios.
4.3 - RTO Trade-offs
Trade-off analysis for RTO (Recovery Time Objective), finding the optimal balance between recovery speed and false failover risk.
RTO (Recovery Time Objective) defines the maximum time required for the system to restore write capability when the primary fails.
For critical transaction systems where availability is paramount, the shortest possible RTO is typically required, such as under one minute.
However, shorter RTO comes at a cost: increased false failover risk. Network jitter may be misinterpreted as a failure, leading to unnecessary failovers.
For cross-datacenter/cross-region deployments, RTO requirements are typically relaxed (e.g., 1-2 minutes) to reduce false failover risk.
Trade-offs
The upper limit of unavailability during failover is controlled by the pg_rto parameter. Pigsty provides four preset RTO modes:
fast, norm, safe, wide, each optimized for different network conditions and deployment scenarios. The default is norm mode (~45 seconds).
You can also specify the RTO upper limit directly in seconds, and the system will automatically map to the closest mode.
When the primary fails, the entire recovery process involves multiple phases: Patroni detects the failure, DCS lock expires, new primary election, promote execution, HAProxy detects the new primary.
Reducing RTO means shortening the timeout for each phase, which makes the cluster more sensitive to network jitter, thereby increasing false failover risk.
You need to choose the appropriate mode based on actual network conditions, balancing recovery speed and false failover risk.
The worse the network quality, the more conservative mode you should choose; the better the network quality, the more aggressive mode you can choose.
flowchart LR
    A([Primary Failure]) --> B{Patroni<br/>Detected?}

    B -->|PG Crash| C[Attempt Local Restart]
    B -->|Node Down| D[Wait TTL Expiration]

    C -->|Success| E([Local Recovery])
    C -->|Fail/Timeout| F[Release Leader Lock]

    D --> F
    F --> G[Replica Election]
    G --> H[Execute Promote]
    H --> I[HAProxy Detects]
    I --> J([Service Restored])

    style A fill:#dc3545,stroke:#b02a37,color:#fff
    style E fill:#198754,stroke:#146c43,color:#fff
    style J fill:#198754,stroke:#146c43,color:#fff
Four Modes
Pigsty provides four RTO modes to help users make trade-offs under different network conditions.
Name
fast
norm
safe
wide
Use Case
Same rack
Same datacenter (default)
Same region, cross-DC
Cross-region/continent
Network
< 1ms, very stable
1-5ms, normal
10-50ms, cross-DC
100-200ms, public network
Target RTO
30s
45s
90s
150s
False Failover Risk
Higher
Medium
Lower
Very Low
Configuration
pg_rto: fast
pg_rto: norm
pg_rto: safe
pg_rto: wide
fast: Same Rack/Switch
Suitable for scenarios with extremely low network latency (< 1ms) and very stable networks, such as same-rack or same-switch deployments
Average RTO: 14s, worst case: 29s, TTL only 20s, check interval 5s
Highest network quality requirements, any jitter may trigger failover, higher false failover risk
norm: Same Datacenter (Default)
Default mode, suitable for same-datacenter deployment, network latency 1-5ms, normal quality, reasonable packet loss rate
Average RTO: 21s, worst case: 43s, TTL is 30s, provides reasonable tolerance window
Balances recovery speed and stability, suitable for most production environments
safe: Same Region, Cross-Datacenter
Suitable for same-region/same-area cross-datacenter deployment, network latency 10-50ms, occasional jitter possible
Average RTO: 43s, worst case: 91s, TTL is 60s, longer tolerance window
Primary restart wait time is longer (60s), gives more local recovery opportunities, lower false failover risk
wide: Cross-Region/Continent
Suitable for cross-region or even cross-continent deployment, network latency 100-200ms, possible public-network-level packet loss
Average RTO: 92s, worst case: 207s, TTL is 120s, very wide tolerance window
Sacrifices recovery speed for extremely low false failover rate, suitable for geo-disaster recovery scenarios
RTO Timeline
Patroni / PG HA has two key failure paths: active failure detection (Patroni detects a PG crash and attempts restart) and passive lease expiration (node down waits for TTL expiration to trigger election).
Implementation
The four RTO modes differ in how the following 10 Patroni and HAProxy HA-related parameters are configured.
Component
Parameter
fast
norm
safe
wide
Description
patroni
ttl
20
30
60
120
Leader lock TTL (seconds)
loop_wait
5
5
10
20
HA loop check interval (seconds)
retry_timeout
5
10
20
30
DCS operation retry timeout (seconds)
primary_start_timeout
15
25
45
95
Primary restart wait time (seconds)
safety_margin
5
5
10
15
Watchdog safety margin (seconds)
haproxy
inter
1s
2s
3s
4s
Normal state check interval
fastinter
0.5s
1s
1.5s
2s
State transition check interval
downinter
1s
2s
3s
4s
DOWN state check interval
rise
3
3
3
3
Consecutive successes to mark UP
fall
3
3
3
3
Consecutive failures to mark DOWN
Patroni Parameters
ttl: Leader lock TTL. Primary must renew within this time, otherwise lock expires and triggers election. Directly determines passive failure detection delay.
loop_wait: Patroni main loop interval. Each loop performs one health check and state sync, affects failure discovery timeliness.
retry_timeout: DCS operation retry timeout. During network partition, Patroni retries continuously within this period; after timeout, primary actively demotes to prevent split-brain.
primary_start_timeout: Wait time for Patroni to attempt local restart after PG crash. After timeout, releases Leader lock and triggers failover.
safety_margin: Watchdog safety margin. Ensures sufficient time to trigger system restart during failures, avoiding split-brain.
HAProxy Parameters
inter: Health check interval in normal state, used when service status is stable.
fastinter: Check interval during state transition, uses shorter interval to accelerate confirmation when state change detected.
downinter: Check interval in DOWN state, uses this interval to probe recovery after service marked DOWN.
rise: Consecutive successes required to mark UP. After new primary comes online, must pass rise consecutive checks before receiving traffic.
fall: Consecutive failures required to mark DOWN. Service must fail fall consecutive times before being marked DOWN.
Key Constraint
Patroni core constraint: Ensures primary can complete demotion before TTL expires, preventing split-brain.
loop_wait+2×retry_timeout≤ttl
Data Summary
Recommendations
fast mode is suitable for scenarios with extremely high RTO requirements, but requires sufficiently good network quality (latency < 1ms, very low packet loss).
Recommended only for same-rack or same-switch deployments, and should be thoroughly tested in production before enabling.
norm mode (default) is Pigsty’s default configuration, sufficient for the vast majority of same-datacenter deployments.
An average recovery time of 21 seconds is within acceptable range while providing a reasonable tolerance window to avoid false failovers from network jitter.
safe mode is suitable for same-city cross-datacenter deployments with higher network latency or occasional jitter.
The longer tolerance window effectively prevents false failovers from network jitter, making it the recommended configuration for cross-datacenter disaster recovery.
wide mode is suitable for cross-region or even cross-continent deployments with high network latency and possible public-network-level packet loss.
In such scenarios, stability is more important than recovery speed, so an extremely wide tolerance window ensures very low false failover rate.
Mode
Target RTO
Passive RTO
Active RTO
Scenario
fast
30
16 / 23 / 29
1 / 24 / 29
Same switch, high-quality network
norm
45
27 / 34 / 41
2 / 35 / 41
Default, same DC, standard network
safe
90
53 / 66 / 78
3 / 61 / 73
Same-city active-active / cross-DC DR
wide
150
104 / 127 / 150
4 / 122 / 145
Geo-DR / cross-country
default
326
22 / 34 / 46
2 / 314 / 326
Patroni default params
Typically you only need to set pg_rto to the mode name, and Pigsty will automatically configure Patroni and HAProxy parameters.
For backward compatibility, Pigsty still supports configuring RTO directly in seconds, but the effect is equivalent to specifying norm mode.
The mode configuration actually loads the corresponding parameter set from pg_rto_plan. You can modify or override this configuration to implement custom RTO strategies.
Pigsty uses HAProxy to provide service access, with optional pgBouncer for connection pooling, and optional L2 VIP and DNS access.
Split read and write operations, route traffic correctly, and deliver PostgreSQL cluster capabilities reliably.
Service is an abstraction: it represents the form in which database clusters expose their capabilities externally, encapsulating underlying cluster details.
Services are crucial for stable access in production environments, showing their value during automatic failover in high availability clusters. Personal users typically don’t need to worry about this concept.
Personal Users
The concept of “service” is for production environments. Personal users with single-node clusters can skip the complexity and directly use instance names or IP addresses to access the database.
For example, Pigsty’s default single-node pg-meta.meta database can be connected directly using three different users:
psql postgres://dbuser_dba:DBUser.DBA@10.10.10.10/meta # Connect directly with DBA superuserpsql postgres://dbuser_meta:DBUser.Meta@10.10.10.10/meta # Connect with default business admin userpsql postgres://dbuser_view:DBUser.View@pg-meta/meta # Connect with default read-only user via instance domain name
Service Overview
In real-world production environments, we use primary-replica database clusters based on replication. Within a cluster, one and only one instance serves as the leader (primary) that can accept writes.
Other instances (replicas) continuously fetch change logs from the cluster leader to stay synchronized. Replicas can also handle read-only requests, significantly offloading the primary in read-heavy, write-light scenarios.
Therefore, distinguishing write requests from read-only requests is a common practice.
Additionally, for production environments with high-frequency, short-lived connections, we pool requests through connection pool middleware (Pgbouncer) to reduce connection and backend process creation overhead. However, for scenarios like ETL and change execution, we need to bypass the connection pool and directly access the database.
Meanwhile, high-availability clusters may undergo failover during failures, causing cluster leadership changes. Therefore, high-availability database solutions require write traffic to automatically adapt to cluster leadership changes.
These varying access needs (read-write separation, pooled vs. direct connections, failover auto-adaptation) ultimately lead to the abstraction of the Service concept.
Typically, database clusters must provide this most basic service:
Read-write service (primary): Can read from and write to the database
For production database clusters, at least these two services should be provided:
Read-write service (primary): Write data: Can only be served by the primary.
Read-only service (replica): Read data: Can be served by replicas; falls back to primary when no replicas are available
Additionally, depending on specific business scenarios, there may be other services, such as:
Default direct service (default): Allows (admin) users to bypass the connection pool and directly access the database
Offline replica service (offline): Dedicated replica not serving online read traffic, used for ETL and analytical queries
Sync replica service (standby): Read-only service with no replication delay, handled by synchronous standby/primary for read queries
Delayed replica service (delayed): Access data from the same cluster as it was some time ago, handled by delayed replicas
Access Services
Pigsty’s service delivery boundary stops at the cluster’s HAProxy. Users can access these load balancers through various means.
The typical approach is to use DNS or VIP access, binding them to all or any number of load balancers in the cluster.
You can use different host & port combinations, which provide PostgreSQL service in different ways.
Host
Type
Sample
Description
Cluster Domain Name
pg-test
Access via cluster domain name (resolved by dnsmasq @ infra nodes)
Cluster VIP Address
10.10.10.3
Access via L2 VIP address managed by vip-manager, bound to primary node
Instance Hostname
pg-test-1
Access via any instance hostname (resolved by dnsmasq @ infra nodes)
Instance IP Address
10.10.10.11
Access any instance’s IP address
Port
Pigsty uses different ports to distinguish pg services
Port
Service
Type
Description
5432
postgres
Database
Direct access to postgres server
6432
pgbouncer
Middleware
Access postgres through connection pool middleware
5433
primary
Service
Access primary pgbouncer (or postgres)
5434
replica
Service
Access replica pgbouncer (or postgres)
5436
default
Service
Access primary postgres
5438
offline
Service
Access offline postgres
Combinations
# Access via cluster domainpostgres://test@pg-test:5432/test # DNS -> L2 VIP -> primary direct connectionpostgres://test@pg-test:6432/test # DNS -> L2 VIP -> primary connection pool -> primarypostgres://test@pg-test:5433/test # DNS -> L2 VIP -> HAProxy -> primary connection pool -> primarypostgres://test@pg-test:5434/test # DNS -> L2 VIP -> HAProxy -> replica connection pool -> replicapostgres://dbuser_dba@pg-test:5436/test # DNS -> L2 VIP -> HAProxy -> primary direct connection (for admin)postgres://dbuser_stats@pg-test:5438/test # DNS -> L2 VIP -> HAProxy -> offline direct connection (for ETL/personal queries)# Access via cluster VIP directlypostgres://test@10.10.10.3:5432/test # L2 VIP -> primary direct accesspostgres://test@10.10.10.3:6432/test # L2 VIP -> primary connection pool -> primarypostgres://test@10.10.10.3:5433/test # L2 VIP -> HAProxy -> primary connection pool -> primarypostgres://test@10.10.10.3:5434/test # L2 VIP -> HAProxy -> replica connection pool -> replicapostgres://dbuser_dba@10.10.10.3:5436/test # L2 VIP -> HAProxy -> primary direct connection (for admin)postgres://dbuser_stats@10.10.10.3::5438/test # L2 VIP -> HAProxy -> offline direct connection (for ETL/personal queries)# Directly specify any cluster instance namepostgres://test@pg-test-1:5432/test # DNS -> database instance direct connection (singleton access)postgres://test@pg-test-1:6432/test # DNS -> connection pool -> databasepostgres://test@pg-test-1:5433/test # DNS -> HAProxy -> connection pool -> database read/writepostgres://test@pg-test-1:5434/test # DNS -> HAProxy -> connection pool -> database read-onlypostgres://dbuser_dba@pg-test-1:5436/test # DNS -> HAProxy -> database direct connectionpostgres://dbuser_stats@pg-test-1:5438/test # DNS -> HAProxy -> database offline read/write# Directly specify any cluster instance IP accesspostgres://test@10.10.10.11:5432/test # Database instance direct connection (directly specify instance, no automatic traffic distribution)postgres://test@10.10.10.11:6432/test # Connection pool -> databasepostgres://test@10.10.10.11:5433/test # HAProxy -> connection pool -> database read/writepostgres://test@10.10.10.11:5434/test # HAProxy -> connection pool -> database read-onlypostgres://dbuser_dba@10.10.10.11:5436/test # HAProxy -> database direct connectionpostgres://dbuser_stats@10.10.10.11:5438/test # HAProxy -> database offline read-write# Smart client: read/write separation via URLpostgres://test@10.10.10.11:6432,10.10.10.12:6432,10.10.10.13:6432/test?target_session_attrs=primary
postgres://test@10.10.10.11:6432,10.10.10.12:6432,10.10.10.13:6432/test?target_session_attrs=prefer-standby
5 - Point-in-Time Recovery
Pigsty uses pgBackRest to implement PostgreSQL point-in-time recovery, allowing users to roll back to any point in time within the backup policy window.
When you accidentally delete data, tables, or even the entire database, PITR lets you return to any point in time and avoid data loss from software defects and human error.
— This “magic” once reserved for senior DBAs is now available out of the box to everyone.
Overview
Pigsty’s PostgreSQL clusters come with auto-configured Point-in-Time Recovery (PITR) capability, powered by the backup component pgBackRest and optional object storage repository MinIO.
High availability solutions can address hardware failures but are powerless against data deletion/overwriting/database drops caused by software defects and human errors.
For such situations, Pigsty provides out-of-the-box Point-in-Time Recovery (PITR) capability, enabled by default without additional configuration.
Pigsty provides default configurations for base backups and WAL archiving. You can use local directories and disks, or dedicated MinIO clusters or S3 object storage services to store backups and achieve geo-redundant disaster recovery.
When using local disks, the default capability to recover to any point within the past day is retained. When using MinIO or S3, the default capability to recover to any point within the past week is retained.
As long as storage space permits, you can retain any arbitrarily long recoverable time window, as your budget allows.
What Problems Does PITR Solve?
Enhanced disaster recovery: RPO drops from ∞ to tens of MB, RTO drops from ∞ to hours/minutes.
Ensures data security: Data integrity in C/I/A: avoids data consistency issues caused by accidental deletion.
Ensures data security: Data availability in C/I/A: provides fallback for “permanently unavailable” disaster scenarios
Standalone Configuration Strategy
Event
RTO
RPO
Nothing
Crash
Permanently lost
All lost
Base Backup
Crash
Depends on backup size and bandwidth (hours)
Lose data since last backup (hours to days)
Base Backup + WAL Archive
Crash
Depends on backup size and bandwidth (hours)
Lose unarchived data (tens of MB)
What Are the Costs of PITR?
Reduces C in data security: Confidentiality, creates additional leak points, requires additional backup protection.
Extra resource consumption: Local storage or network traffic/bandwidth overhead, usually not a concern.
Increased complexity: Users need to pay backup management costs.
Limitations of PITR
If only PITR is used for failure recovery, RTO and RPO metrics are inferior compared to high availability solutions, and typically both should be used together.
RTO: With only standalone + PITR, recovery time depends on backup size and network/disk bandwidth, ranging from tens of minutes to hours or days.
RPO: With only standalone + PITR, some data may be lost during crashes - one or several WAL segment files may not yet be archived, losing 16 MB to tens of MB of data.
Besides PITR, you can also use delayed clusters in Pigsty to address data deletion/modification caused by human errors or software defects.
How It Works
Point-in-time recovery allows you to restore and roll back your cluster to “any point” in the past, avoiding data loss caused by software defects and human errors. To achieve this, two preparations are needed: Base Backup and WAL Archiving.
Having a base backup allows users to restore the database to its state at backup time, while having WAL archives starting from a base backup allows users to restore the database to any point after the base backup time.
Pigsty uses pgBackRest to manage PostgreSQL backups. pgBackRest initializes empty repositories on all cluster instances but only actually uses the repository on the cluster primary.
pgBackRest supports three backup modes: full backup, incremental backup, and differential backup, with the first two being most commonly used.
Full backup takes a complete physical snapshot of the database cluster at the current moment; incremental backup records the differences between the current database cluster and the previous full backup.
Pigsty provides a wrapper command for backups: /pg/bin/pg-backup [full|incr]. You can schedule regular base backups as needed through Crontab or any other task scheduling system.
WAL Archiving
Pigsty enables WAL archiving on the cluster primary by default and uses the pgbackrest command-line tool to continuously push WAL segment files to the backup repository.
pgBackRest automatically manages required WAL files and timely cleans up expired backups and their corresponding WAL archive files based on the backup retention policy.
If you don’t need PITR functionality, you can disable WAL archiving by configuring the cluster: archive_mode: off and remove node_crontab to stop scheduled backup tasks.
Implementation
By default, Pigsty provides two preset backup strategies: The default uses local filesystem backup repository, performing one full backup daily to ensure users can roll back to any point within the past day. The alternative strategy uses dedicated MinIO clusters or S3 storage for backups, with weekly full backups, daily incremental backups, and two weeks of backup and WAL archive retention by default.
Pigsty uses pgBackRest to manage backups, receive WAL archives, and perform PITR. Backup repositories can be flexibly configured (pgbackrest_repo): defaults to primary’s local filesystem (local), but can also use other disk paths, or the included optional MinIO service (minio) and cloud S3 services.
pgbackrest_enabled:true# enable pgBackRest on pgsql host?pgbackrest_clean:true# remove pg backup data during init?pgbackrest_log_dir:/pg/log/pgbackrest# pgbackrest log dir, `/pg/log/pgbackrest` by defaultpgbackrest_method: local # pgbackrest repo method:local, minio, [user-defined...]pgbackrest_repo: # pgbackrest repo:https://pgbackrest.org/configuration.html#section-repositorylocal:# default pgbackrest repo with local posix fspath:/pg/backup # local backup directory, `/pg/backup` by defaultretention_full_type:count # retention full backup by countretention_full:2# keep at most 3 full backup, at least 2, when using local fs repominio:# optional minio repo for pgbackresttype:s3 # minio is s3-compatible, so use s3s3_endpoint:sss.pigsty # minio endpoint domain name, `sss.pigsty` by defaults3_region:us-east-1 # minio region, us-east-1 by default, not used for minios3_bucket:pgsql # minio bucket name, `pgsql` by defaults3_key:pgbackrest # minio user access key for pgbackrests3_key_secret:S3User.Backup # minio user secret key for pgbackrests3_uri_style:path # use path style uri for minio rather than host stylepath:/pgbackrest # minio backup path, `/pgbackrest` by defaultstorage_port:9000# minio port, 9000 by defaultstorage_ca_file:/etc/pki/ca.crt # minio ca file path, `/etc/pki/ca.crt` by defaultbundle:y# bundle small files into a single filecipher_type:aes-256-cbc # enable AES encryption for remote backup repocipher_pass:pgBackRest # AES encryption password, default is 'pgBackRest'retention_full_type:time # retention full backup by time on minio reporetention_full:14# keep full backup for last 14 days# You can also add other optional backup repos, such as S3, for geo-redundant disaster recovery
Pigsty parameter pgbackrest_repo target repositories are converted to repository definitions in the /etc/pgbackrest/pgbackrest.conf configuration file.
For example, if you define a US West S3 repository for storing cold backups, you can use the following reference configuration.
You can directly use the following wrapper commands for PostgreSQL database cluster point-in-time recovery.
Pigsty uses incremental differential parallel recovery by default, allowing you to recover to a specified point in time at maximum speed.
pg-pitr # Restore to the end of WAL archive stream (e.g., for entire datacenter failure)pg-pitr -i # Restore to the most recent backup completion time (rarely used)pg-pitr --time="2022-12-30 14:44:44+08"# Restore to a specified point in time (for database or table drops)pg-pitr --name="my-restore-point"# Restore to a named restore point created with pg_create_restore_pointpg-pitr --lsn="0/7C82CB8" -X # Restore to immediately before the LSNpg-pitr --xid="1234567" -X -P # Restore to immediately before the specified transaction ID, then promote cluster to primarypg-pitr --backup=latest # Restore to the latest backup setpg-pitr --backup=20221108-105325 # Restore to a specific backup set, backup sets can be listed with pgbackrest infopg-pitr # pgbackrest --stanza=pg-meta restorepg-pitr -i # pgbackrest --stanza=pg-meta --type=immediate restorepg-pitr -t "2022-12-30 14:44:44+08"# pgbackrest --stanza=pg-meta --type=time --target="2022-12-30 14:44:44+08" restorepg-pitr -n "my-restore-point"# pgbackrest --stanza=pg-meta --type=name --target=my-restore-point restorepg-pitr -b 20221108-105325F # pgbackrest --stanza=pg-meta --type=name --set=20221230-120101F restorepg-pitr -l "0/7C82CB8" -X # pgbackrest --stanza=pg-meta --type=lsn --target="0/7C82CB8" --target-exclusive restorepg-pitr -x 1234567 -X -P # pgbackrest --stanza=pg-meta --type=xid --target="0/7C82CB8" --target-exclusive --target-action=promote restore
When performing PITR, you can use Pigsty’s monitoring system to observe the cluster LSN position status and determine whether recovery to the specified point in time, transaction point, LSN position, or other point was successful.
5.1 - How PITR Works
PITR mechanism: base backup, WAL archive, recovery window, and transaction boundaries
The core principle of PITR is: base backup + WAL archiving = recover to any point in time.
In Pigsty, this is implemented by pgBackRest, running scheduled backups + WAL archiving automatically.
Three Elements
Element
Purpose
Pigsty Implementation
Base Backup
Provides a consistent physical snapshot, recovery starting point
Base backup is a physical snapshot at a point in time, the starting point of PITR. Pigsty uses pgBackRest and provides pg-backup wrapper for common ops.
Backup Types
Type
Description
Restore Cost
Full
Copies all data files
Fastest restore, largest space
Differential
Changes since latest full
Restore needs full + diff
Incremental
Changes since latest any backup
Smallest space, restore needs full chain
Pigsty Defaults
pg-backupdefaults to incremental, and auto-runs a full if none exists.
Backup jobs are configured via pg_crontab and written to postgres crontab.
Script detects role; only primary runs, replicas exit.
PITR targets are defined by PostgreSQL recovery_target_* parameters, wrapped by pg_pitr / pg-pitr in Pigsty.
Target Types
Target
Param
Description
Typical Scenario
latest
N/A
Recover to end of WAL stream
Disaster, latest restore
time
time
Recover to specific timestamp
Accidental deletion
xid
xid
Recover to specific transaction ID
Bad transaction rollback
lsn
lsn
Recover to specific LSN
Precise rollback
name
name
Recover to named restore point
Planned checkpoint
immediate
type: immediate
Stop at first consistent point
Fastest restore
Inclusive vs Exclusive
Recovery targets are inclusive by default.
To roll back before the target, set exclusive: true in pg_pitr, mapping to recovery_target_inclusive = false.
Transaction Boundaries
PITR keeps committed transactions before the target, and rolls back uncommitted ones.
gantt
    title Transaction Boundaries and Recovery Target
    dateFormat X
    axisFormat %s
    section Transaction A
    BEGIN → COMMIT (committed) :done, a1, 0, 2
    section Transaction B
    BEGIN → uncommitted :active, b1, 1, 4
    section Recovery
    Recovery target :milestone, m1, 2, 0
Production should use remote repo (MinIO/S3) to avoid data and backups lost together on host failure.
See Backup Repository.
Config Mapping
Pigsty renders pgbackrest_repo into /etc/pgbackrest/pgbackrest.conf.
Backup logs are under /pg/log/pgbackrest/, restore generates temporary config and logs.
pgbackrest_exporter exports backup status metrics (last backup time, type, size, etc), enabled by default on port 9854.
You can control it with pgbackrest_exporter_enabled.
Longer recovery window means more storage. Window length is defined by backup retention + WAL retention.
Factors
Factor
Impact
Database size
Baseline for full backup size
Change rate
Affects incremental backups and WAL size
Backup frequency
Higher frequency = faster restore but more storage
Retention
Longer retention = longer window, more storage
Intuitive Examples
Assume DB is 100GB, daily change 10GB:
Daily full backups (keep 2)
Full backups: 100GB × 2 ≈ 200GB
WAL archive: 10GB × 2 ≈ 20GB
Total: ~2–3x DB size
Weekly full + daily incremental (keep 14 days)
Full backups: 100GB × 2 ≈ 200GB
Incremental: ~10GB × 12 ≈ 120GB
WAL archive: 10GB × 14 ≈ 140GB
Total: ~4–5x DB size
Space vs window is a hard constraint: you cannot get a longer window with less storage.
Strategy Choices
Daily Full Backup
Simplest and most reliable, also the default for local repo:
Full backup once per day
Keep 2 full backups
Recovery window about 24–48 hours
Suitable when:
DB size is small to medium (< 500GB)
Backup window is sufficient
Storage cost is not a concern
Full + Incremental
Space-optimized strategy, for large DBs or longer windows:
Weekly full backup
Incremental on other days
Keep 14 days
Suitable when:
Large DB size
Using object storage
Need 1–2 week recovery window
flowchart TD
    A{"DB size<br/>< 100GB?"} -->|Yes| B["Daily full backup"]
    A -->|No| C{"DB size<br/>< 500GB?"}
    C -->|No| D["Full + incremental"]
    C -->|Yes| E{"Backup window<br/>sufficient?"}
    E -->|Yes| F["Daily full backup"]
    E -->|No| G["Full + incremental"]
Typical PITR scenarios: data deletion, DDL drops, batch errors, branch restore, and site disasters
The value of PITR is not just “rolling back a database”, but turning irreversible human/software mistakes into recoverable problems.
It covers cases from “drop one table” to “entire site down”, addressing logical errors and disaster recovery.
Overview
PITR addresses these scenarios:
Scenario Type
Typical Problem
Recommended Strategy
Recovery Target
Accidental DML
DELETE/UPDATE without WHERE, script mistake
Branch restore first
time / xid
DDL drops
DROP TABLE/DATABASE, bad migration
Branch restore
time / name
Batch errors / bad release
Buggy release pollutes data
Branch restore + verify
time / xid
Audit / investigation
Need to inspect historical state
Branch restore (read-only)
time / lsn
Site disaster / total loss
Hardware failure, ransomware, power outage
In-place or rebuild
latest / time
A Simple Rule of Thumb
If writes already caused business errors, consider PITR.
Need online verification or partial recovery → branch restore.
Need service restored ASAP → in-place restore (accept downtime).
flowchart TD
    A["Issue discovered"] --> B{"Downtime allowed?"}
    B -->|Yes| C["In-place restore<br/>shortest path"]
    B -->|No| D["Branch restore<br/>verify then switch"]
    C --> E["Rebuild backups after restore"]
    D --> F["Verify / export / cut traffic"]
Scenario Details
Accidental DML (Delete/Update)
Typical issues:
DELETE without WHERE
Bad UPDATE overwrites key fields
Batch script bugs spread bad data
Approach:
Stop the bleeding: pause related apps or writes.
Locate time point: use logs/metrics/business feedback.
Choose strategy:
Downtime allowed: in-place restore before error
No downtime: branch restore, export correct data back
DDL is irreversible; in-place restore rolls back the whole cluster.
Branch restore lets you export only the dropped objects back, minimizing impact.
Recommended flow:
Create branch cluster and PITR to before drop
Validate schema/data
pg_dump target objects
Import back to production
sequenceDiagram
    participant O as Original Cluster
    participant B as Branch Cluster
    O->>B: Create branch cluster
    Note over B: PITR to before drop
    B->>O: Dump and import objects
    Note over B: Destroy branch after verification
Batch Errors / Bad Releases
Typical issues:
Release writes incorrect data
ETL/batch jobs pollute large datasets
Fix scripts fail or scope unclear
Principles:
Prefer branch restore: verify before cutover
Compare data diff between original and branch
Suggested flow:
Determine error window
Branch restore to before error
Validate key tables
Export partial data or cut traffic
This scenario often needs business review, so branch restore is safer and controllable.
How Pigsty’s monitoring system is architected and how monitored targets are automatically managed.
Pigsty’s monitoring system has three pillars: metrics, logs, and alerting, and is available out-of-the-box.
It can monitor clusters managed by Pigsty, existing PostgreSQL clusters, and external RDS services.
Pigsty defense-in-depth model with layered security baselines from physical to user.
Security is not a wall, but a city. Pigsty adopts a defense-in-depth strategy and builds multiple protections across seven layers. Even if one layer is breached, other layers still protect the system.
This layered approach addresses three core risks:
Perimeter breach: reduce the chance that one breach compromises everything.
Internal abuse: even if an internal account is compromised, least privilege limits damage.
Unpredictable failures: hardware, software, and human errors all get multi-layer fallbacks.
Overview
L1 Physical and Media Security
When the physical layer falls, the only defense is the data itself.
Problems solved
Silent data corruption from hardware faults
Data leakage from stolen media
Pigsty support
Data checksums: default pg_checksum: true, detects corruption from bad blocks/memory errors.
Optional transparent encryption: pg_tde and similar extensions encrypt data at rest.
L2 Network Security
Control who can reach services to reduce attack surface.
Problems solved
Unauthorized network access
Plaintext traffic sniffing/tampering
Pigsty support
Firewall zones: node_firewall_mode can enable zone, trust intranet, restrict public.
Listen hardening: pg_listen limits bind addresses to avoid full exposure.
TLS: HBA supports ssl/cert for encryption and identity checks.
L3 Perimeter Security
A unified ingress is the basis for audit, control, and blocking.
Problems solved
Multiple entry points are hard to manage
External systems lack a unified hardening point
Pigsty support
HAProxy ingress: unified DB traffic entry for blocking/limiting/failover.
Nginx gateway: unified HTTPS ingress for infrastructure services (nginx_sslmode).
Centralized credentials: HAProxy and Grafana admin passwords are declared in config.
L4 Host Security
The foundation of DB security: least privilege, isolation, and hardening.
Problems solved
Host compromise leads to total loss
Admin privileges spread too widely
Pigsty support
SELinux mode: node_selinux_mode can switch to enforcing.
Least-privilege admin: node_admin_sudo supports limit to restrict sudo commands.
Data integrity, backup and recovery, encryption and audit.
Data security focuses on three things: integrity, recoverability, confidentiality. Pigsty enables key capabilities by default and supports further hardening.
Data Integrity
Problems solved
Silent corruption from bad disks or memory errors
Accidental writes causing data pollution
Pigsty support
Data checksums: default pg_checksum: true, enables data-checksums at init.
Replica fallback: recover bad blocks from replicas (with HA).
Recoverability (Backup and PITR)
Problems solved
Accidental deletion or modification
Disaster-level data loss
Pigsty support
pgBackRest enabled by default: pgbackrest_enabled: true.
Local repository: keeps 2 full backups by default.
Remote repository: MinIO support, object storage and multi-replica.
PITR: recover to any point in time with WAL archive.
This page uses SOC2 and MLPS Level 3 as entry points to map Pigsty’s security capabilities and compliance evidence.
Default Credentials Checklist (Must Change)
From source defaults:
Component
Default Username
Default Password
PostgreSQL Admin
dbuser_dba
DBUser.DBA
PostgreSQL Monitor
dbuser_monitor
DBUser.Monitor
PostgreSQL Replication
replicator
DBUser.Replicator
Patroni API
postgres
Patroni.API
HAProxy Admin
admin
pigsty
Grafana Admin
admin
pigsty
MinIO Root
minioadmin
S3User.MinIO
etcd Root
root
Etcd.Root
Must change all defaults in production.
Evidence Preparation (Recommended)
Evidence Type
Description
Pigsty Support
Config snapshots
HBA, roles, TLS, backup policy
pigsty.yml / inventory config
Access control
roles and privileges
pg_default_roles / pg_default_privileges
Connection audit
connect/disconnect/DDL
log_connections / log_statement
Backup reports
full backup and restore records
pgBackRest logs and jobs
Monitoring alerts
abnormal events
Prometheus + Grafana
Certificate management
CA/cert distribution records
files/pki/ / /etc/pki/ca.crt
SOC2 Perspective (Example Mapping)
SOC2 focuses on security, availability, confidentiality. Below is a conceptual mapping of common controls:
Control (SOC2)
Problem
Pigsty Capability
Process Needed
CC6 Logical access control
Unauthorized access
HBA + RBAC + default privileges
Access approval and periodic audit
CC6 Auth strength
Weak/reused passwords
SCRAM + passwordcheck
Password rotation policy
CC6 Transport encryption
Plaintext transport
TLS/CA, ssl/cert
Enforced TLS policy
CC7 Monitoring
Incidents unnoticed
Prometheus/Grafana
Alert handling process
CC7 Audit trail
No accountability
connection/DDL/slow query logs, pgaudit
Log retention and review
CC9 Business continuity
Data not recoverable
pgBackRest + PITR
Regular recovery drills
This is a conceptual mapping. SOC2 requires organizational policies and audit evidence.
MLPS Level 3 (GB/T 22239-2019) Mapping
MLPS Level 3 focuses on identity, access control, audit, data security, communication security, host security, and network boundary. Below is a mapping of key controls:
Control
Problem
Pigsty Capability
Config/Process Needed
Identity uniqueness
Shared accounts
Unique users + SCRAM
Account management process
Password complexity
Weak passwords
passwordcheck/credcheck
Enable extensions
Password rotation
Long-term risk
expire_in
Rotation policy
Access control
Privilege abuse
RBAC + default privileges
Access approvals
Least privilege
Privilege sprawl
Four-tier role model
Account tiering
Transport confidentiality
Plaintext leakage
TLS/CA, HBA ssl/cert
Enforce TLS
Security audit
No accountability
connection/DDL/slow query logs + pgaudit
Log retention
Data integrity
Silent corruption
pg_checksum: true
-
Backup and recovery
Data loss
pgBackRest + PITR
Drills and acceptance
Host security
Host compromise
SELinux/firewall
Hardening policy
Boundary security
Exposed entry
HAProxy/Nginx unified ingress
Network segmentation
Security management system
Lack of process
-
Policies and approvals
Tip: MLPS Level 3 is not only technical; it requires strong operations processes.